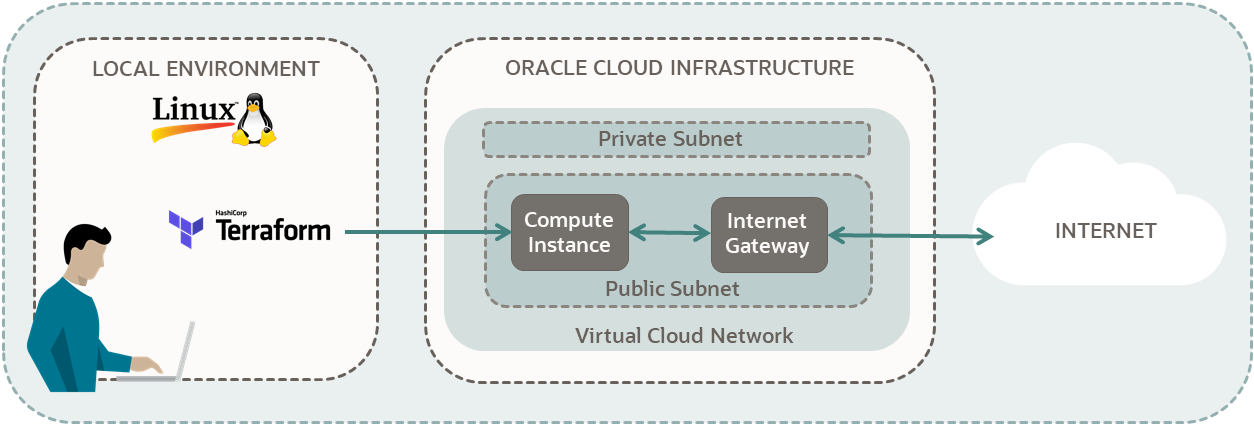
Create a Compute Instance
Use Terraform to create a compute instance in your Oracle Cloud Infrastructure tenancy.
Key tasks include how to:
- Create SSH keys.
- Create a virtual cloud network in your tenancy.
- Use Oracle Cloud Infrastructure Terraform provider to create a compute instance in the network.
- Connect to your instance.
For more information, see:
Before You Begin
To successfully perform this tutorial, you must have the following:
- An Oracle Cloud Infrastructure account. See Request and Manage Free Oracle Cloud Promotions.
- A MacOS, Linux, or Windows computer.
- Terraform tutorial resources:
- Go through all the steps in:
- Keep the scripts you created in the following directories:
-
$HOME/tf-provider/ -
$HOME/tf-compartment/
-
- Keep the compartment from the tutorial Create a Compartment in your tenancy.
1. Prepare
Prepare your environment for creating a compute instance. Also, collect all the information you need to complete the tutorial.
Create ssh encryption keys to connect to your compute instance.
You have generated the required encryption keys.
For detailed information on generating ssh encryption keys, see Creating a Key Pair.
- Open the navigation menu , select Networking, and then select Virtual cloud networks.
-
On the Virtual Cloud Networks list page, perform one of the following actions depending on the option that you see:
- From Actions, select Start VCN Wizard.
- Select Start VCN Wizard.
- In the Start VCN Wizard panel, select Create VCN with Internet Connectivity .
- Select Start VCN Wizard.
The Create a VCN with internet connectivity window opens.
1. Configuration
Enter the following basic information:
-
VCN name: <your-vcn-name>
- Compartment: <your-compartment-name>
Configure VCN
-
VCN IPv4 CIDR block: Keep the default value: 10.0.0.0/16
-
Use DNS hostnames in this VCN: Clear this checkbox.
Configure Public Subnet
-
IPv4 CIDR block: Keep the default value: 10.0.0.0/24
Configure Private Subnet
-
IPv4 CIDR block: Keep the default value: 10.0.1.0/24
Notice that the public and private subnets have different network addresses.
Select Next. The Review and create page opens.
2. Review and create
Review the complete VCN configuration and then select Create.
Resources are created, and then a message appears stating that VCN creation is complete.
To view the created VCN, select View VCN.
You have successfully created a VCN to host your compute instance.
Collect and copy the information you need into your notepad.
- Compartment name
- Compartment ID
- Subnet ID
- Source ID (image of compute instance)
- Shape (compute instance)
- SSH Authorized Key (public key path)
- Private SSH Key Path
For steps to collect this information, see the following table.
| Item | Steps to collect item |
|---|---|
| Compartment name | Reference the completed tutorial Create a Compartment. |
| Compartment ID |
|
| Instance display name | Name of your choice. |
| Subnet ID |
|
| Source ID (image of compute instance) |
|
| Shape and configuration (compute instance) |
Note: The |
| SSH Authorized Key (public key path) | Reference the completed section, Create SSH Encryption Keys. Use this path when you set up the compute instance. |
| Private SSH Key Path | Reference the completed section, Create SSH Encryption Keys. Use this private key when you connect to your compute instance. |
If your username is in the Administrators group, then skip this section. Otherwise, ask your administrator to add the following policy to your tenancy:
allow group <a-group-your-username-belongs-to> to manage all-resources in compartment <your-compartment-name>
With this privilege, you can manage all resources in your compartment, giving you administrative rights in that compartment.
- In the Console: Open the navigation menu and select Identity & Security. Under Identity, select Policies.
- Select your compartment.
- Select Create Policy.
- On the Create Policy page, enter the following values:
-
Name:
manage-<your-compartment-name>-resources -
Description:
Allow users to list, create, update, and delete resources in <your-compartment-name>. -
Compartment:
<your-tenancy>(root)
-
Name:
- For Policy Builder, enter the following values:
-
Policy use cases:
Compartment Management -
Common policy templates:
Let compartment admins manage the compartment - Identity domain: <identity-domain>
-
Groups:
<a-group-your-username-belongs-to> -
Location:
<your-compartment-name>
-
Policy use cases:
- Select Create.
Reference: Common Policies
2. Create Scripts
Create scripts for authentication, fetching data, creating a compute instance, and printing outputs.
First, set up a directory for your Terraform scripts. Then copy the provider and versions scripts from the Set Up OCI Terraform tutorial so your Oracle Cloud Infrastructure account can authenticate the scripts running from this directory.
Fetch the name of an availability domain from your account. An availability domain is one of the required inputs to create a compute instance.
When you set up Terraform in the first tutorial, Set Up OCI Terraform, the output block included the following line:
value = data.oci_identity_availability_domains.ads.availability_domains
Then, the output was similar to the following:
Outputs:

all-availability-domains-in-your-tenancy = tolist([
  {
    "compartment_id" = "ocid1.tenancy.xxx"
    "id" = "ocid1.availabilitydomain.xxx"
    "name" = "QnsC:US-ASHBURN-AD-1"
  },
  {
    "compartment_id" = "ocid1.tenancy.xxx"
    "id" = "ocid1.availabilitydomain.xxx"
    "name" = "QnsC:US-ASHBURN-AD-2"
  },
  {
    "compartment_id" = "ocid1.tenancy.xxx"
    "id" = "ocid1.availabilitydomain.xxx"
    "name" = "QnsC:US-ASHBURN-AD-3"
  },
])
Now, you want to fetch the name of the first availability domain in the list, to use for the location of your compute instance later:
"name" = "xxxx:US-ASHBURN-AD-1"- The attributes for Data Source: oci_identity_availability_domains are:
-
availability_domains, a list with three string attributes:
- compartment_id
- id
- name
-
availability_domains, a list with three string attributes:
- Use square brackets to add an index to a list attribute.
- Use the index 0 for the first item in a list.
- Use a dot after the square brackets followed by an attribute of the list, to specify that attribute.
- Example: First item in the list:
value = data.oci_identity_availability_domains.ads.availability_domains[0] - Example: Name of first item in the list:
value = data.oci_identity_availability_domains.ads.availability_domains[0].name
Declare an Oracle Cloud Infrastructure compute resource, and then define the specifics for the instance.
You can save a stack from the Console workflow for creating a compute instance. The stack contains a Terraform configuration that you can use as a reference for the shape and shape configuration. See Creating a Stack from a Resource Creation Page and Getting a Stack's Terraform Configuration.
In Terraform, resources are objects such as virtual cloud networks (VCNs) or compute instances. You can create, update, and delete them with Terraform.
To declare a compute resource:
- Go to Oracle Cloud Infrastructure Provider.
-
In the Filter box on the upper left, enter
core instance.Results include data sources and resources for several services.
- Under Core, go to Resources and select oci_core_instance.
The title of the page is the resource type:
oci_core_instance - In the Argument Reference section, use the following required arguments (inputs):
- availability_domain
- compartment_id
- shape
-
source_details
- source_id
- source_type
- Construct a resource block:
- Declare a resource block with the keyword:
resource - Add a label for resource type:
"oci_core_instance" - Add a label for a local name (your choice):
-
The label can contain letters, digits, underscores (
_), and hyphens (-). The first character must not be a digit. - Example:
"ubuntu_instance"
-
The label can contain letters, digits, underscores (
- Inside the code block, provide a value for required arguments. They don't have a default value.
- For optional arguments, provide values for the ones you want to override. Otherwise, their default values are used.
- Declare a resource block with the keyword:
Add output blocks to your code to get information about your compute instance after Terraform creates it.
- Go to Attributes Reference (oci_core_instance).Note
Attributes are the outputs that you can return for theoci_core_instanceresource. - Search for the attribute for public IP:
public_ip. - Construct a resource output block for
public_ip:- For the value expression, use the following format:
-
value = <type>.<local-name-for-resource>.<attribute> - Example:
value = oci_core_instance.ubuntu_instance.public_ip
-
- For the value expression, use the following format:
- Create an output block for each of the following outputs:
- display_name
- id
- region
- shape
- state
- ocpus
- memory_in_gbs
- time_created
3. Run Scripts
Run your Terraform scripts to create the compute instance in a compartment in your tenancy. Use your SSH keys to connect to the instance. When you no longer need your instance, destroy it with Terraform.
Congratulations! You have successfully created a compute instance using Terraform, in your Oracle Cloud Infrastructure account.
References:
What's Next
For the next Terraform tutorial, go to:
To explore more information about development with Oracle products, check out these sites: