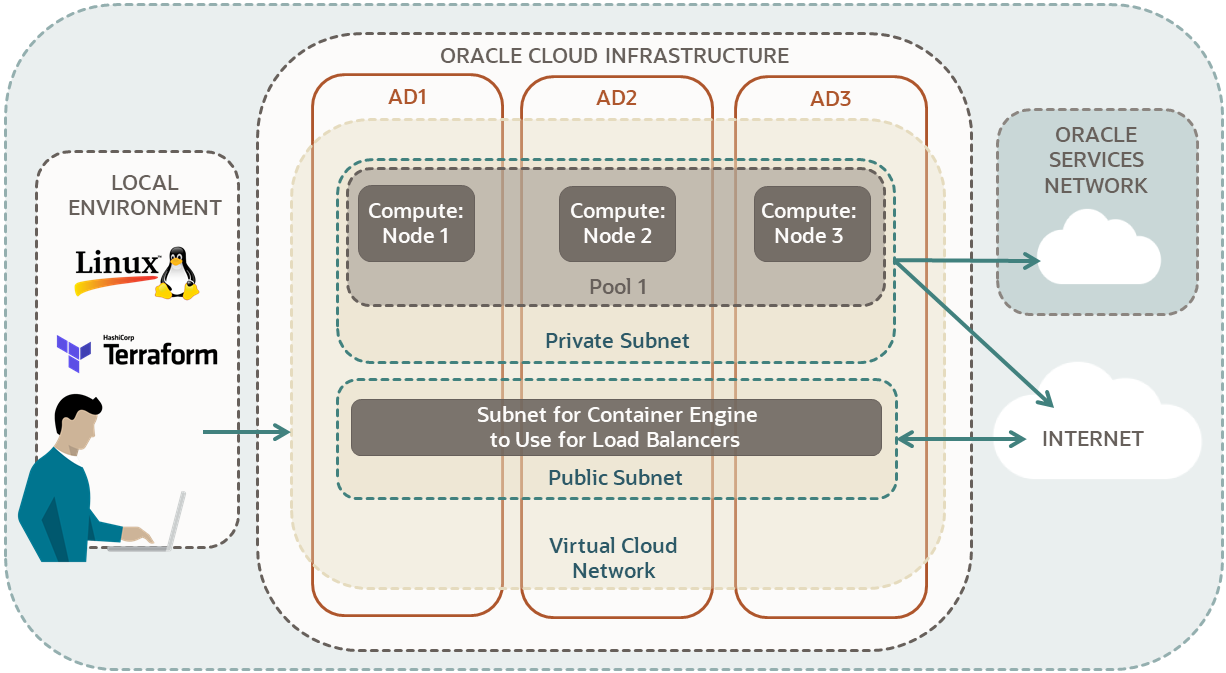
Create a Kubernetes Cluster
Use Terraform to set up a Kubernetes cluster in your Oracle Cloud Infrastructure account.
Key tasks include how to:
- Copy your existing scripts from Terraform tutorials.
- Edit existing scripts for reuse.
- Write new scripts for a Kubernetes cluster.
For more information, see:
Before You Begin
To successfully perform this tutorial, you must have the following:
- A paid Oracle Cloud Infrastructure account. See Request and Manage Free Oracle Cloud Promotions.
- A MacOS, Linux, or Windows computer.
- Terraform tutorial resources:
- Go through all the steps in:
- Keep the scripts you created in the following directory:
-
$HOME/tf-simple-infrastructure/
-
1. Gather Required Information
Gather information for the compute instances in the node pool.
VM.Standard2.1
for the compute instances in the node pool..<node-shape>
VM.Standard2.1
in your notepad.
2. Copy Existing Scripts
Copy scripts created at Set Up a Simple Infrastructure with OCI Terraform. Then, remove the scripts and outputs related to the compute instance. In the next section, you declare a node pool with compute instances.
3. Create Scripts
Create scripts for a cluster, a node pool, and to print outputs.
At Argument Reference (oci_containerengine_cluster), find all required arguments:
- compartment_id
- kubernetes_version
- name
- vcn_id
To navigate to Argument Reference (oci_containerengine_cluster):
- Go to Oracle Cloud Infrastructure Provider.
-
In the Filter box on the upper left, enter
container engine.Results are returned for both data sources and resources.
- Under Container Engine, go to Resources and select oci_containerengine_cluster.
- Select Argument Reference.
Argument Reference opens.
Construct a resource block:
- Declare a resource block with the keyword:
resource - Add a label for resource type:
"oci_containerengine_cluster" - Add a label for a local name (your choice):
-
The label can contain letters, digits, underscores (
_), and hyphens (-). The first character must not be a digit. - Example:
"oke-cluster"
-
The label can contain letters, digits, underscores (
- Inside the code block, provide a value for the required arguments:
-
compartment_id: Point to the compartment declared in
compartment.tf:oci_identity_compartment.tf-compartment.id -
kubernetes_version: This tutorial uses version
v1.21.5. You can check the Quick Create option in the Console for the latest version. - name: Assign a name of your choice.
-
vcn_id: Point to the compartment declared in
vcn-module.tf:module.vcn.vcn_id
A required argument doesn't have a default value.
-
compartment_id: Point to the compartment declared in
- Provide values for the following optional arguments to override their default values.
-
add_ons: Assign
trueorfalsefor the following arguments:- is_kubernetes_dashboard_enabled
- is_tiller_enabled
-
kubernetes_network_config: Assign a CIDR block as a string for the following arguments:
-
pods_cidr -
services_cidr
Note
The CIDR block for the pods must not overlap with the worker node and load balancer subnet CIDR blocks.
The CIDR block for the Kubernetes service must not overlap with the VCN CIDR block.
The example code in this tutorial uses the same CIDR blocks as the Quick Create option in the Console.
For more explanation, see CIDR Blocks and Kubernetes Engine (OKE).
-
-
service_lb_subnet_ids: Assign the public subnet you declared in
public-subnet.tfNote
The argument, service_lb_subnet_ids accepts a list of subnet ids:- Even if you have one subnet, use square brackets to denote a list.
- Example:
[oci_core_subnet.vcn-public-subnet.id]
-
add_ons: Assign
At Alarm Reference (oci_containerengine_node_pool), find all required arguments:
- cluster_id
- compartment_id
- kubernetes_version
- name
-
node_config_details
-
placement_configs
- availability_domain
- subnet_id
-
placement_configs
- node_shape
-
node_source_details
- image_id
- source_type
To navigate to Alarm Reference (oci_containerengine_node_pool):
- Go to Oracle Cloud Infrastructure Provider.
-
In the Filter box on the upper left, enter
container engine.Results are returned for both data sources and resources.
- Under Container Engine, go to Resources and select oci_containerengine_node_pool.
- Select Argument Reference.
Argument Reference opens.
Construct a resource block:
- Declare a resource block with the keyword:
resource - Add a label for resource type:
"oci_containerengine_node_pool" - Add a label for a local name (your choice):
-
The label can contain letters, digits, underscores (
_), and hyphens (-). The first character must not be a digit. - Example:
"oke-node-pool"
-
The label can contain letters, digits, underscores (
- Inside the code block, provide a value for the required arguments:
-
cluster_id: Point to the cluster declared in
cluster.tf:oci_containerengine_cluster.oke-cluster.id -
compartment_id Point to the compartment declared in
compartment.tf:oci_identity_compartment.tf-compartment.id - kubernetes_version: This tutorial uses the same version as the Console Create Cluster wizard.
-
name: Assign a name of your choice. The Console
Create Cluster wizard uses the name
pool1. - node_shape: Enter information you gathered in section one.
-
node_source_details:
- image_id: Enter information you gathered in section one.
-
source_type: Set to
"image".
-
cluster_id: Point to the cluster declared in
- Provide values for the following optional arguments to override their default values.
-
initial_node_labels: Assign key/value pairs for the nodes.
-
key: Assign a key of your choice. The Console
Quick Create option creates the key
"name". -
value: Assign a value for the key. The Console
Quick Create option assigns
"<your-cluster-name>"to the"name"key.
-
key: Assign a key of your choice. The Console
Quick Create option creates the key
-
initial_node_labels: Assign key/value pairs for the nodes.
In this section, you declare outputs for the cluster and the node pool.
- For cluster outputs, see Attribute Reference at oci_containerengine_cluster.
- For node pool outputs, see Attribute Reference at oci_containerengine_node_pool page.
Outputs for List Items
- Usually list attributes are plural (end in s).
- List attribute example for node pool:
-
node_config_details
-
- To output all the attributes in a list, use the list attribute by itself, without any brackets.
- Example:
output "node-configuration-details"{
  value = oci_containerengine_node_pool.oke-node-pool.node_config_details
}
Sample output:
node-configuration-details = [ { "placement_configs" = [ { "availability_domain" = "QnsC:US-ASHBURN-AD-1" "subnet_id" = "ocid1.subnet.xxx" }, { "availability_domain" = "QnsC:US-ASHBURN-AD-2" "subnet_id" = "ocid1.subnet.xxx" }, { "availability_domain" = "QnsC:US-ASHBURN-AD-3" "subnet_id" = "ocid1.subnet.xxx" }, ] "size" = 3 }, ] - To output or call an item from a list:
- Use the following format:
<list-attribute-name>[index].<attribute-from-list> - Replace
[index]with:- [0] for the first item.
- [1] for the second item.
- ...
- [n] for the (n+1)th item.
- Use the following format:
- Example:
Value for the
sizeattribute:output "node-size" { value = oci_containerengine_node_pool.oke-node-pool.node_config_details[0].size }
4. Run Scripts
Run your Terraform scripts to create a compartment, a virtual cloud network, a Kubernetes cluster, and a node pool.
.terraform that includes the plugins for the oci provider.Run your Terraform scripts:
terraform applyWhen prompted for confirmation, enter yes, for your resources to be created.
It might take 15 minutes or more for the cluster to be created. After Terraform creates the resources, review the output in the terminal.
Apply complete! Resources: 14 added, 0 changed, 0 destroyed.

Outputs:
...
cluster-OCID = ocid1.cluster.xxx
cluster-kubernetes-version = "v1.21.5"
cluster-name = <your-cluster-name>
cluster-state = ACTIVE
...
node-pool-OCID = ocid1.nodepool.xxx
node-pool-kubernetes-version = "v1.21.5"
node-pool-name = "pool1"
node-shape = "VM.Standard2.1"
node-size = 3
...-
401 errors - (Service error:NotAuthenticated):
- You have an incorrect value for one of the following:
- tenancy OCID
- user OCID
- fingerprint
- RSA private key (the path or the key)
- You have an incorrect value for one of the following:
-
no such host:
- You have an incorrect value for the following:
- region identifier
- You have an incorrect value for the following:
References:
What's Next
Congratulations! You have created a Kubernetes cluster using Terraform, in your Oracle Cloud Infrastructure account.
Now that you have a Kubernetes cluster, try Kubernetes tutorials at Developer Tutorials.
To explore more information about development with Oracle products, check out these sites: