Create a Virtual Cloud Network

Use Terraform to create a virtual cloud network (VCN) in your Oracle Cloud Infrastructure tenancy.

Key tasks include how to:

  • Set up a basic virtual cloud network.
  • Define and add the following resources to the network:
    • Security lists
    • Private and public subnets
A diagram of the components needed to create an Oracle Cloud Infrastructure virtual cloud network with Terraform. From a local Linux environment, the user creates a virtual cloud network with Terraform. This network has a public subnet that can be reached from the internet. The network also has a private subnet that connects to the internet through a NAT gateway, and also privately connects to the Oracle Services Network. The CIDR block for the virtual cloud network is 10.0.0.0/16, for the public subnet is 10.0.0.0/24, and for the private subnet is 10.0.1.0/24.

For more information, see:

Before You Begin

Requirements

To successfully perform this tutorial, you must have the following:

1. Prepare

Prepare your environment for creating a virtual cloud network (VCN). Also, collect all the information you need to complete the tutorial.

Gather Required Information

Copy the following information into your notepad.

For steps to collect this information, see the following table.

Item Steps to collect item
Compartment name Reference the completed tutorial Create a Compartment.
Compartment ID
  1. In the Console search bar, enter <your-compartment-name>.
  2. Select <your-compartment-name> in the search results.
  3. Select Copy next to the OCID.
Region
  1. In the Console navigation bar, find your region.

    Example: US East (Ashburn)

    For more information, see Working in Regions.

  2. Look up your region's identifier at Regions and Availability Domains.

    Example: us-ashburn-1.

Add Resource Policy

If your username is in the Administrators group, then skip this section. Otherwise, ask your administrator to add the following policy to your tenancy:

allow group <a-group-your-username-belongs-to> to manage all-resources in compartment <your-compartment-name>

With this privilege, you can manage all resources in your compartment, giving you administrative rights in that compartment.

Steps to Add the Policy
  1. In the Console: Open the navigation menu  and select Identity & Security. Under Identity, select Policies.
  2. Select your compartment.
  3. Select Create Policy.
  4. On the Create Policy page, enter the following values:
    • Name: manage-<your-compartment-name>-resources
    • Description: Allow users to list, create, update, and delete resources in <your-compartment-name>.
    • Compartment: <your-tenancy>(root)
  5. For Policy Builder, enter the following values:
    • Policy use cases: Compartment Management
    • Common policy templates: Let compartment admins manage the compartment
    • Identity domain: <identity-domain>
    • Groups: <a-group-your-username-belongs-to>
    • Location: <your-compartment-name>
  6. Select Create.

Reference: Common Policies

2. Create a Basic Network

Create scripts for authentication, a basic virtual cloud network (VCN) defined by a module, and outputs.

Add Authentication

First, set up a directory for your Terraform scripts. Then add a provider script so your Oracle Cloud Infrastructure account can authenticate the scripts running from this directory.

  1. In your $HOME directory, create a directory called tf-vcn and change to that directory.
    mkdir tf-vcn
    cd tf-vcn
  2. Copy the provider.tf file into the tf-vcn directory.

    The provider.tf file was created during the tutorial Set Up OCI Terraform.

    cp ../tf-provider/provider.tf .
Declare a Basic Network

Declare a basic network with an Oracle Cloud Infrastructure virtual cloud network (VCN) module, documented in the Terraform Registry. Then, run your scripts and create the network. In the next sections, add components to customize your network.

  1. Go to Terraform Registry.
  2. Select Modules.
    You're directed to Modules.
  3. Under Provider list, select Oracle.
  4. Select oracle-terraform-modules/vcn.
  5. For Version, from the list, select Version 3.1.0.
    This tutorial uses version 3.1.0. If you use another version, you might have different number of required inputs and create different resources for your vcn.
  6. Create a file called vcn-module.tf.
  7. Copy the code from Provision Instructions into vcn-module.tf.

    Example:

    module "vcn" {
      source  = "oracle-terraform-modules/vcn/oci"
      version = "3.1.0"
      # insert the 5 required variables here
    }
  8. Select Inputs and find Required Inputs.
  9. Review the optional inputs to override.
  10. Add the following code to vcn-module.tf.
    # Source from https://registry.terraform.io/modules/oracle-terraform-modules/vcn/oci/
    module "vcn"{
      source  = "oracle-terraform-modules/vcn/oci"
      version = "3.1.0"
      # insert the 5 required variables here
    
      # Required Inputs
      compartment_id = "<compartment-ocid>"
      region = "<region-identifier>"
    
      internet_gateway_route_rules = null
      local_peering_gateways = null
      nat_gateway_route_rules = null
    
      # Optional Inputs
      vcn_name = "vcn-module"
      vcn_dns_label = "vcnmodule"
      vcn_cidrs = ["10.0.0.0/16"]
      
      create_internet_gateway = true
      create_nat_gateway = true
      create_service_gateway = true  
    }
    • Replace <compartment-ocid> and <region-identifier> with the information from Gather Required Information.
    • Replace <your-vcn-name> with a name of your choice. The default value is vcn-module
    • Replace <your-dns-label> with a label of your choice. The default value is vcnmodule.
      Note

      The DNS domain name for your virtual cloud network is:
      <your-dns-label>.oraclevcn.com
  11. Save the vcn-module.tf file.
Explanation
About Modules

A module is a container for multiple resources that are used together. Instead of declaring infrastructure resources one by one, start with a module provided by Oracle Cloud Infrastructure. For example, start with a basic virtual cloud network module. Then, add the resources that aren't included in the module to your scripts.

Declare a Module Block
  • Start the block with the keyword: module.
  • Add a label for the module's provided name:
    • Example: "vcn"
  • Inside the code block:
    • Add source and version information from the Provision Instructions section of the module documentation.
    • Provide a value for the required inputs. They don't have a default value. Example:
      • compartment_id
      • internet_gateway_route_rules
      • local_peering_gateways
      • nat_gateway_route_rules
      • region
    • Provide values for the optional inputs that you want to override. Otherwise, their default values are used. Example:
      • create_internet_gateway
      • create_nat_gateway
      • create_service_gateway
      • vcn_dns_label
      • vcn_cidrs
      • vcn_name
    • You can declare the optional inputs with their default value, so later when you review your code, you know what value you used. Example:
      vcn_name = "vcn-module"
      vcn_dns_label = "vcnmodule"
      vcn_cidrs = ["10.0.0.0/16"]
Add Outputs

Add output blocks to your code to get information about your virtual cloud network after you run your scripts.

  1. In the tf-vcn directory, create a file called outputs.tf.
  2. Add the following code to outputs.tf.
    # Outputs for the vcn module
    
    output "vcn_id" {
      description = "OCID of the VCN that is created"
      value = module.vcn.vcn_id
    }
    output "id-for-route-table-that-includes-the-internet-gateway" {
      description = "OCID of the internet-route table. This route table has an internet gateway to be used for public subnets"
      value = module.vcn.ig_route_id
    }
    output "nat-gateway-id" {
      description = "OCID for NAT gateway"
      value = module.vcn.nat_gateway_id
    }
    output "id-for-for-route-table-that-includes-the-nat-gateway" {
      description = "OCID of the nat-route table - This route table has a nat gateway to be used for private subnets. This route table also has a service gateway."
      value = module.vcn.nat_route_id
    }
  3. Save the outputs.tf file.
    Note

    Ensure that outputs.tf, provider.tf, and vcn-module.tf are in the same directory.
Explanation
About Module Outputs

Module outputs are the attributes that you can return for that module.

Find Outputs for VCN Module

Go to the vcn page and select Outputs to view a list of attributes that can be output for the VCN module. Review the description of the attributes:

  • ig_route_id
    • OCID of the route table that includes the internet gateway
  • nat_gateway_id
    • OCID of the NAT gateway
  • nat_route_id
    • OCID of the route table that includes the NAT gateway
  • vcn_id
    • OCID of the VCN
Declare a Module Output Block
    • Start the block with the keyword: output.
    • Add a label to be printed with the output results:
      • The label can contain letters, digits, underscores (_), and hyphens (-). The first character must not be a digit.
      • Example: "vcn_id"
    • Get the attributes from the outputs for the module at Oracle Terraform Modules.
    • Inside the code block, enter a value for the module output with the expression:
      • value = module.<module-name>.<output-attribute>
      • Example: value = module.vcn.vcn_id
    • (Optional): Inside the code block, add a description string. Example:
      description = "OCID of the internet-route table. This route table has an internet gateway to be used for public subnets"
      Note

      A description string isn't printed in the output, so ensure that the label describes what it outputs.
    • Create an output block for each output.
Create the Basic Network
  1. Create your basic network with Terraform:
    terraform init
    terraform plan
    terraform apply

    When prompted for confirmation, enter yes, for your resources to be created.

    After the virtual network is created, the outputs that you defined are displayed in the output terminal.
  2. (Optional) Watch the creation from the Console:
    • Open the navigation menu , select Networking, and then select Virtual cloud networks.
    • Select your compartment.
    • Watch your virtual cloud network appear in the list of networks.

Congratulations! You have successfully created a basic virtual network using Terraform, in your Oracle Cloud Infrastructure account. You have a virtual network and you can be done at this point. The next sections show you how to customize a network created from a module.

3. Customize the Network

Create scripts for security lists, private subnets, and public subnets to create the same virtual network as in the Console creation workflow.

Create a Security List for the Private Subnet
Declare a Security List
  1. Create a file called private-security-list.tf.
  2. Add the following code to private-security-list.tf.
    # Source from https://registry.terraform.io/providers/oracle/oci/latest/docs/resources/core_security_list
    
    resource "oci_core_security_list" "private-security-list"{
    
    # Required
      compartment_id = "<compartment-ocid>"
      vcn_id = module.vcn.vcn_id
    
    # Optional
      display_name = "security-list-for-private-subnet"
    }
    • Replace <compartment-ocid>, with the information from Gather Required Information.
    • Point vcn_id to the VCN OCID you created with the module:
      vcn_id = module.vcn.vcn_id
Explanation

At Argument Reference (oci_core_security_list), find all required arguments (first-level bullets):

  • compartment_id
  • vcn_id
To navigate to this URL

To navigate to Argument Reference (oci_core_security_list):

  1. Go to Oracle Cloud Infrastructure Provider.
  2. In the Filter box on the upper left, enter security list.

    Results are returned for both data sources and resources.

  3. Under Core, go to Resources and select oci_core_security_list.
  4. Select Argument Reference.

    Argument Reference opens.

Declare the security list:

  • For compartment_id: use
    compartment_id = "<compartment-ocid>"
  • For vcn_id, use the OCID of the basic virtual network. To assign the OCID before knowing it, assign an output from the module as input for the security list resource:
    • Get the module's output attribute from the module's Outputs page.
    • Assign a value to the resource argument with the expression:
      • <resource argument> = module.<module-name>.<output-attribute>
      • Example: vcn_id = module.vcn.vcn_id
      • Both oci_core_security_list resource and oracle-terraform-modules/vcn use the same argument name for the virtual cloud network OCID: vcn_id.
      • The leftmost vcn_id is the argument (required input) for the resource.
      • The rightmost vcn_id is the OCID of the VCN that you create with the module.
      • It doesn't matter if you have run the VCN module script and created the VCN or not. Either way, Terraform assigns the VCN OCID to the security list after the VCN module is created.
Add an Egress Rule
Add an egress rule to your security list based on the following values:
  • Stateless: No
  • Destination: 0.0.0.0/0
  • IP Protocol: All Protocols
Note

The Allows field in the table is automatically generated based on other fields. You don't add an argument for it in your script.
  1. Add the following code to private-security-list.tf:
      
      egress_security_rules {
          stateless = false
          destination = "0.0.0.0/0"
          destination_type = "CIDR_BLOCK"
          protocol = "all" 
      }
  2. Save the private-security-list.tf file.
  3. Add the following code to outputs.tf.
    
    # Outputs for private security list
    
    output "private-security-list-name" {
      value = oci_core_security_list.private-security-list.display_name
    }
    output "private-security-list-OCID" {
      value = oci_core_security_list.private-security-list.id
    }
  4. Save the outputs.tf file.
    Note

    Ensure that private-security-list.tf, outputs.tf, provider.tf, and vcn-module.tf are in the same directory.
Explanation

For private-security-list.tf, go to Argument Reference (oci_core_security_list) and find the following arguments:

  • egress_security_rules
    • stateless
    • destination
    • destination_type
    • protocol
To navigate to this URL

To navigate to Argument Reference (oci_core_security_list):

  1. Go to Oracle Cloud Infrastructure Provider.
  2. In the Filter box on the upper left, enter security list.

    Results are returned for both data sources and resources.

  3. Under Core, go to Resources and select oci_core_security_list.
  4. Select Argument Reference.

    Argument Reference opens.

Note

Use the equals sign (=) to assign a value to an argument inside the block only.

  • Write:
    egress_security_rules {
    <arguments with assigned values>
    }
  • Don't write:
    egress_security_rules = {
    <arguments with assigned values>
    }

For attributes for use as outputs in outputs.tf, select Attribute Reference to open Attributes Reference (oci_core_security_list) and find the following attributes:

  • display_name
  • id
Create the Security List
  1. Create the security list for the private subnet, with Terraform:
    terraform init
    terraform plan
    terraform apply

    When prompted for confirmation, enter yes, for your resources to be created.

    After the security list is created, the outputs that you defined are displayed in the output terminal.
  2. (Optional) Watch the network creation from the Console.
    1. Open the navigation menu , select Networking, and then select Virtual cloud networks.
    2. Select your VCN.
    3. On the details page, select Security Lists.
    4. Select the security list that was created for a private subnet (security-list-for-private-subnet).
    5. Select Egress Rules.

Congratulations! You have successfully created a security list with an egress rule in your virtual cloud network. You add three ingress rules to this security list in the next section.

Create Ingress Rules for the Private Subnet

In this section, you add the following three ingress rules to the security list you created in the previous section.

Ingress Rules

  • Rule 1:
    • Stateless: No
    • Source: 10.0.0.0/16
    • IP Protocol: TCP
    • Source Port Range: All
    • Destination Port Range: 22
  • Rule 2:
    • Stateless: No
    • Source: 0.0.0.0/0
    • IP Protocol: ICMP
    • Type and Code: 3, 4
  • Rule 3:
    • Stateless: No
    • Source: 10.0.0.0/16
    • IP Protocol: ICMP
    • Type and Code: 3
Note

The Allows field in the table is automatically generated based on other fields. You don't add an argument for it in your script.
  1. Add the following code to private-security-list.tf:
     
    ingress_security_rules { 
          stateless = false
          source = "10.0.0.0/16"
          source_type = "CIDR_BLOCK"
          # Get protocol numbers from https://www.iana.org/assignments/protocol-numbers/protocol-numbers.xhtml TCP is 6
          protocol = "6"
          tcp_options { 
              min = 22
              max = 22
          }
        }
      ingress_security_rules { 
          stateless = false
          source = "0.0.0.0/0"
          source_type = "CIDR_BLOCK"
          # Get protocol numbers from https://www.iana.org/assignments/protocol-numbers/protocol-numbers.xhtml ICMP is 1  
          protocol = "1"
      
          # For ICMP type and code see: https://www.iana.org/assignments/icmp-parameters/icmp-parameters.xhtml
          icmp_options {
            type = 3
            code = 4
          } 
        }   
      
      ingress_security_rules { 
          stateless = false
          source = "10.0.0.0/16"
          source_type = "CIDR_BLOCK"
          # Get protocol numbers from https://www.iana.org/assignments/protocol-numbers/protocol-numbers.xhtml ICMP is 1  
          protocol = "1"
      
          # For ICMP type and code see: https://www.iana.org/assignments/icmp-parameters/icmp-parameters.xhtml
          icmp_options {
            type = 3
          } 
        }
    
  2. Save the private-security-list.tf file.
  3. Run your scripts.
    terraform init
    terraform plan
    terraform apply

    When prompted for confirmation, enter yes, for your resources to be created.

  4. (Optional) Watch the creation from the Console:
    1. Open the navigation menu , select Networking, and then select Virtual cloud networks.
    2. Select your VCN.
    3. On the details page, select Security Lists.
    4. Select the security list that was created for a private subnet (security-list-for-private-subnet).
    5. Select Ingress Rules.

Congratulations! You have successfully added three ingress rules to your security list. You use this security list for a private subnet. You create another security list for a public subnet in the next section.

Explanation

At Argument Reference (oci_core_security_list), find the following arguments:

  • ingress_security_rules
    • stateless
    • source
    • source_type
    • protocol
    • icmp_options
      • type
      • code
    • tcp_options
      • min
      • max
To navigate to this URL

To navigate to Argument Reference (oci_core_security_list):

  1. Go to Oracle Cloud Infrastructure Provider.
  2. In the Filter box on the upper left, enter security list.

    Results are returned for both data sources and resources.

  3. Under Core, go to Resources and select oci_core_security_list.
  4. Select Argument Reference.

    Argument Reference opens.

Create a Security List for the Public Subnet

In this section, you create a security list in your network with egress and ingress rules. Later, you assign this security list to a public subnet.

  1. In the tf-vcn directory, copy the private-security-list.tf file and call it public-security-list.tf.
    cp private-security-list.tf public-security-list.tf
  2. Open the public-security-list.tf file and update the following:
    • resource block local name: from "private-security-list" to "public-security-list"
    • security list name: display_name = "security-list-for-public-subnet"
    # Source from https://registry.terraform.io/providers/oracle/oci/latest/docs/resources/core_security_list
    
    resource "oci_core_security_list" "public-security-list"{
    
    # Required
      compartment_id = "<compartment-ocid>"
      vcn_id = module.vcn.vcn_id
    
    # Optional
      display_name = "security-list-for-public-subnet"
  3. Use the same egress rule as the private one.

    Egress Rule

    • Stateless: No
    • Destination: 0.0.0.0/0
    • IP Protocol: All Protocols
      
      egress_security_rules {
          stateless = false
          destination = "0.0.0.0/0"
          destination_type = "CIDR_BLOCK"
          protocol = "all" 
      }
  4. Update the TCP rule for the first ingress rule as follows:
    • from source = "10.0.0.0/16" to source = "0.0.0.0/0"

    Ingress Rules

    • Rule 1:
      • Stateless: No
      • Source: 0.0.0.0/0
      • IP Protocol: TCP
      • Source Port Range: All
      • Destination Port Range: 22
    • Rule 2:
      • Stateless: No
      • Source: 0.0.0.0/0
      • IP Protocol: ICMP
      • Type and Code: 3, 4
    • Rule 3:
      • Stateless: No
      • Source: 10.0.0.0/16
      • IP Protocol: ICMP
      • Type and Code: 3
     
    ingress_security_rules { 
          stateless = false
          source = "0.0.0.0/0"
          source_type = "CIDR_BLOCK"
          # Get protocol numbers from https://www.iana.org/assignments/protocol-numbers/protocol-numbers.xhtml TCP is 6
          protocol = "6"
          tcp_options { 
              min = 22
              max = 22
          }
        }
      ingress_security_rules { 
          stateless = false
          source = "0.0.0.0/0"
          source_type = "CIDR_BLOCK"
          # Get protocol numbers from https://www.iana.org/assignments/protocol-numbers/protocol-numbers.xhtml ICMP is 1  
          protocol = "1"
      
          # For ICMP type and code see: https://www.iana.org/assignments/icmp-parameters/icmp-parameters.xhtml
          icmp_options {
            type = 3
            code = 4
          } 
        }   
      
      ingress_security_rules { 
          stateless = false
          source = "10.0.0.0/16"
          source_type = "CIDR_BLOCK"
          # Get protocol numbers from https://www.iana.org/assignments/protocol-numbers/protocol-numbers.xhtml ICMP is 1  
          protocol = "1"
      
          # For ICMP type and code see: https://www.iana.org/assignments/icmp-parameters/icmp-parameters.xhtml
          icmp_options {
            type = 3
          } 
        }
    
  5. Save the public-security-list.tf file.
  6. Add the following code to outputs.tf.
    
    # Outputs for public security list
    
    output "public-security-list-name" {
      value = oci_core_security_list.public-security-list.display_name
    }
    output "public-security-list-OCID" {
      value = oci_core_security_list.public-security-list.id
    }
  7. Save the outputs.tf file.
    Note

    Ensure that public-security-list.tf, private-security-list.tf, outputs.tf, provider.tf, and vcn-module.tf are in the same directory.
  8. Run your scripts.
    terraform init
    terraform plan
    terraform apply

    When prompted for confirmation, enter yes, for the security list to be created.

  9. (Optional) Watch the creation from the Console.
    1. Open the navigation menu , select Networking, and then select Virtual cloud networks.
    2. Select your VCN.
    3. On the details page, select Security Lists.
    4. Select the security list that was created for a public subnet (security-list-for-public-subnet).
    5. Select Ingress Rules.
    6. Select Egress Rules.

Congratulations! You have successfully created another security list in your virtual cloud network.

Create a Private Subnet

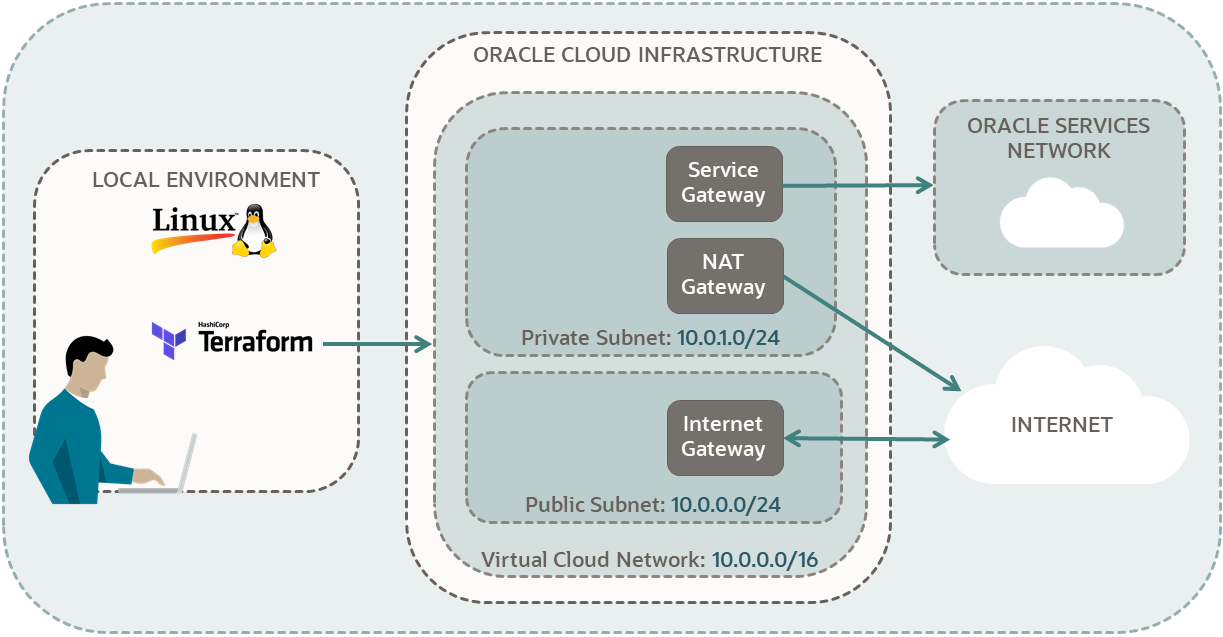
In this section, you create a private subnet in your network and associate the private security list to this subnet. You also add the NAT route table that you made with the VCN module to this subnet. The NAT route table has one NAT gateway and one service gateway and is designed for private subnets. See the first diagram in the tutorial.

  1. In the tf-vcn directory, create a file called private-subnet.tf and add the following code to it:
    # Source from https://registry.terraform.io/providers/oracle/oci/latest/docs/resources/core_subnet
    
    resource "oci_core_subnet" "vcn-private-subnet"{
    
      # Required
      compartment_id = "<compartment-ocid>"
      vcn_id = module.vcn.vcn_id
      cidr_block = "10.0.1.0/24"
     
      # Optional
      # Caution: For the route table id, use module.vcn.nat_route_id.
      # Do not use module.vcn.nat_gateway_id, because it is the OCID for the gateway and not the route table.
      route_table_id = module.vcn.nat_route_id
      security_list_ids = [oci_core_security_list.private-security-list.id]
      display_name = "private-subnet"
    }
  2. Save the private-subnet.tf file.
  3. Add the following code to outputs.tf.
    
    # Outputs for private subnet
    
    output "private-subnet-name" {
      value = oci_core_subnet.vcn-private-subnet.display_name
    }
    output "private-subnet-OCID" {
      value = oci_core_subnet.vcn-private-subnet.id
    }
  4. Save the outputs.tf file.
    Note

    Ensure that private-subnet.tf is in the tf-vcn directory.
  5. Run your scripts.
    terraform init
    terraform plan
    terraform apply

    When prompted for confirmation, enter yes, for the private subnet to be created.

  6. (Optional) Watch the creation from the Console:
    1. Open the navigation menu , select Networking, and then select Virtual cloud networks.
    2. Select your VCN.
    3. On the details page, select Subnets.
    4. Select the private subnet (private-subnet).
    5. On the details page, find the route table: nat-route.
    6. Select Security or Security Lists (depending on what you see) and find the security list (security-list-for-private-subnet).

Congratulations! You have successfully created a private subnet in your virtual cloud network.

Explanation

At Argument Reference (oci_core_subnet), find all required arguments:

  • compartment_id
  • vcn_id
  • cidr_block
To navigate to this URL

To navigate to Argument Reference (oci_core_subnet):

  1. Go to Oracle Cloud Infrastructure Provider.
  2. In the Filter box on the upper left, enter subnet.

    Results are returned for both data sources and resources.

  3. Under Core, go to Resources and select oci_core_subnet.
  4. Select Argument Reference.

    Argument Reference opens.

  • Override the following optional arguments:
    • route_table_id
    • security_list_ids
    • display_name
  • Assign values to the following arguments:
    • cidr_block
      • See the first diagram in the tutorial.
    • route_table_id
      • The OCID of a route table.
      • To see the gateways for this route table, reference the private subnet in the first diagram in the tutorial:
        • NAT Gateway
        • Service Gateway
      • Assign the route table with the NAT gateway that you created with the VCN module. This route table also contains a service gateway.
        Note

        • Use module.vcn.nat_route_id.
        • Don't use module.vcn.nat_gateway_id, because it returns the OCID of the gateway and not the route table.
      • (Optional): In the Console, review the rules of the route table and compare the Target Type values with the tutorial diagram (Service Gateway, NAT Gateway).
        1. On the details page for your VCN, select Routing or Route Tables (depending on what you see).
        2. Select nat-route.
        3. Select Route Rules.
    • security_list_ids
      • Returns a list of strings, each an OCID of a security list.
      • Get the OCID of the private security list.
      • Use square brackets for this argument. Example:
        security_list_ids = ["sec-list-1","sec-list-2","sec-list-3"]
      • To assign one security list, place it inside the square brackets without any commas.
      • To reference the security list created with another resource, use its local name. Example:
        security_list_ids = [oci_core_security_list.<local-name>.id]
        security_list_ids = [oci_core_security_list.private-security-list.id]
Create a Public Subnet

In this section, you create a public subnet in your network and associate the public security list to this subnet. You also add the internet route table that you made with the VCN module to this subnet. The internet route table has an internet gateway and is designed for public subnets. See the first diagram in the tutorial.

  1. In the tf-vcn directory, create a file called public-subnet.tf and add the following code to it:
    # Source from https://registry.terraform.io/providers/oracle/oci/latest/docs/resources/core_subnet
    
    resource "oci_core_subnet" "vcn-public-subnet"{
    
      # Required
      compartment_id = "<compartment-ocid>"
      vcn_id = module.vcn.vcn_id
      cidr_block = "10.0.0.0/24"
     
      # Optional
      route_table_id = module.vcn.ig_route_id
      security_list_ids = [oci_core_security_list.public-security-list.id]
      display_name = "public-subnet"
    }
  2. Save the public-subnet.tf file.
  3. Add the following code to outputs.tf.
    
    # Outputs for public subnet
    
    output "public-subnet-name" {
      value = oci_core_subnet.vcn-public-subnet.display_name
    }
    output "public-subnet-OCID" {
      value = oci_core_subnet.vcn-public-subnet.id
    }
  4. Save the outputs.tf file.
    Note

    Ensure that public-subnet.tf is in the tf-vcn directory.
  5. Run your scripts.
    terraform init
    terraform plan
    terraform apply

    When prompted for confirmation, enter yes, for the public subnet to be created.

  6. (Optional) Watch the creation from the Console:
    1. Open the navigation menu , select Networking, and then select Virtual cloud networks.
    2. Select your VCN.
    3. On the details page, select Subnets.
    4. Select the public subnet (public-subnet).
    5. On the details page, find the route table: internet-route.
    6. Select Security or Security Lists (depending on what you see) and find the security list (security-list-for-public-subnet).

Congratulations! You have successfully created a public subnet in your virtual cloud network.

Explanation

At Argument Reference (oci_core_subnet), find all required arguments:

  • compartment_id
  • vcn_id
  • cidr_block
To navigate to this URL

To navigate to Argument Reference (oci_core_subnet):

  1. Go to Oracle Cloud Infrastructure Provider.
  2. In the Filter box on the upper left, enter subnet.

    Results are returned for both data sources and resources.

  3. Under Core, go to Resources and select oci_core_subnet.
  4. Select Argument Reference.

    Argument Reference opens.

  • Override the following optional arguments:
    • route_table_id
    • security_list_ids
    • display_name
  • Assign values to the following arguments:
    • cidr_block
      • See the first diagram in the tutorial.
    • route_table_id
      • The OCID of a route table.
      • To see the gateway for this route table, reference the public subnet in the first diagram in the tutorial:
        • Internet Gateway
      • Assign the route table with an internet gateway that you created with the VCN module.
        Note

        • Use module.vcn.ig_route_id.
      • (Optional): In the Console, review the rules of the route table and compare the Target Type value with the tutorial diagram (Internet Gateway).
        1. On the details page for your VCN, select Routing or Route Tables (depending on what you see).
        2. Select internet-route.
        3. Select Route Rules.
    • security_list_ids
      • Returns a list of strings, each an OCID of a security list.
      • Get the OCID of the public security list.
      • Use square brackets for this argument. Example:
        security_list_ids = ["sec-list-1","sec-list-2","sec-list-3"]
      • To assign one security list, place it inside the square brackets without any commas.
      • To reference the security list created with another resource, use its local name. Example:
        security_list_ids = [oci_core_security_list.<local-name>.id]
        security_list_ids = [oci_core_security_list.public-security-list.id]

4. Re-create the Virtual Cloud Network (Optional)

Destroy your virtual cloud network. Then rerun your scripts to create another virtual cloud network.

Run the Scripts

In the previous sections, to check your work, you ran your scripts every time you declared a resource. Now, you run them together. You observe that the scripts are declarative and Terraform resolves the order in which it creates the objects.

  1. Destroy your instance with Terraform:
    terraform destroy

    When prompted for confirmation, enter yes, for your resource to be destroyed.

  2. (Optional) Watch the termination from the Console:
    • Open the navigation menu , select Networking, and then select Virtual cloud networks.
    • Select your compartment.
    • Watch your virtual cloud network disappear from the list of networks.
  3. Make a new virtual cloud network with Terraform:
    terraform init
    terraform plan
    terraform apply

    When prompted for confirmation, enter yes, for your resources to be created.

    After the network is created, the outputs that you defined are displayed in the output terminal.

    Note

    This new virtual cloud network has new OCIDs for its resources. This network isn't the same one that you destroyed.
  4. (Optional) Watch the creation from the Console:
    • Open the navigation menu , select Networking, and then select Virtual cloud networks.
    • Select your compartment.
    • Watch your re-created (new) virtual cloud network appear in the list of networks.
  5. Display the outputs again.
    terraform output

Congratulations! You have successfully re-created a virtual cloud network and its components using Terraform, in your Oracle Cloud Infrastructure account.

Note

This virtual cloud network has the same components as a virtual cloud network that's created using Start VCN Wizard in the Console, with the VCN with Internet Connectivity option. You can follow the tutorial steps to set up a network and then compare it with this network.

References: