Set Up a Simple Infrastructure with OCI Terraform
Use Terraform to set up a simple infrastructure in your Oracle Cloud Infrastructure account.
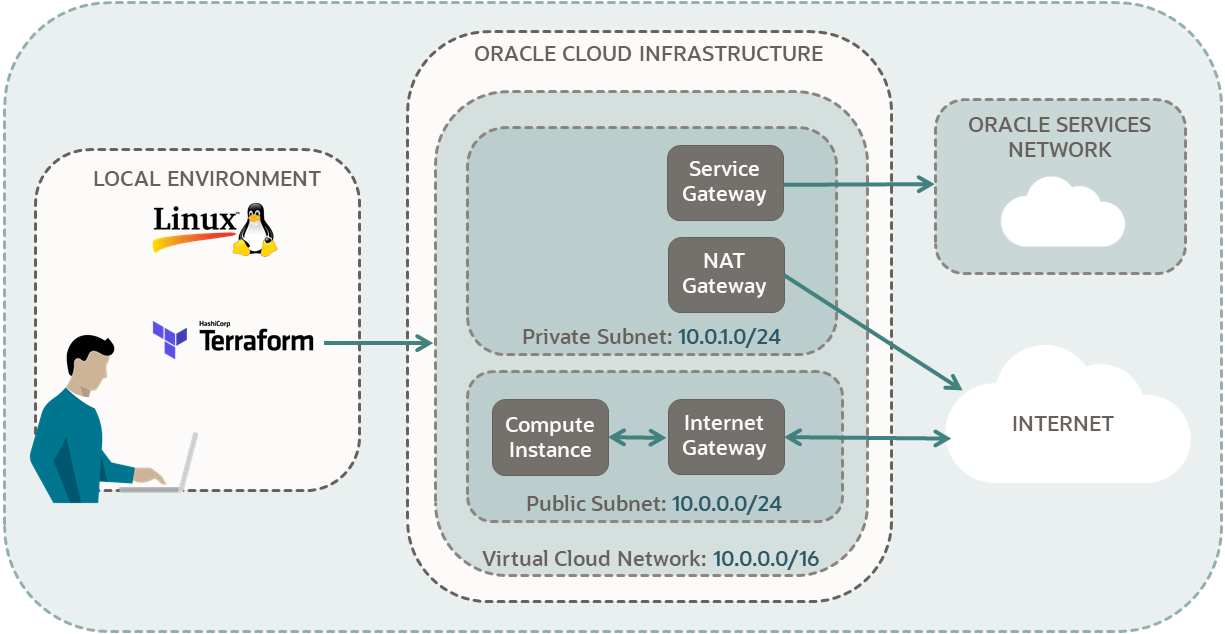
Key tasks include how to:
- Copy existing scripts from other Terraform tutorials.
- Edit the scripts to combine all the resources in one directory.
- Run an
applycommand to create the following resources:- a compartment
- a virtual cloud network
- a compute instance
For more information, see:
Before You Begin
To successfully perform this tutorial, you must have the following:
- A paid Oracle Cloud Infrastructure account. See Request and Manage Free Oracle Cloud Promotions.
- A MacOS, Linux, or Windows computer.
- Terraform tutorial resources:
- Go through all the steps in:
- Keep the scripts you created in the following directories:
-
$HOME/tf-provider/ -
$HOME/tf-compartment/ -
$HOME/tf-compute/ -
$HOME/tf-vcn/
-
1. Prepare
Copy the scripts you created in previous Terraform tutorials into a new directory.
2. Edit the Scripts
Edit the scripts to assign a new name for your compartment and to replace all hard-coded OCIDs with references.
In the previous tutorials, you hard-coded the compartment OCID. Now, update <compartment-ocid> to reference the compartment from compartment.tf.
- Find how the compartment OCID is referenced in the
outputs.tffile.grep -R compartment outputs.tfExample output:
# Outputs for compartment output "compartment-name" { value = oci_identity_compartment.tf-compartment.name output "compartment-OCID" { value = oci_identity_compartment.tf-compartment.id - Copy the value for the compartment OCID into your notepad:
oci_identity_compartment.tf-compartment.id
- Find which files reference
compartment_id.grep -Rn compartment_idExample output:
availability-domains.tf:7:  compartment_id = "<tenancy-ocid>"
compartment.tf:3:   compartment_id = "<tenancy-ocid>"
compute.tf:4:  compartment_id = "<compartment-ocid>"
private-security-list.tf:6:  compartment_id = "<compartment-ocid>"
private-subnet.tf:6:  compartment_id = "<compartment-ocid>"
public-security-list.tf:6:  compartment_id = "<compartment-ocid>"
public-subnet.tf:6:  compartment_id = "<compartment-ocid>"
vcn-module.tf:9:  compartment_id = "<compartment-ocid>"
Note
Theavailability-domains.tfandcompartment.tffiles both point to the<tenancy-ocid>. For example, thecompartment.tffile points to the tenancy as its parent compartment and then creates a compartment underneath it. Don't edit thecompartment_idin these two files. - Except for
availability-domains.tfandcompartment.tffiles, in the remaining files that result from yourgrepcommand, replacecompartment_id = "<compartment-ocid>"with:compartment_id = oci_identity_compartment.tf-compartment.id
In the tutorial Create a Compute Instance, you hard-coded the public subnet that hosts the compute instance. Now, update the compute.tf file to reference the public-subnet-OCID from the public-subnet.tf file.
- Find how
subnet OCIDis referenced in theoutputs.tffile.grep -R subnet outputs.tfExample output:
... # Outputs for private subnet output "private-subnet-name" { value = oci_core_subnet.vcn-private-subnet.display_name output "private-subnet-OCID" { value = oci_core_subnet.vcn-private-subnet.id # Outputs for public subnet output "public-subnet-name" { value = oci_core_subnet.vcn-public-subnet.display_name output "public-subnet-OCID" { value = oci_core_subnet.vcn-public-subnet.id - Copy the value for the public subnet OCID into your notepad:
oci_core_subnet.vcn-public-subnet.id
- Find which files reference
subnet_id.grep -Rn subnet_idExample output:
compute.tf:19: subnet_id = "<your-public-subnet-ocid>" - In the
compute.tffile that results from yourgrepcommand, replacecompartment_id = "<your-public-subnet-ocid>"with:subnet_id = oci_core_subnet.vcn-public-subnet.id
Congratulations! All your scripts are now ready to run.
3. Create a Simple Infrastructure
Run your Terraform scripts to create a compartment, a virtual cloud network, and a compute instance in the public subnet.
- Initialize a working directory in the
tf-simple-infrastructuredirectory.terraform init - Create an execution plan and review the changes that Terraform plans to make to your account:
terraform planExample output:
.... Terraform will perform the following actions: # oci_core_instance.ubuntu_instance will be created .... Plan: 14 to add, 0 to change, 0 to destroy. Changes to Outputs: + all-availability-domains-in-your-tenancy = [ .... - Create your simple infrastructure with
Terraform:
terraform applyWhen prompted for confirmation, enter
yes, for your resources to be created.
- open the navigation menu , select Identity & Security. Under Identity, select Compartments.
- Refresh the page, until you see the compartment name.
- Open the navigation menu , select Networking, and then select Virtual cloud networks.
- Select your compartment.
If you can't find your compartment, then refresh the page.
- Select your VCN and then review created resources.
- Open the navigation menu and select Compute. Under Compute, select Instances.
- Watch your instance appear in the list of instances.
Review the outputs in the output terminal.
oci_identity_compartment.tf-compartment: Creating...
oci_identity_compartment.tf-compartment: Creation complete after 7s [id=xxx]
module.vcn.oci_core_vcn.vcn: Creating...
module.vcn.oci_core_vcn.vcn: Creation complete after 2s [id=xxx]
module.vcn.oci_core_internet_gateway.ig[0]: Creating...
module.vcn.oci_core_nat_gateway.nat_gateway[0]: Creating...
module.vcn.oci_core_default_security_list.lockdown[0]: Creating...
module.vcn.oci_core_service_gateway.service_gateway[0]: Creating...
oci_core_security_list.private-security-list: Creating...
oci_core_security_list.public-security-list: Creating...
module.vcn.oci_core_internet_gateway.ig[0]: Creation complete after 1s [id=xxx]
module.vcn.oci_core_route_table.ig[0]: Creating...
oci_core_security_list.public-security-list: Creation complete after 1s [id=xxx]
module.vcn.oci_core_default_security_list.lockdown[0]: Creation complete after 1s [id=xxx]
oci_core_security_list.private-security-list: Creation complete after 1s [id=xxx]
module.vcn.oci_core_route_table.ig[0]: Creation complete after 1s [id=xxx]
oci_core_subnet.vcn-public-subnet: Creating...
module.vcn.oci_core_nat_gateway.nat_gateway[0]: Creation complete after 2s [id=xxx]
module.vcn.oci_core_service_gateway.service_gateway[0]: Creation complete after 3s [id=xxx]
module.vcn.oci_core_route_table.service_gw[0]: Creating...
module.vcn.oci_core_route_table.nat[0]: Creating...
module.vcn.oci_core_route_table.service_gw[0]: Creation complete after 0s [id=xxx]
module.vcn.oci_core_route_table.nat[0]: Creation complete after 1s [id=xxx]
oci_core_subnet.vcn-private-subnet: Creating...
oci_core_subnet.vcn-public-subnet: Creation complete after 2s [id=xxx]
oci_core_instance.ubuntu_instance: Creating...
oci_core_subnet.vcn-private-subnet: Creation complete after 2s [id=xxx]
oci_core_instance.ubuntu_instance: Still creating... [10s elapsed]
oci_core_instance.ubuntu_instance: Still creating... [20s elapsed]
oci_core_instance.ubuntu_instance: Still creating... [30s elapsed]
oci_core_instance.ubuntu_instance: Creation complete after 38s [id=xxx]

Apply complete! Resources: 14 added, 0 changed, 0 destroyed.
References:
What's Next
Congratulations! You have successfully created a simple infrastructure using Terraform, in your Oracle Cloud Infrastructure account.
Now that you know how to use data sources, resources and modules, go ahead and add new objects from Oracle Cloud Infrastructure Provider to your simple infrastructure.
To explore more information about development with Oracle products, check out these sites: