RAG Tool Object Storage Guidelines for Generative AI Agents
Review the following sections to prepare Object Storage data for RAG tools in Generative AI Agents.
General Guidelines
Follow these guidelines to prepare data for Generative AI Agents data sources before uploading to Object Storage:
- Data Sources: Data for Generative AI Agents must be uploaded as files to an Object Storage bucket.
- Number of Buckets: Only one bucket is allowed per data source.
- Supported File Types:
PDF,txt,JSON,HTML, and Markdown (MD) files are supported. - File Size Limit: Each file must be no larger than 100 MB. Any files that exceed the limit are ignored. For other requirements, see File Type Requirements and Support.
- URLs: All the hyperlinks present in the documents are extracted and displayed as hyperlinks in the chat response.
- Data Not Ready: If your data isn't yet available, create an empty folder for the data source and populate it later. This way, you can ingest data into the source after the folder is populated.
Set up the following Object Storage permissions before you proceed.
- User access to Object Storage files
- Data ingestion job access to Object Storage files for long-running jobs
See Getting Access for the permissions.
File Type Requirements and Support
Data source files must be uploaded to Object Storage. Ensure that the requirements are met for the type of file to be ingested.
The requirements and support for ingestion of PDF files are as follows:
- File extension: Must be
.pdf - File size: A single file must not exceed 100 MB.
- File password: If a PDF file is password-protected, a file failure is recorded in the status logs.
- Contents: A PDF file can include images, charts, and reference tables but these must not exceed 8 MB.
- Chart preparation: No special preparation is needed for charts, as long as they're two-dimensional with labeled axes. The model can answer questions about the charts without explicit explanations.
- Table preparation: Use reference tables with several rows and columns. For example, the agent can read the table on the limits page.
txt
The requirements and support for ingestion of txt files are as follows:
- File extension: Must be
.txt - File size: A single file must not exceed 100 MB.
JSON
The requirements and support for ingestion of JSON files are as follows:
- File extension: Must be
.json - File size: A single file must not exceed 100 MB.
- Encoding: Only UTF-8 encoding in English is supported. The JSON structured data can contain key-value pairs, arrays, and nested objects.
- Depth of nesting: The depth of structure must not exceed 50.
- List limit: A list inside the JSON structure must not be longer than 10000 items.
HTML
The requirements and support for ingestion of HTML files are as follows:
- File extension: Must be
.html - File size: A single file must not exceed 100 MB.
- Contents: Only visible content is ingested. Any dynamic content is not ingested and script tags are stripped.
- Images: Images that are referenced in a file can be processed if the image source is not an external
HTTPor an absolute path. Any images that don't meet the following requirements are ignored.- Only
JPEGimages (.jpgor.jpeg) are supported. - A single image must not exceed 6 MB. Any images exceeding the limit are ignored.
- Images must be uploaded to Object Storage at the same level as the uploaded HTML file or below it.
- The source path (
srcattribute) to each image must be a path relative to the parent HTML file. For example:<img src="./my-image.jpg"> <img src="./myfolder/my-imagetwo.jpg"> - The source path (
srcattribute) to each image must not specify URLs (http,https, ordata)
- Only
MD (Markdown)
The requirements and support for ingestion of MD (Markdown) files are as follows:
- File extension: Must be
.md - File size: A single file must not exceed 100 MB.
- Images: Images are ignored and not processed.
Ensuring Enhanced Table Understanding
Enhanced table understanding, a feature of RAG tools, aims to enhance the accuracy of responses to queries with answers embedded in PDF table data. It processes these tables to generate more precise and relevant responses aligned with the information they contain. In general, the RAG tools can read the tables. For the RAG tool to read the tables with enhanced table understanding, ensure that the tables have the following features:
- All cells of the table are separated with visible lines or object boundaries from other cells, including the header names in the first row.
- All columns including the first column have a header name.
- Each table has more than one column and more than one row, excluding the row with header names.
Count of tables that support enhanced table understanding in following PDFs:
      - enhanced_table_test_data/2025_Report1.pdf has 4 tables processed successfully
      - enhanced_table_test_data/2025_Report2.pdf has 3 tables processed successfully
      - enhanced_table_test_data/2025_Report3.pdf has 3 tables processed successfully
Enhancing Responses with Metadata Filtering
Use predefined metadata to apply filters during a chat. When filters are applied, an agent's searches in a chat session are limited to data files that are associated with the metadata, helping the model generate answers relevant to the content scope, thus enhancing the agent's response accuracy and relevance.
The following steps describe an overview of how to use the metadata filtering feature. After you understand the workflow overview, review the details for your use case in the sections provided after the overview steps.
- In a text editor, create the metadata schema, which is required for the filters that you want to be made available. Write the schema in JSON format. Name the file
_metadata_schema.json.Example:
{ "metadataSchema": [ { "name": "publication_year", "type": "integer" }, { "name": "title", "type": "string" } ] } - Upload the
_metadata_schema.jsonfile created in step 1 to the root level of the Object Storage bucket that contains the data files for a knowledge base. - Create JSON files to associate data files with the predefined metadata and provide the metadata values.
Example:
{
    "metadataAttributes": {
        "publication_year": 2020
    }
}
You can associate one or more data files or all files in a bucket with the metadata. For details about the JSON file name conventions to use for the options you choose, see Metadata Filter Options (File Name and Location).
- Upload the JSON files created in step 3 to the Object Storage bucket that contains the data files for a knowledge base. For each option, ensure that you save the file in the correct location in the hierarchy.
- Create a knowledge base. Select Object Storage as the data store type, and the option to automatically start the ingestion job.
When the data files are ingested, Generative AI Agents creates a list of the metadata names and the values that can be selected in a chat. To view the ingested metadata names and values, see Getting a Knowledge Base's Details in Generative AI Agents.
- Create an agent with a RAG tool, selecting the knowledge base created in step 5. In the agent, select the option to automatically create an endpoint. If you need help, see Creating an Agent and Creating a RAG tool.
- In a chat window, add one or more predefined metadata filters and select the values to apply. See Use Metadata Filters in a Chat.
Review the following sections to learn more about preparing metadata JSON files for your use case and how to add and apply metadata filters in a chat session.
Select one or more of the following methods that works best for you.
| Method | File Name and Location | Usage |
|---|---|---|
| Include metadata for all the files in a bucket without mentioning the file names. | Create a _common.metadata.json file at the Object Storage root level. |
Use this file for metadata that's common to all files in the bucket. This method helps avoid entering metadata duplicates across objects. |
| In one file create a metadata entry for each file in a bucket and include the file names. | Create an _all.metadata.json file at the Object Storage root level. |
Use this method if you have a lot of files and creating one file that includes all the file names is more convenient for you than creating one metadata file per file. |
| Create a metadata file for each file in a bucket. | Create a <file-name>.metadata.json file for each file, at the file level.
|
Use this method when metadata differs for each file and there aren't many files to create a metadata file for, or if you're automating the creation of the metadata files. |
| Add Object Storage metadata headers to each file. | Add metadata header through each file's Object Storage metadata property. | Use this method, if you have few metadata properties to include. We recommend you use the other methods with JSON files, because files are easier to update and manage and metadata headers are difficult to update. |
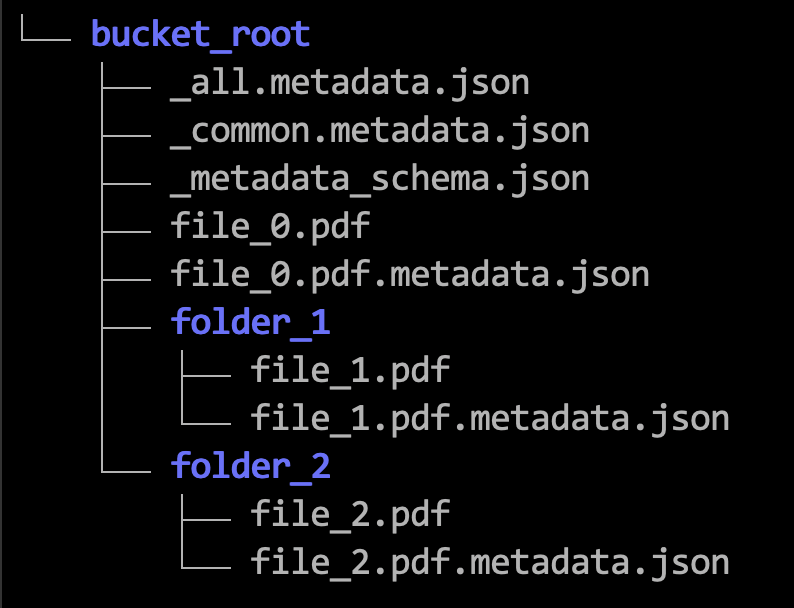
For all methods, you must define a metadata schema file called _metadata_schema.json at the Object Storage bucket root level.
Here's an example hierarchy of where you save the metadata files that you need.
The following steps use examples to show how to format the metadata JSON files. See also Limits for Metadata Filtering.
You can't change or remove the metadata fields after the knowledge base data is ingested. You can add new fields up the allowed limit. To remove or update a field, recreate the knowledge base.
The following procedure assumes that you have created the required metadata schema and optional metadata filter JSON files, a knowledge base, and an agent with a RAG tool and an endpoint.
| Description | Limit |
|---|---|
Maximum number of entries in _all.metadata.json |
10,000 |
| Maximum number of metadata fields that can be specified for each file | 20 |
Maximum number of items in a list_of_string type |
10 |
Maximum length of individual item in a list_of_string type |
50 |
| Maximum length of a metadata key in characters | 25 |
| Maximum length of metadata value in characters | 50 |
Adding Metadata to an Object Storage Metadata Header
Adding Data with Custom URL to an Object Storage Bucket
Beta Customers:
If you created a knowledge base in the Beta phase, you might need to delete and re-create the data source for the URL handling feature to work.
Assigning a Custom URL to a Citation
metadata object for that file.This topic shows how to add or update the metadata object through OCI CLI.
- The
metadataobject that overrides the default citation must have the name,customized_url_source. - You can have one
metadataobject with the name,customized_url_source - Each
customized_url_sourcecan have only one URL. - The commands in step 5 works for both adding and updating the
metadataobject, because they replace the currentmetadataobject's value. - Ensure that you pass the values for the
--metadataobject with the format shown in the commands in step 5.