GoldenGate
GoldenGate on Oracle Database@Azure is a fully managed, native cloud service that enables real-time, large-scale data movement. It processes data as it flows from one or more source data management systems to target databases. Creating an Oracle GoldenGate may take up to 1 hour or more.
- GoldenGate deployment, database connection creation , connection assignment must be completed from the OCI console.
- Create a Deployment
- Complete the prerequisites before deploying a GoldenGate. For more information, see the Prerequisites section.
- From the Azure portal, you must create Resource Anchor and Network Anchor before creating GoldenGate deployment.
- From the OCI console, select Oracle Database, and then select GoldenGate.
- From the left menu, select Deployments, and then click on the Create deployment button.
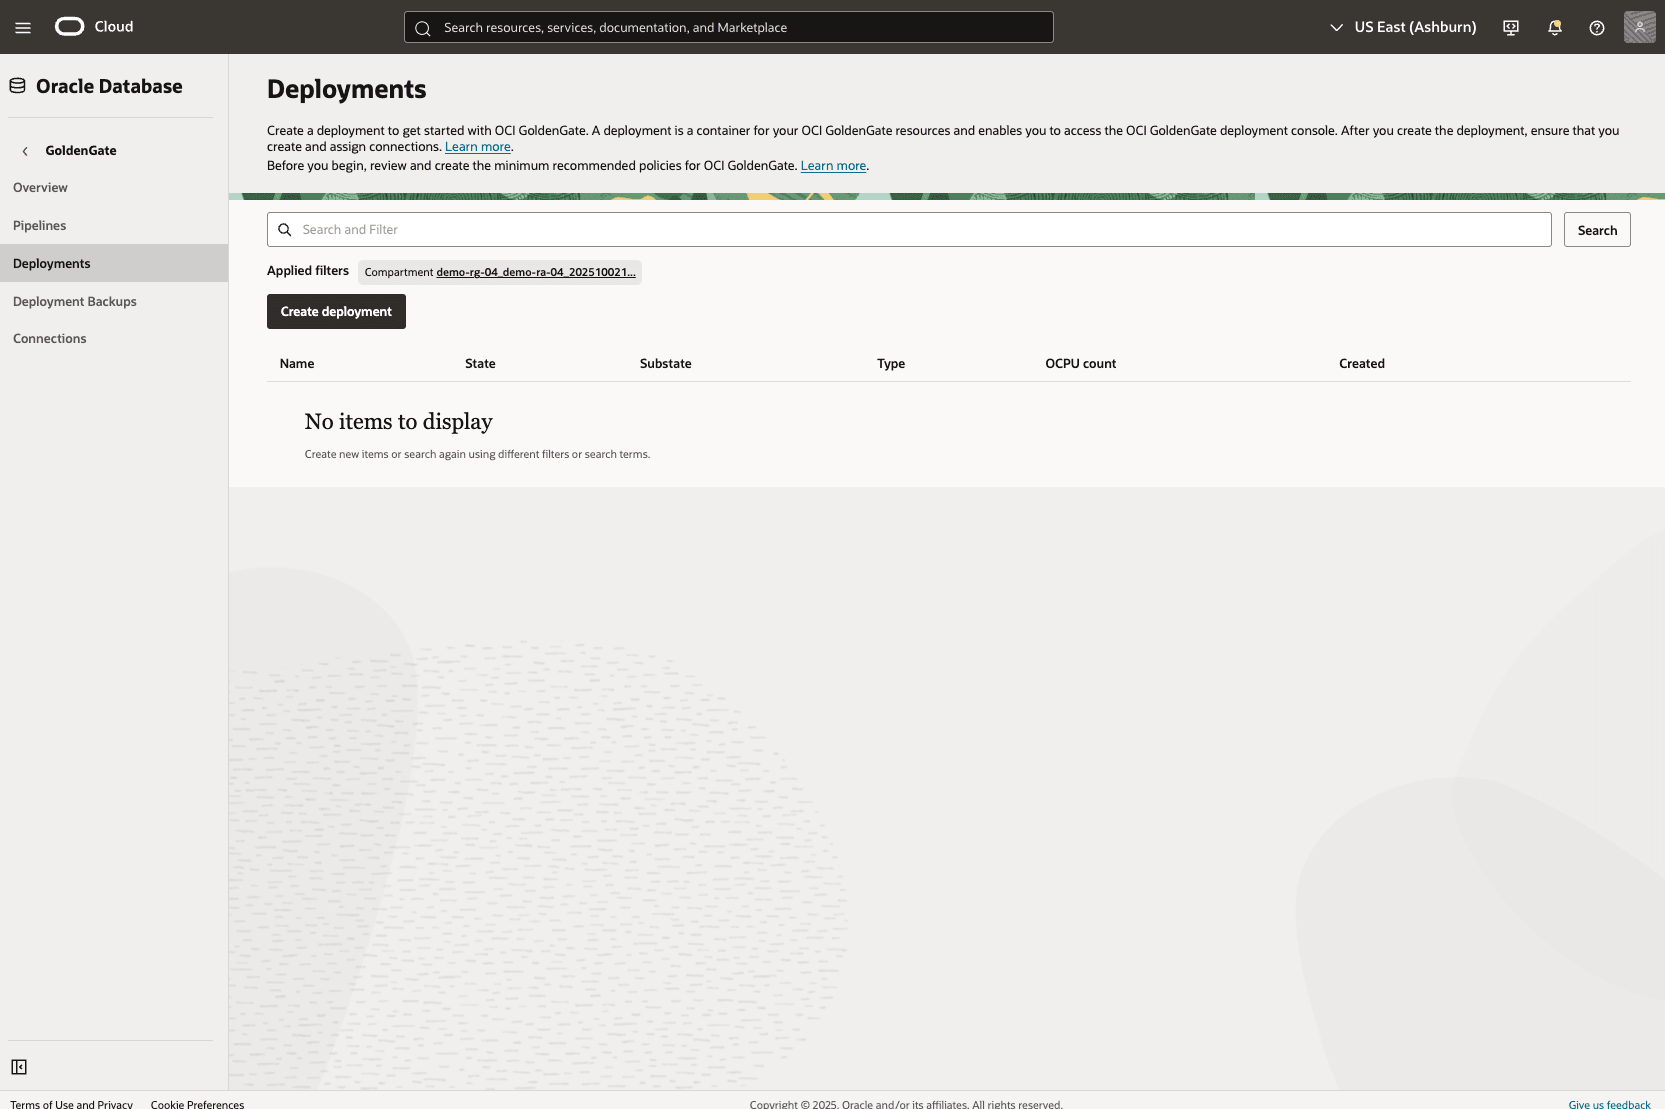
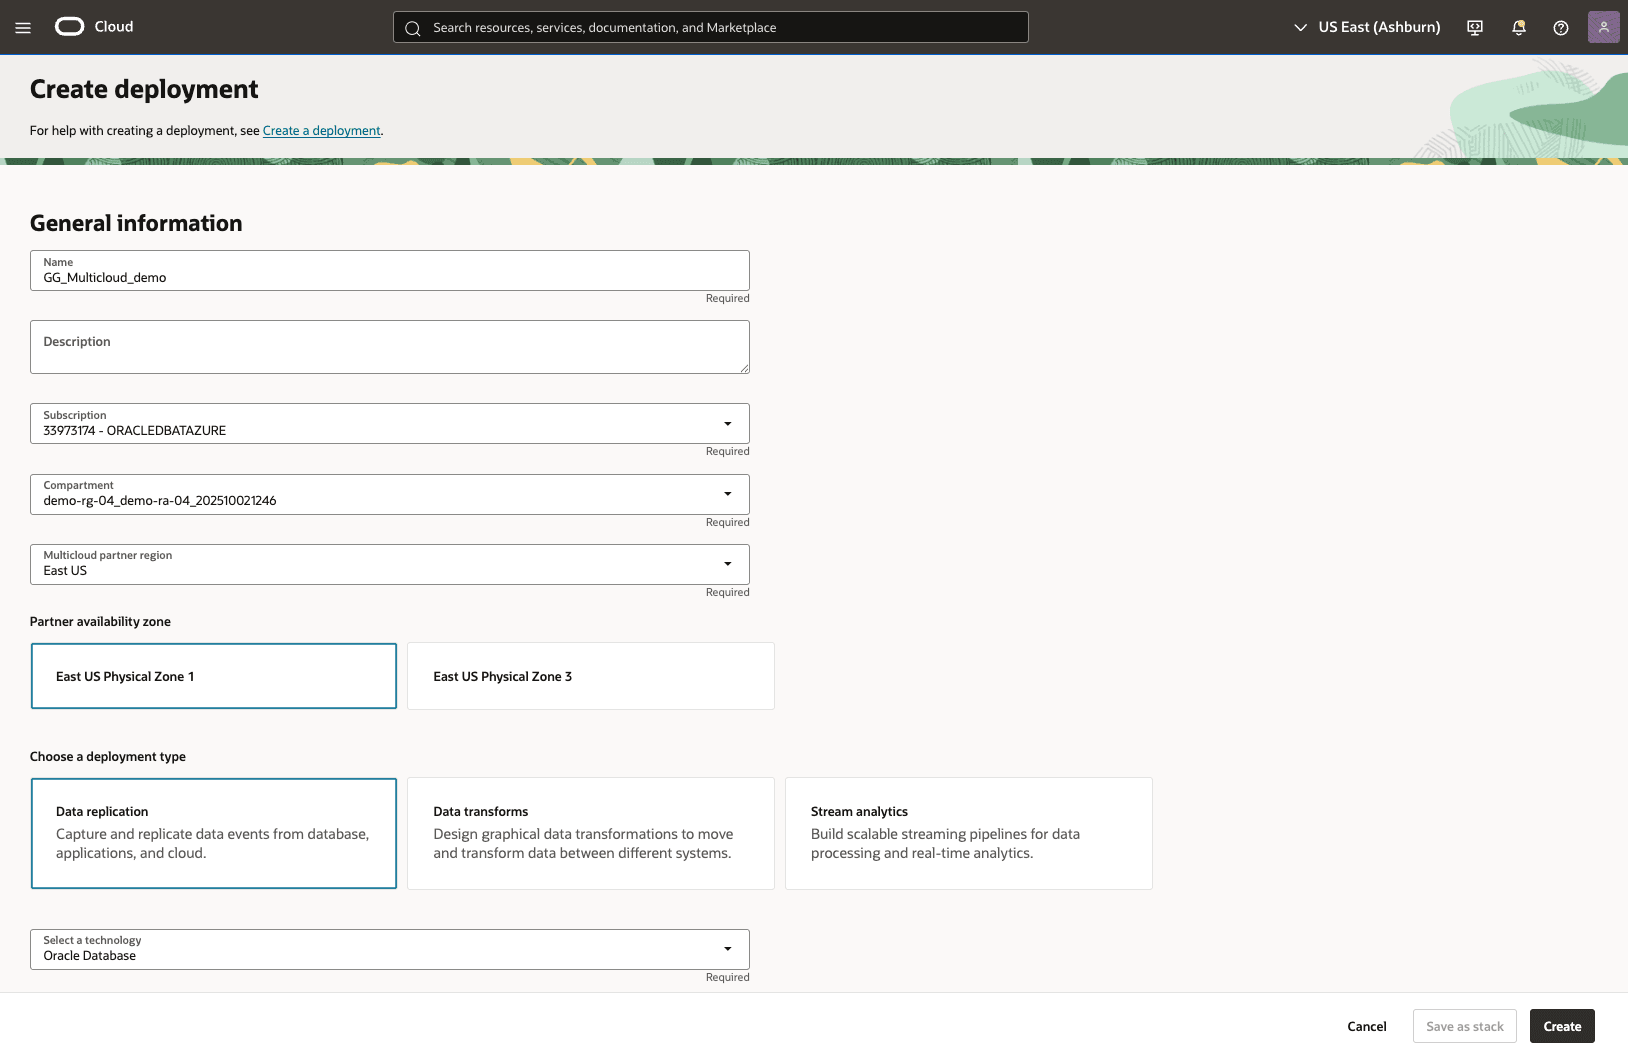
- From the Create deployment page, complete the following substeps:
- Enter a descriptive name in the Name field for your deployment.
- The Description field is optional. You can enter a description that helps you easily identify the resource.
- From the dropdown list, select the subscription with ORACLEDBATAZURE
- From the dropdown list, select the Compartment where Resource Anchor resides in.
- From the dropdown list, select the Multicloud partner region.
- Choose your Partner availability zone. The available options populates based on the selected Multicloud partner region.
- The Choose a deployment type section allows you to select one of the following options including Data replication and Data transforms. Based on your requirements, choose a deployment type.
- From the dropdown list, select a technology.
- The Version field shows a GoldenGate version for the deployment. If you want to make a change, click on the Change version button.
- Expand the Supported technologies section to view the list of supported technologies.
- From the Hardware configuration section, you can choose either the Development or testing option or the Production option. Make a choice based on your requirements.
- From the dropdown list, select your OCPU. The minimum is 3 and maximum is 24.
- Enable the Auto scaling toggle, if it is required.

- From the Configure your deployment section, select your Private subnet in compartment and then select the Private subnet which is created as part of Network Anchor creation.
- Choose either the License included option or the Bring Your Own License (BYOL) option as a license type.
- You can enable the Enable BYOL OCPU Limit toggle. This allows you to control how many OCPUs will be covered by BYOL licenses. Use this limit if the number of BYOL licenses you bring does not cover all of the deployment OCPUs you have provisioned, including those for auto-scaling and disaster recovery peers.
- Enter a descriptive GoldenGate instance name that helps you easily identify the resource.
- From the Credential store dropdown list, select GoldenGate.
- You must provide your Administrator username that helps you to connect to the resource.
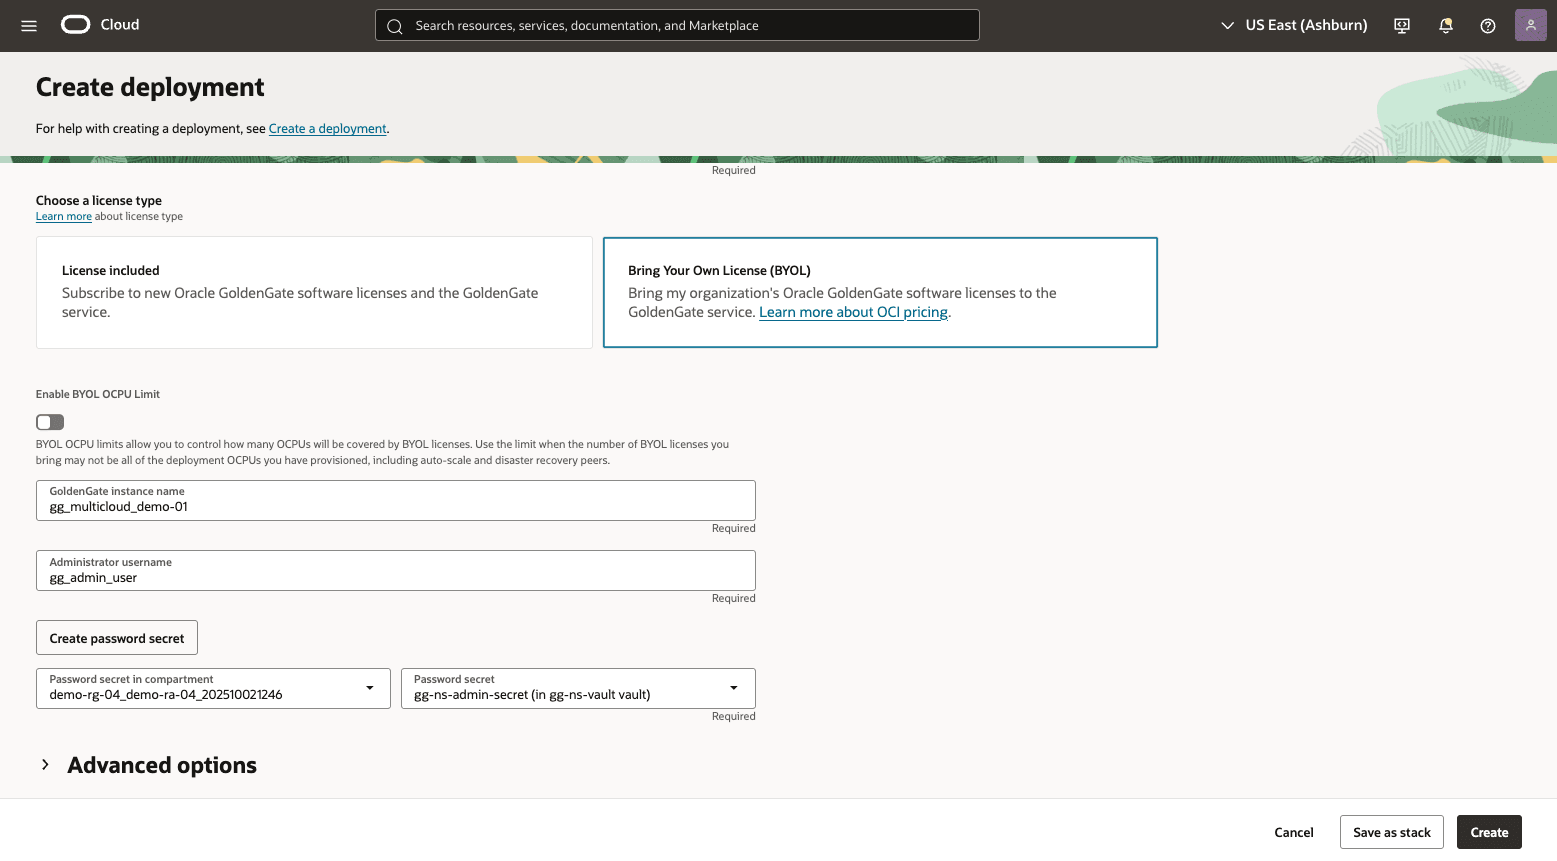
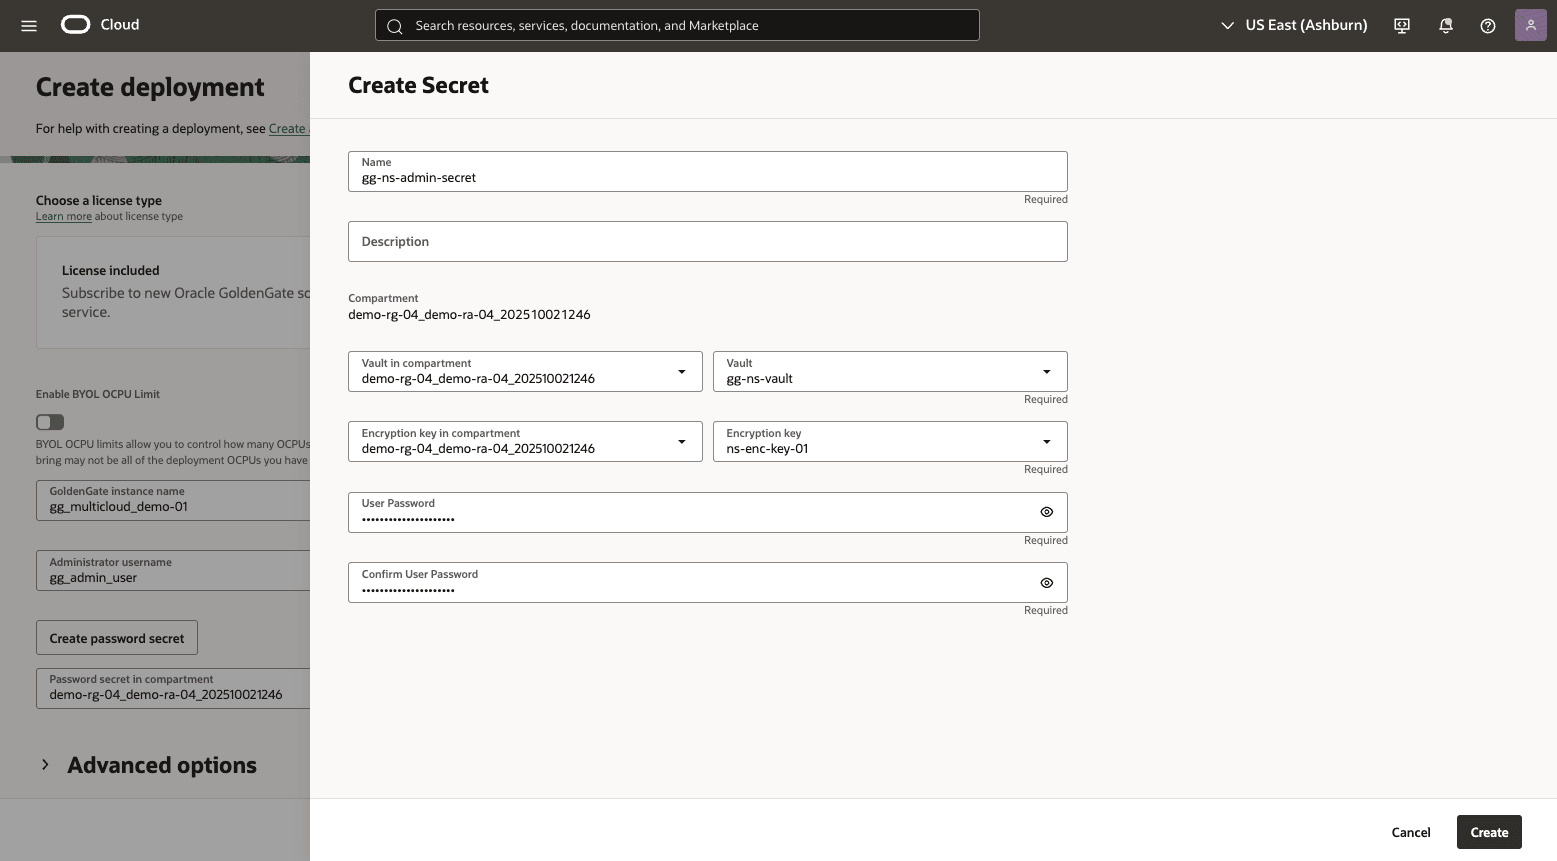
- Select Password secret from dropdown list. From the Password secret in compartment dropdown list, select the compartment where password secret is saved. If you do not have an existing password secret or you want to create a new one, you can create one by clicking the Create password secret button.
- The Advanced options section is optional. You can expand the Advanced options section to manage the Network, Maintenance, Backup schedule and Tags options.
- From the Network section, you can enable the toggle for GoldenGate console public access and customize endpoint.
- From the Maintenance section, you can customize your Maintenance window.
- From the Backup schedule section, you can enable backup schedule.
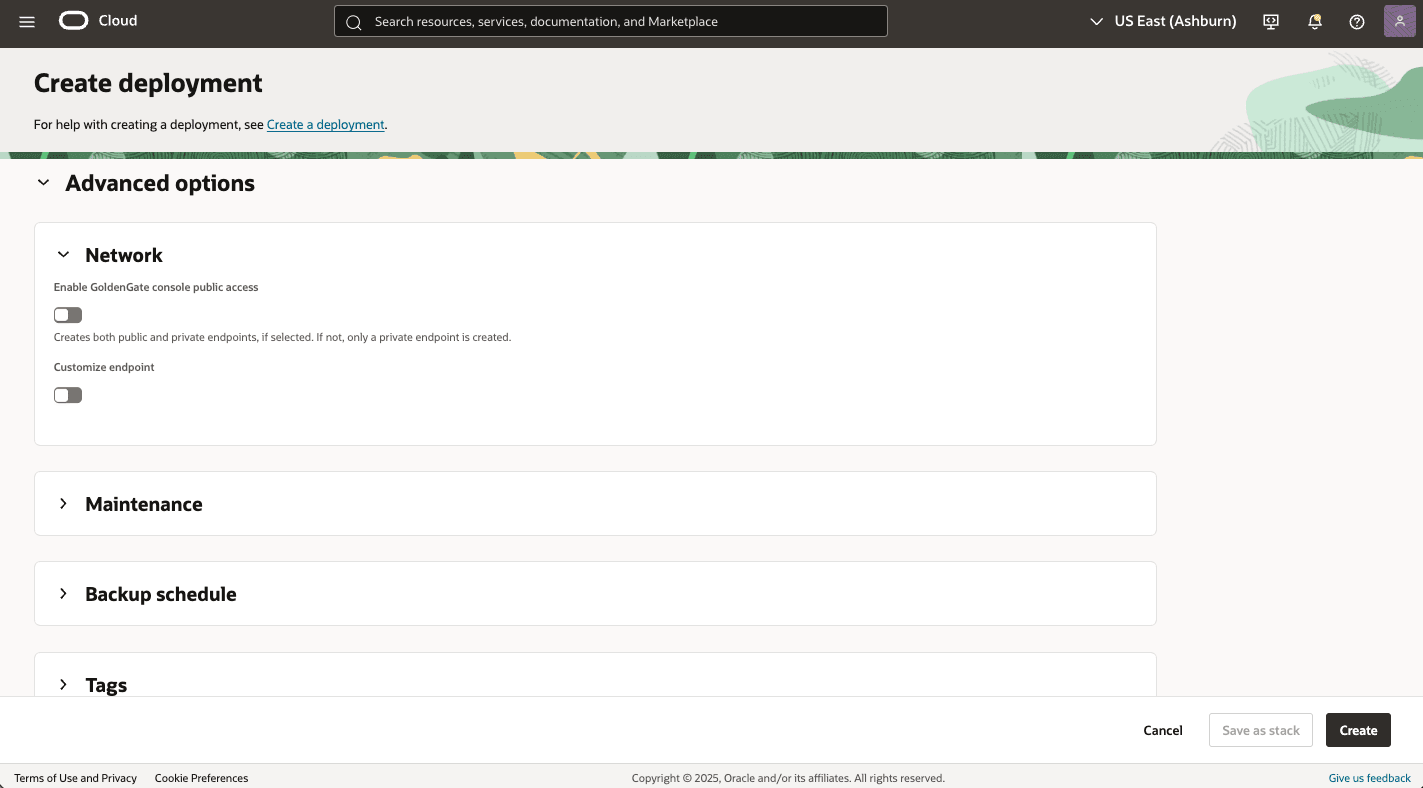
- Select the Create button to save the changes.
- Return to Deployments list to view the State of your creation process.
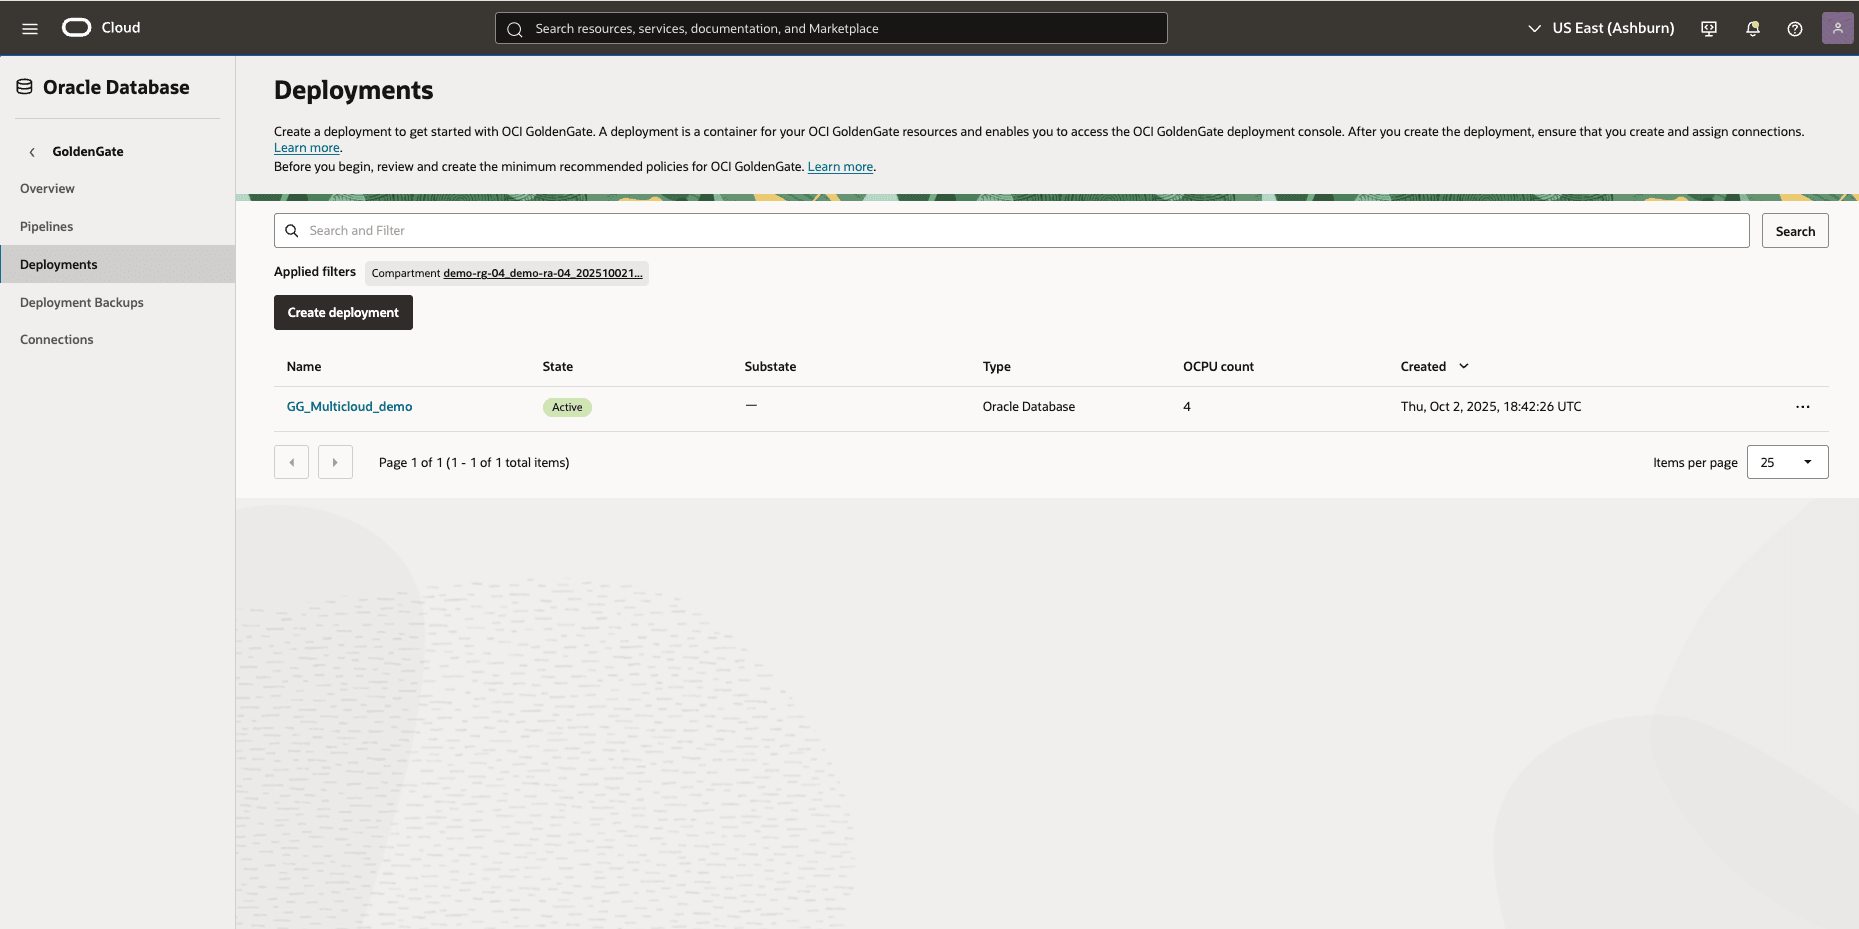
Create a Database Connection- From the OCI console, select Oracle Database, and then select GoldenGate.
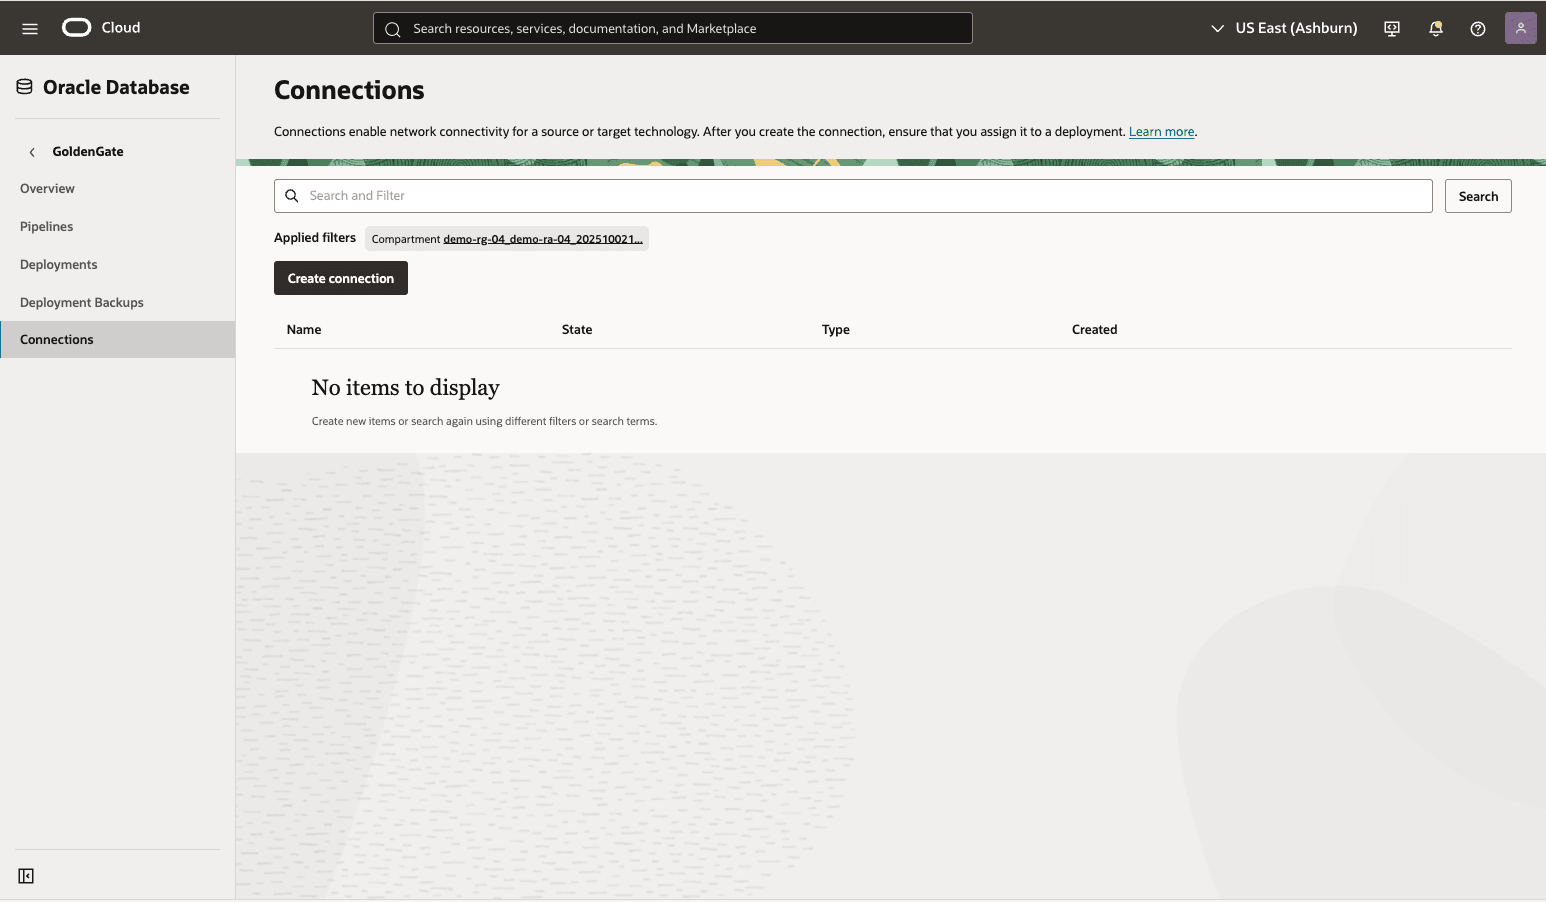
- From the Connections page, select the Create connection button and then complete the following substeps:
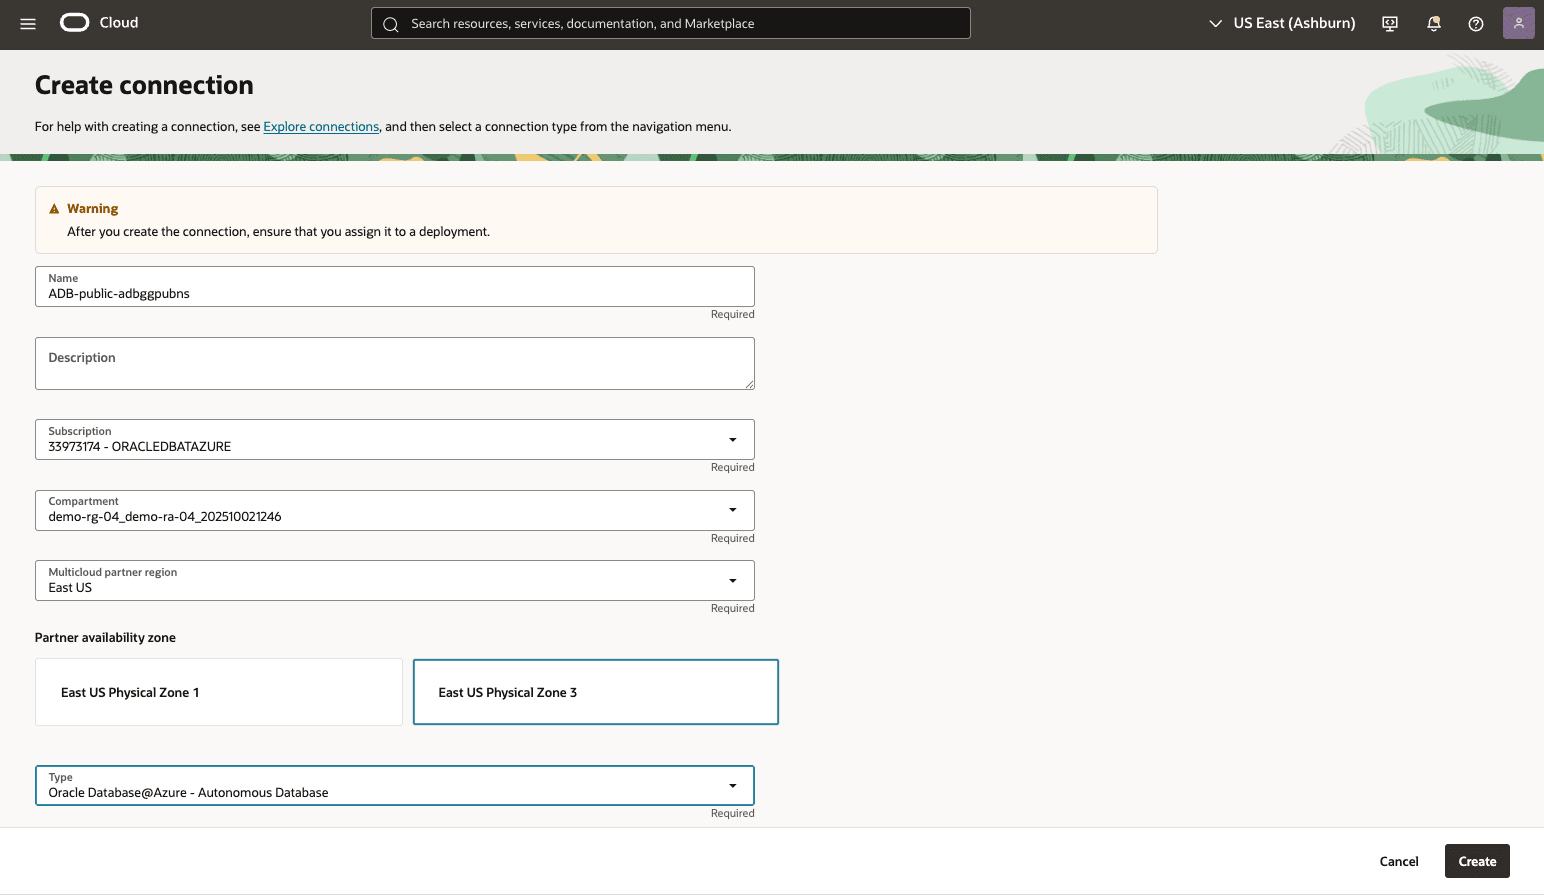
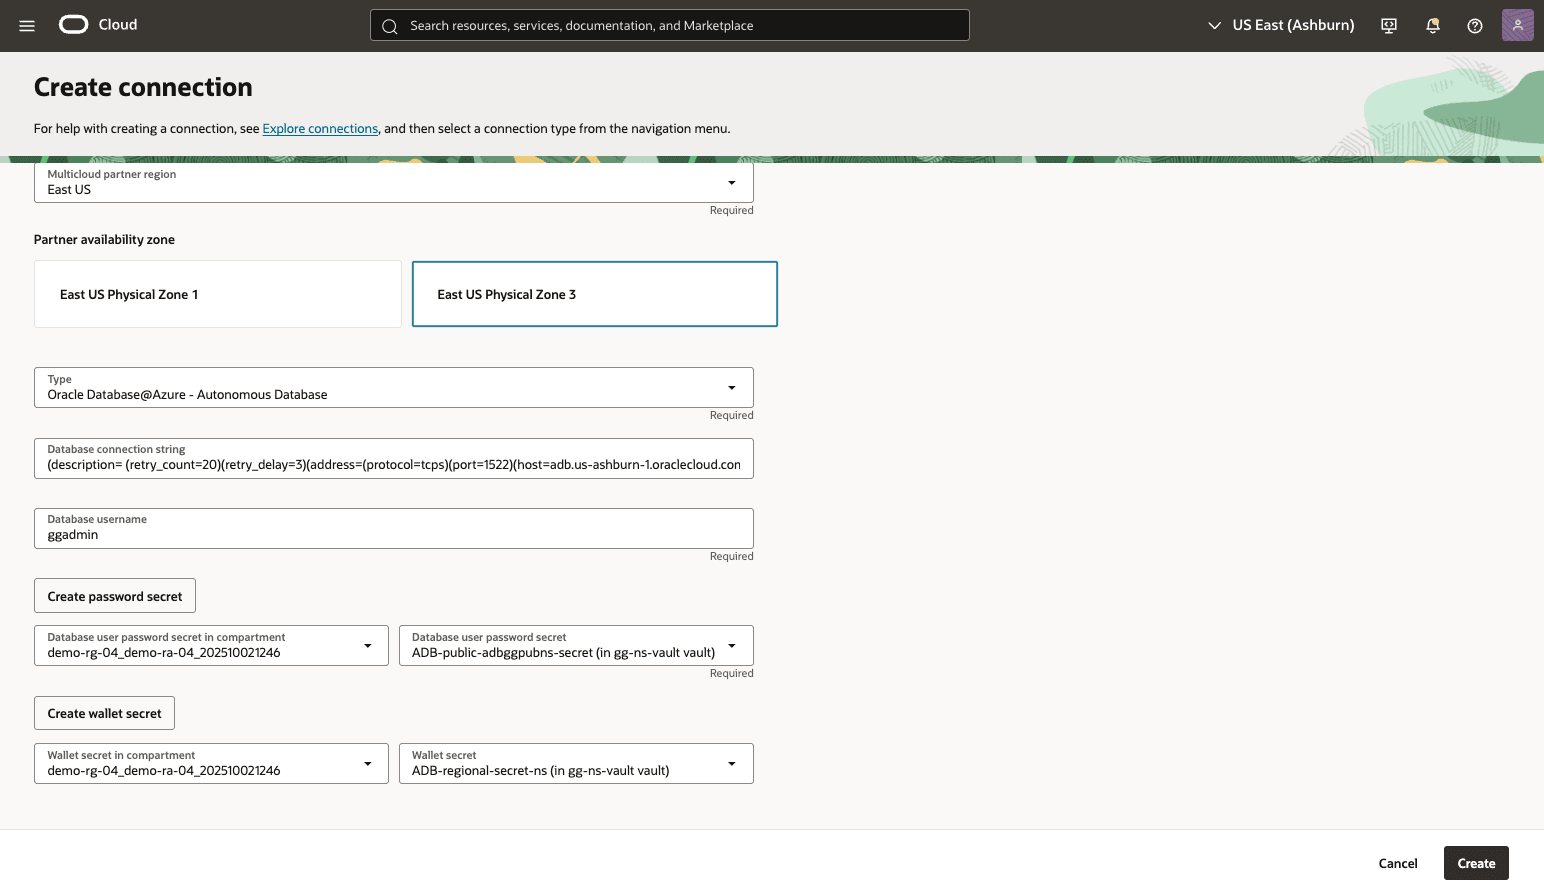
- From the Create connection page, enter a Name and a Description that helps you easily identify the resource.
- From the dropdown list, select the subscription with ORACLEDBATAZURE
- From the dropdown list, select the Compartment where Resource Anchor resides in.
- From the dropdown list, select the Multicloud partner region.
- Choose your Partner availability zone. The available options populates based on the selected Multicloud partner region.
- The Type section allows you to create a connection type for the data source or target you want to use with GoldenGate. For a complete list of data sources, see Explore connections.
- Based on the type of connection selected, additional details for the data source or target need to be provided. Complete instructions on how to connect to a specific data source or target are available in the Connections supported in 21c documentation.
- Enter your Database username.
- The Password Secret section allows you to select an existing password secret or create a new one to be stored as a secret. Creating a vault is a prerequisite. If you do not have an existing password secret, you can create one by clicking the Create password secret button.
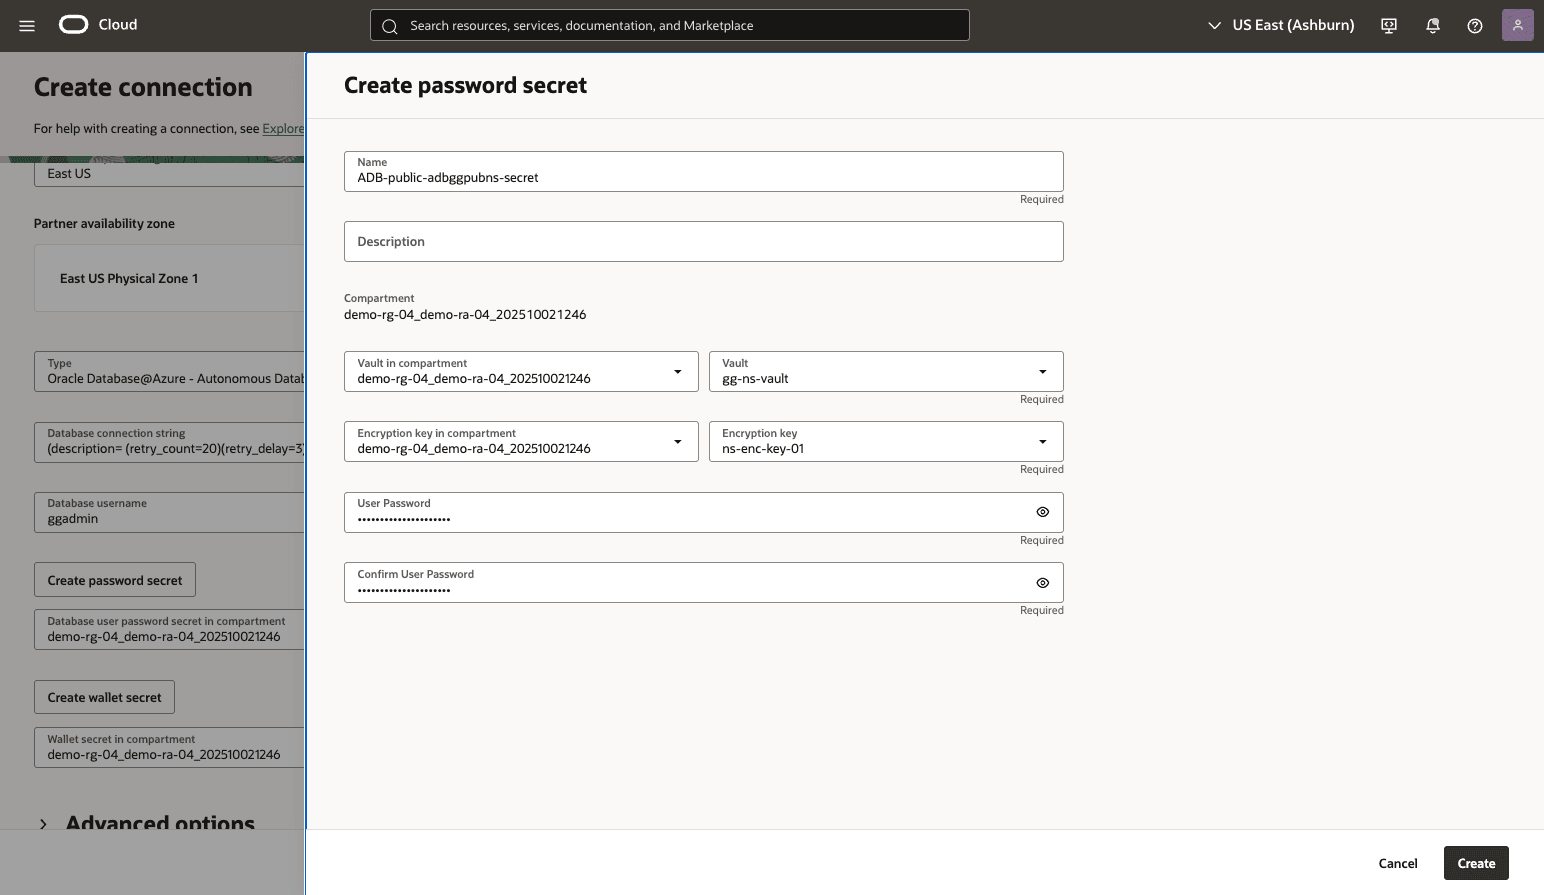
- From the Create password secret page, enter a descriptive Name and Description that helps you easily identify the password.
- The Compartment field is read-only.
- From the dropdown list, select your Vault in compartment and Vault.
- From the dropdown list, select your Encryption key in compartment and Encryption key.
- Enter your User Password and Confirm User Password.
- Select the Create button to apply changes.
- From the dropdown list, select Database user password secret in compartment, and then select Database user password secret.
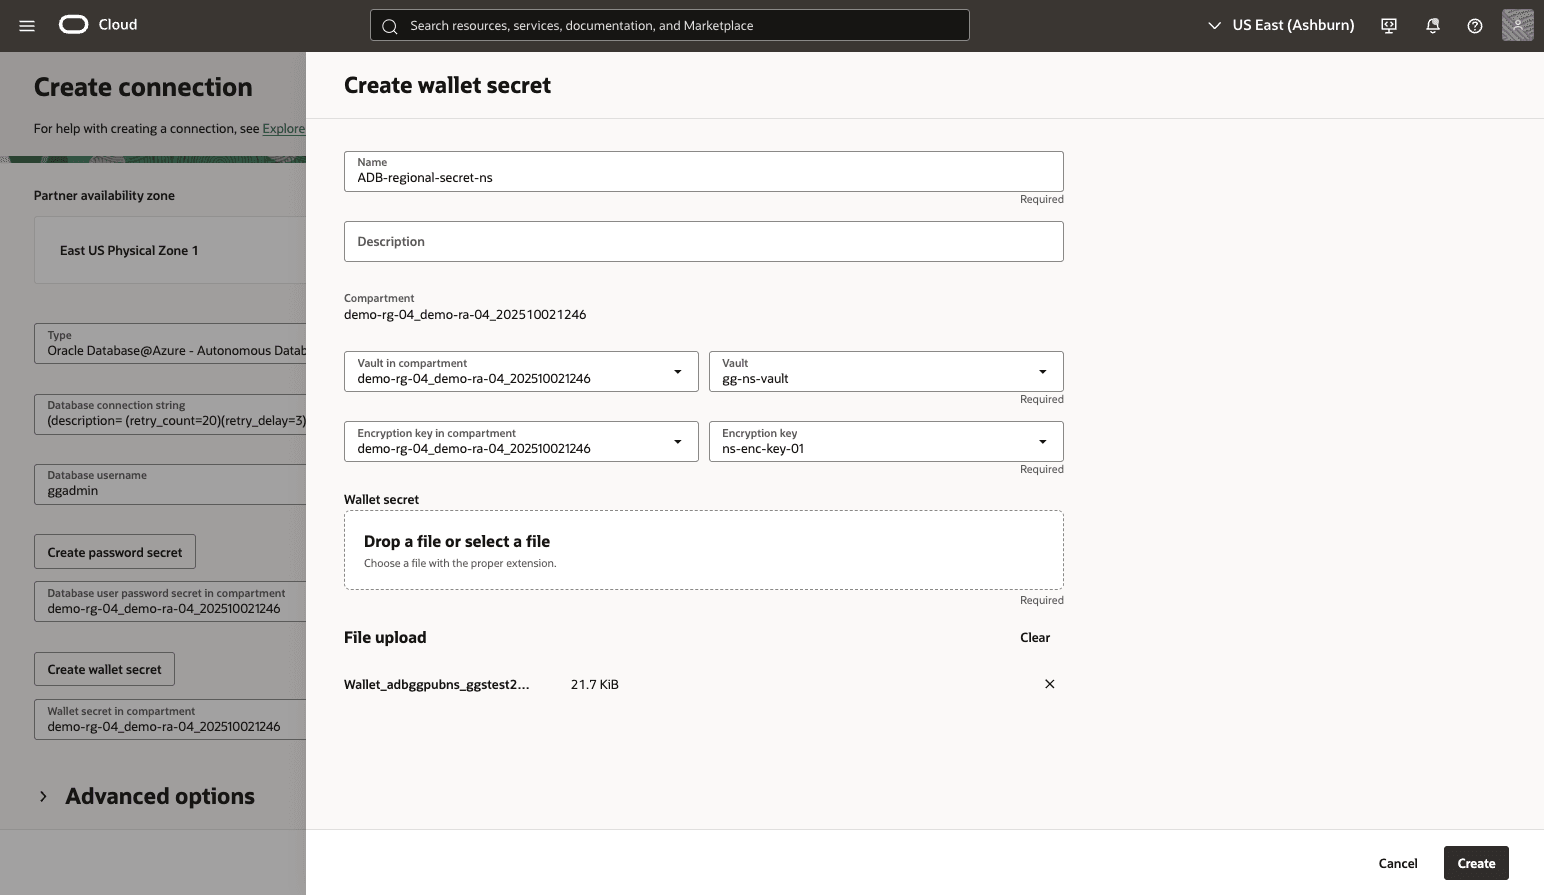
- From the dropdown list, select Wallet secret in compartment, and then select Wallet secret. If you do not have an existing wallet secret, you can create one by clicking the Create wallet secret button.
- From the Create wallet secret page, enter a descriptive Name and Description that helps you easily identify the password.
- The Compartment field is read-only.
- From the dropdown list, select your Vault in compartment and Vault.
- From the dropdown list, select your Encryption key in compartment and Encryption key.
- From the Wallet secret section, you can select a file and upload it.
- Select the Create button to apply the changes.
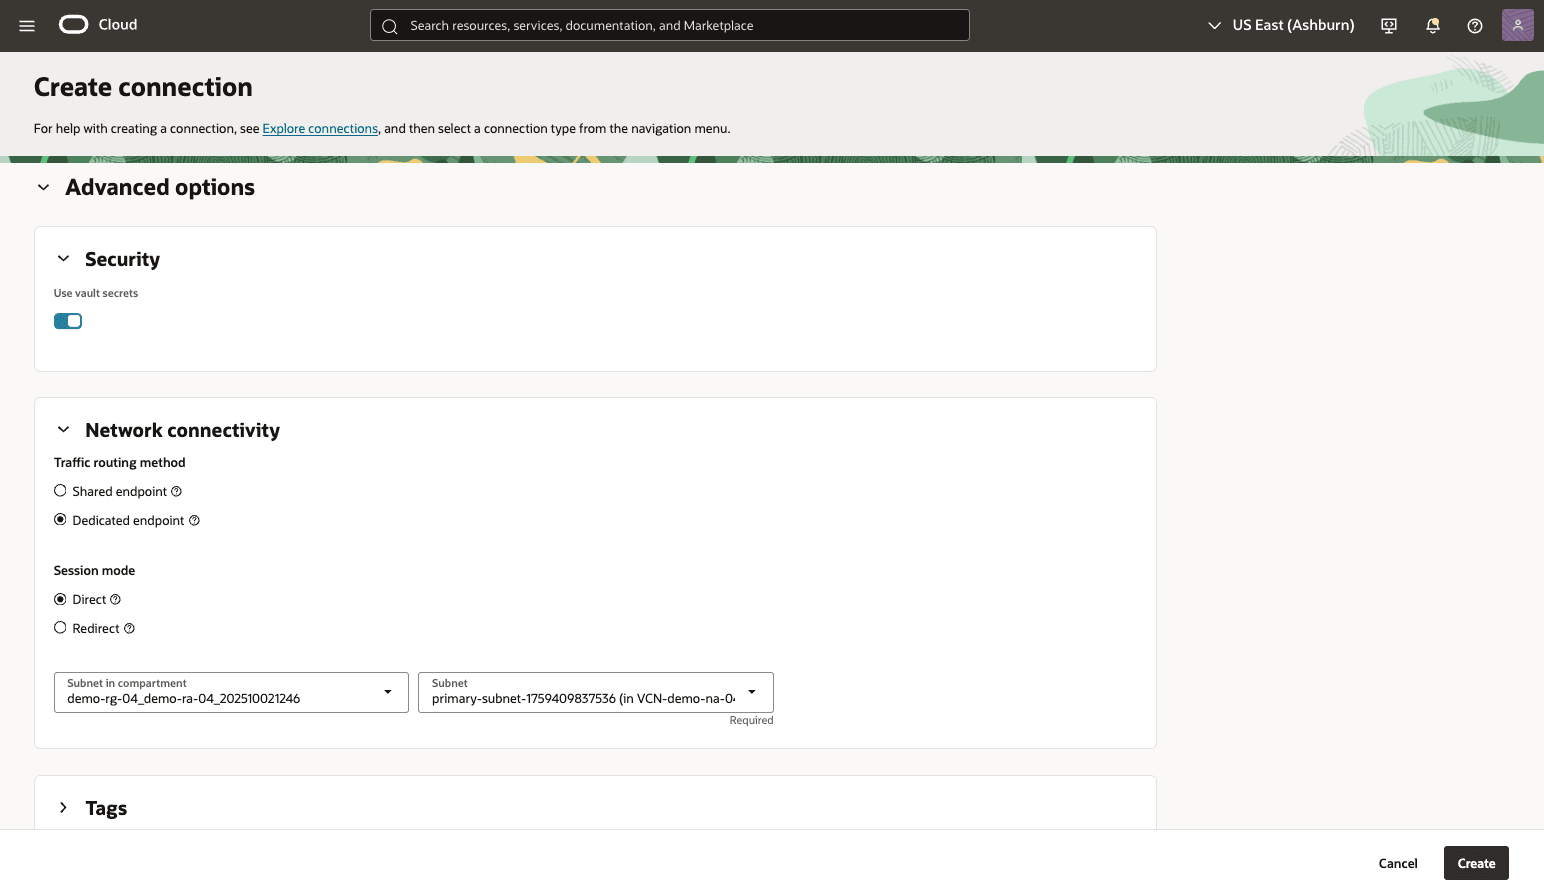
- Expand the Advanced options section to manage the Security and Network connectivity and Tags options.
- From the Security section, you can enable the vault secret option.
- From the Network connectivity section, you can either choose the Shared endpoint or Dedicated endpoint.
- Shared endpoint: Network traffic flows through a single shared endpoint in the deployment subnet, which can impact performance. You must allow connectivity from your deployment’s ingress IP.
- Dedicated endpoint Network traffic flows through a dedicated endpoint in the assigned subnet in your VCN. You must allow connectivity from the connection’s ingress IPs.
- From the Network connectivity section, you can choose the Session mode.
- Direct: It uses local listener running on the database node.
- Redirect: It uses SCAN FQDN listener in Oracle Real Application Clusters (RAC) Deployment.
- Select the Create button to save the changes.
- From the Deployments section, select the provisioned GoldenGate deployment, and then select the Network security groups tab. Select the Add network security groups button and complete the following substeps:
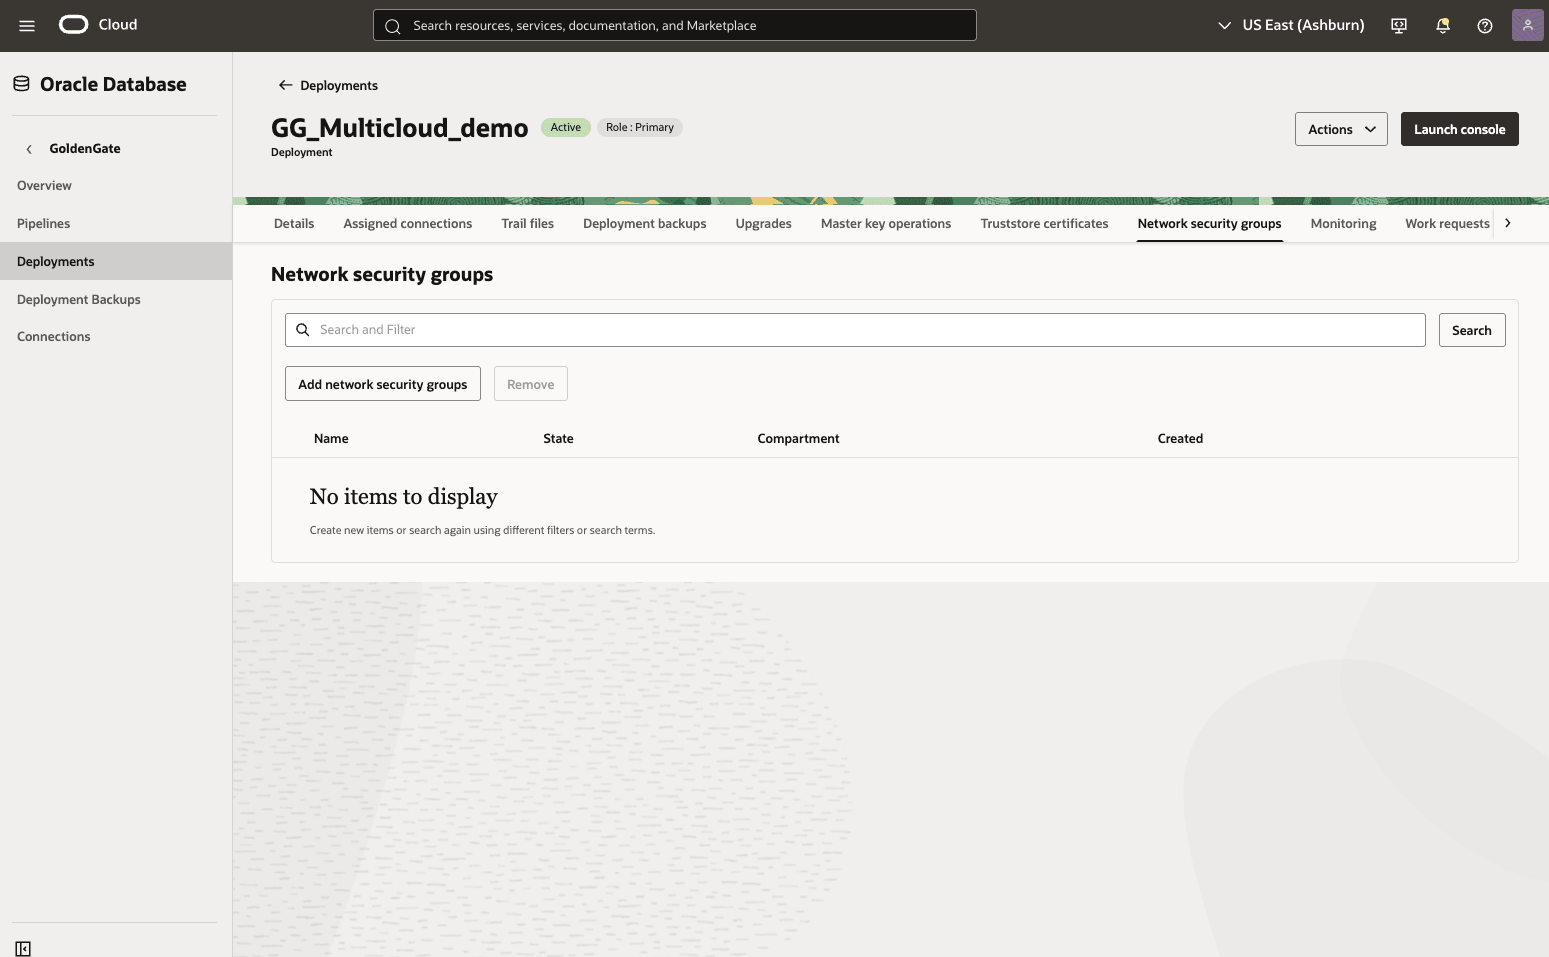
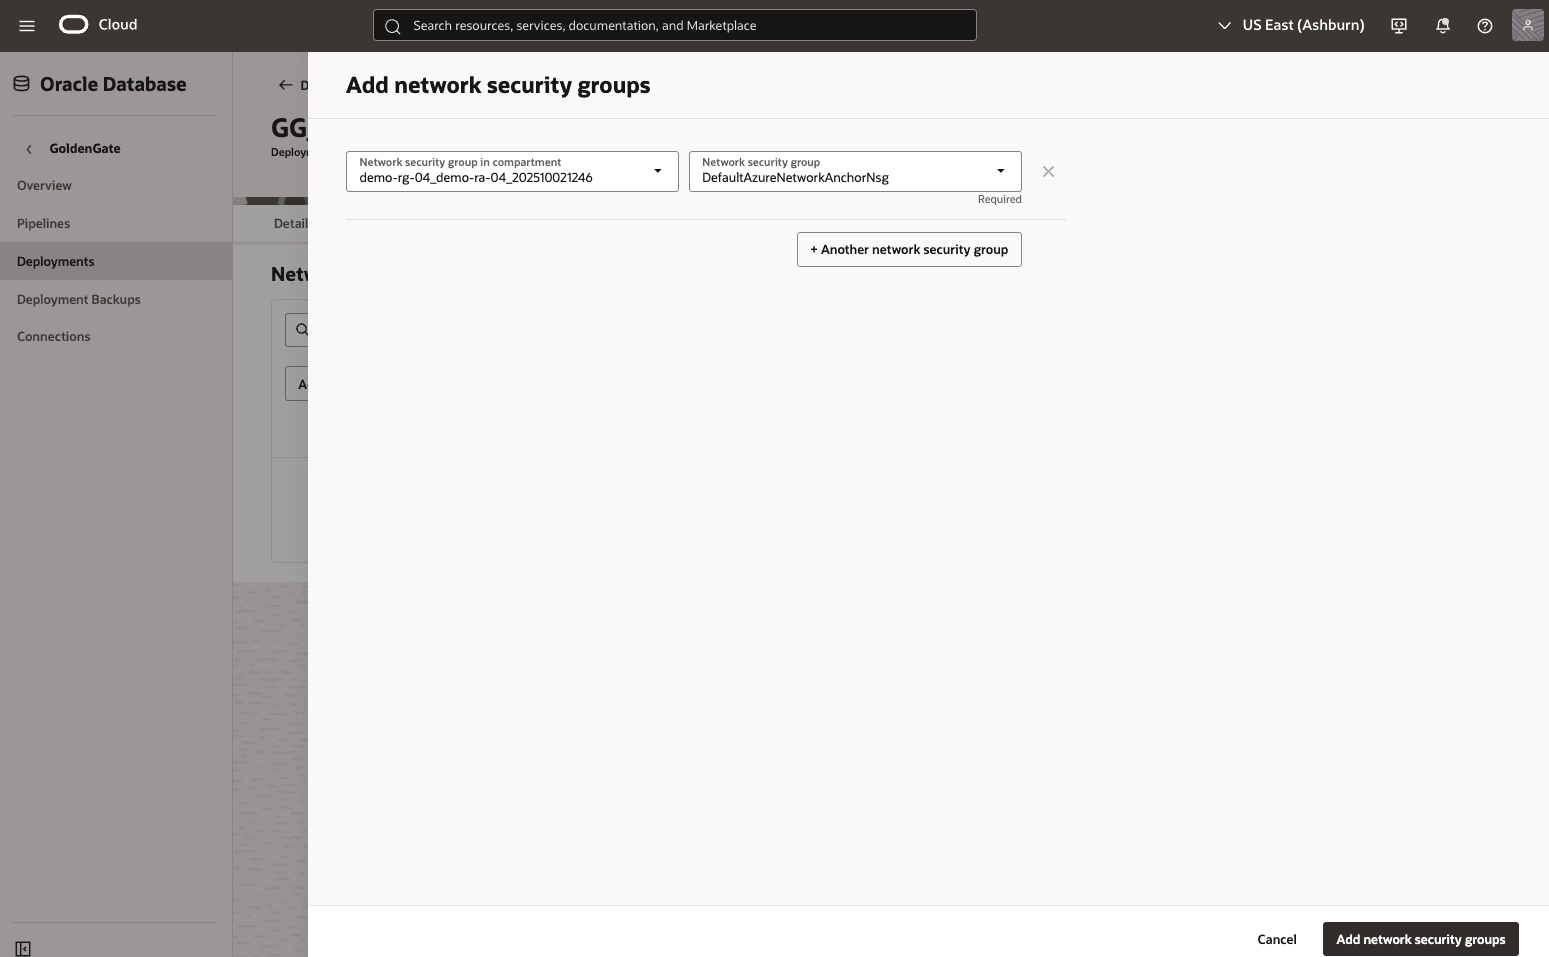
- From the dropdown list, select Network security group in compartment and Network security group.
- Once you complete, select the Add network security groups button to apply the changes.
Assign a Connection- From the OCI console, select Oracle Database, and then select GoldenGate.
- From the Deployments page, select the provisioned GoldenGate deployment, and then select the Assigned connections tab.
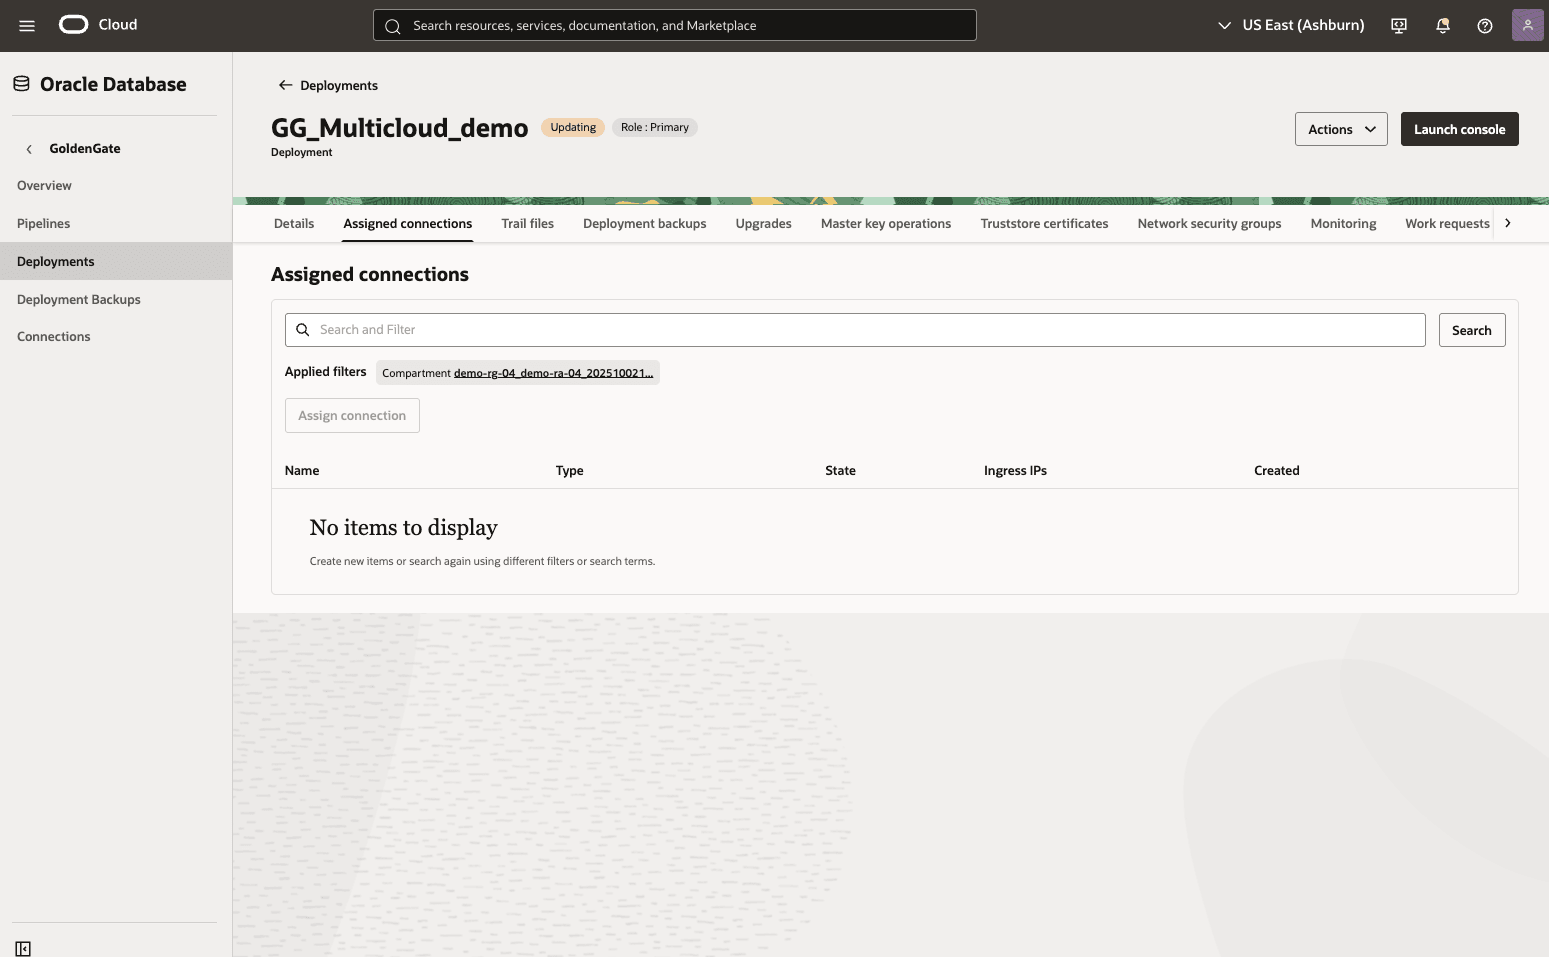
- Select the Assign connection button and then complete the following substeps:
- From the dropdown list, select Connection in compartment and Connection.
- Select the Assign connection button to save the changes.
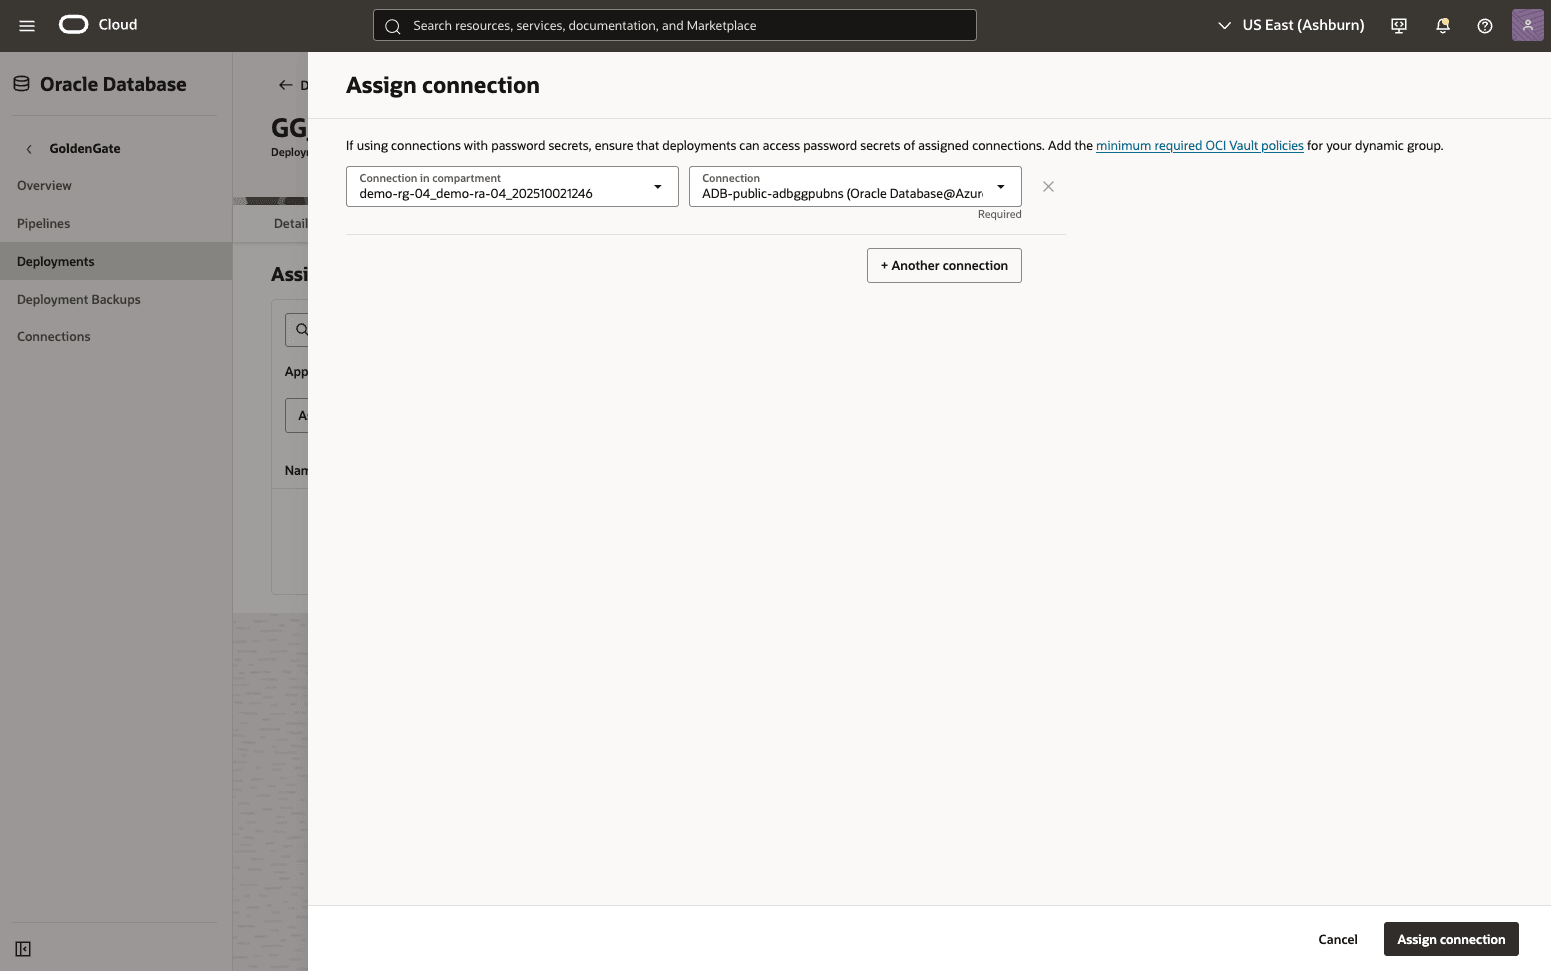
- From the Assigned connections list, you can view the State of the connection.
- You can also test the connection by selecting the ... icon and then select the Test connection option. If the connection is successful, a pop-up window with a green check-mark and the message Success will appear.
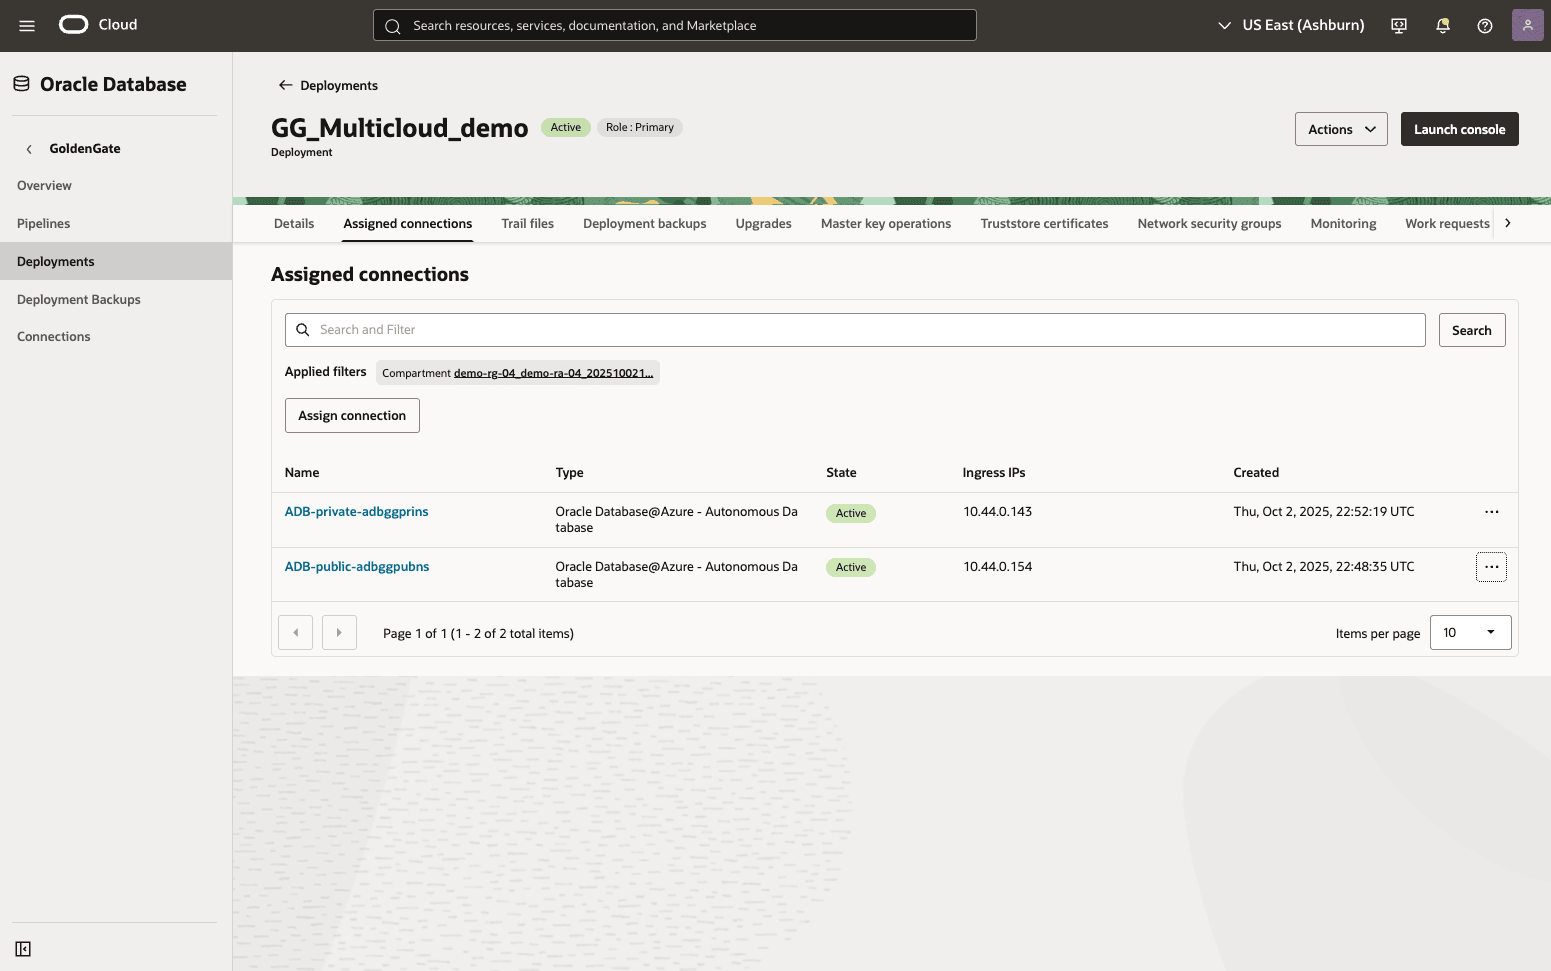
- Select the Assign connection button and then complete the following substeps:
There is currently no content for this page. Oracle Database@Azure team intends to add content here, and this placeholder text is provided until that text is added. The Oracle Database@Azure team is excited about future new features, enhancements, and fixes to this product and this accompanying documentation. We strongly recommend you watch this page for those updates.
GoldenGate deployment, database connection creation , connection assignment must be completed from the OCI console.
There is currently no content for this page. Oracle Database@Azure team intends to add content here, and this placeholder text is provided until that text is added. The Oracle Database@Azure team is excited about future new features, enhancements, and fixes to this product and this accompanying documentation. We strongly recommend you watch this page for those updates.