Q&A
Starting with Release 22.04, the Q&A feature is being phased out and replaced by the Knowledge feature. The Knowledge feature has significant advantages over the Q&A feature, namely:
- You can generate answer intents in your skill directly from existing FAQs or Knowledge Base documents. You don't have to manually format those documents before importing them into your skill. In addition, example utterances are generated for each intent.
- In conversations with the skill, the generated answer intents are resolved with NLP like regular intents. You don't need any Q&A-specific properties or components to handle those intents.
In addition, the Q&A feature does not work in dialog flows developed in Visual mode.
If you have an existing skill that has a Q&A module, you can continue using that Q&A module in future versions of the skill. But we recommend that you switch to using answer intents (either with the help of the Knowledge feature or by creating answer intents manually). See Answer Intents.
The Q&A feature enables your skill to answer general interest questions by returning one or more question and answer pairs. It's a way for you to use a skill to surface FAQs or other knowledge-base documents.
Adding a Q&A module to your skill enables it to evaluate whether the user input is intended for a transaction ("What's my balance?") or to answer a question ("What's the bank's address?") and then respond appropriately.
Adding Q&A to a Skill
-
Enable the Q&A capability by clicking Q&A (
 ) in the left navbar. Then click Add Q&A.
Note
This is only possible in skills that have been created in YAML dialog mode. -
Load the source files (formatted as CSVs) that holds the categorized question and answer pairs. Create the Data Source File describes the format and provides some content guidelines.
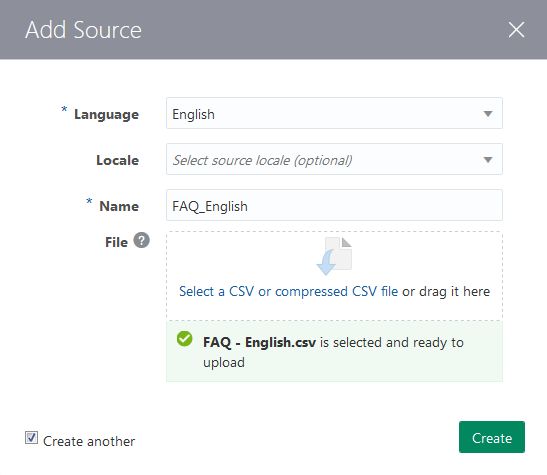
Description of the illustration add-qna-source.png -
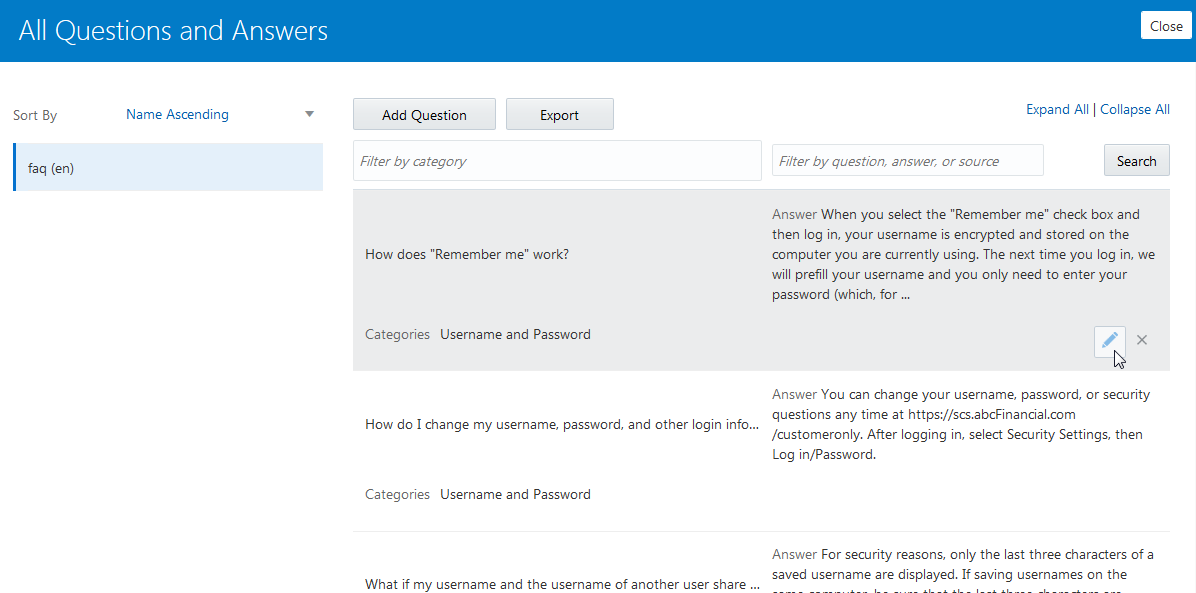
If needed, you can edit the questions and answers. You can also add or delete questions and answers.
-
Train the skill with the Q&A trainer.
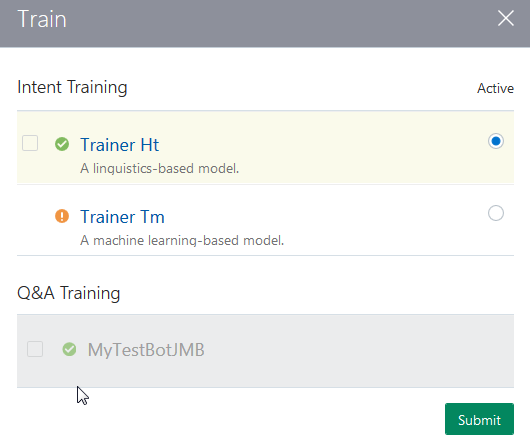
Description of the illustration train-w-qna.png -
Test the new Q&A capability by entering questions into the Q&A Tester. As part of the testing process, you need to add alternate questions to the data source to improve the question recognition capability. You need to retrain if you add to or change anything from the data source.
-
To use Q&A in a skill dialog flow, you need to configure the
System.Qnacomponent. You must also append a new transition to theSystem.Intentcomponent that references this new component, so that Q&A questions are routed to the Q&A component, see How Do I Configure the Dialog Flow for Q&A?. -
Add a state for the
noneaction and set the transition back to the Q&A component when the question is answered by addingqnafor thenexttransition:qna: component: "System.QnA" transitions: actions: none: "unresolved" next: "qna" unresolved: component: "System.Output" properties: text: "Sorry, I did not find any match. Can you rephrase the question?" transitions: return: "done" -
Test the skill.
Create the Data Source File
category_path, questions, and
content.
| Column | Content |
|---|---|
category_path |
The category (or categories) for a given question and answer (Q&A) pair. When a Q&A pair belongs to more than one category, add each of the categories on new line. Use a forward slash (/) to indicate a hierarchy. For
example: |
questions |
The questions that display for the user. Add each
alternate versions of these question on a new line. The first
question, known as the canonical question, is the question that
displays in the skill’s message by default. The subsequent
questions in the column are alternative versions. |
content |
The answers. |
The Data Source Guidelines
-
Adding multiple questions for each answer increases the likelihood of relevant Q&A pairs getting returned to users. Create 2-5 questions for each answer. Provide enough questions to cover a sample of the different ways you expect the user to inquire about a topic. Consider varying the subject (but be consistent with the answer’s topic), the verb and interrogatives like “how”, “what”, “where”, etc. For example, How do I find out how much money do I have? can be restated as:
-
How do I get my account balance?
-
Where can I find my account balance?
-
Can I get my account balance?
-
-
Remember that although the questions may be framed differently, they should all return the same answers.
-
You don’t need to create alternative questions just to accommodate commonly used words, synonyms, or typos. You can use the Language Configuration page to add synonyms or abbreviations. Typos are handled automatically.
-
Keep the answers as short as possible. Provide a link for more detailed information. Q&A links can’t be hidden, meaning that you can’t use
<a
                            href>
to specify a site name. The links must be explicit (http://www.myanswers.com/answer/topic1.html, for example). -
Always use plain text.
-
Users are interested in the top three matches to get the information they want. While you should focus on the top match, the goal should be to ensure that the requested and related information is in the top three matches.
-
Create a batch test file whenever you update your data source. This batch file contains all of the questions that you want to make sure that your skill is answering correctly. To find out more about this file, see Create the CSV File for Batch Testing.
Q&A Modules and Data Sources Management
Add More Data Sources
-
Click Q&A (
 ) in the left navbar.
-
Select the Data Sources tab and then click Add Q&A Source.
-
Complete the dialog by entering a language, a locale (if needed) and the data source file.
-
You can add batches of data sources by choosing Create Another.
-
By default, the data source is enabled. If you need to temporarily remove Q&A pairs from the data source, you can choose Disabled rather than delete the data source.
-
Click Create.
-
Retrain Q&A.
Edit the Q&A Data Source Configuration Parameters
-
Click Q&A (
 ) in the left navbar.
-
Select the Data Sources tab.
-
Hover over the data source to invoke the Edit and Delete icons.

-
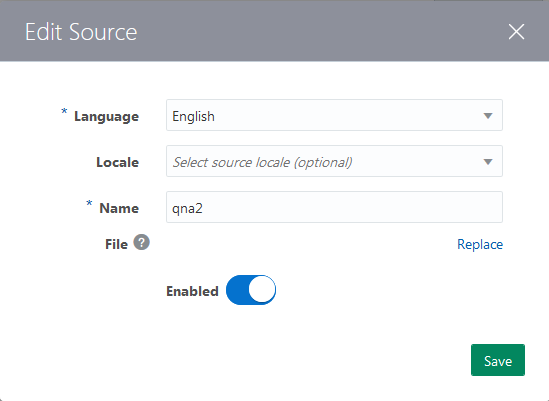
Click Edit.
-
Perform any of the following and then click Save.
-
Change the language and locale.
-
Rename the source.
-
Overwrite the existing source file by clicking Replace and selecting a new file.
-
Enabling or disabling the source.
-
-
Retrain the Q&A module.
Add Questions and Answers One-by-One
-
In the Data Sources tab, click on the data source.
-
Click View All Q&A.
-
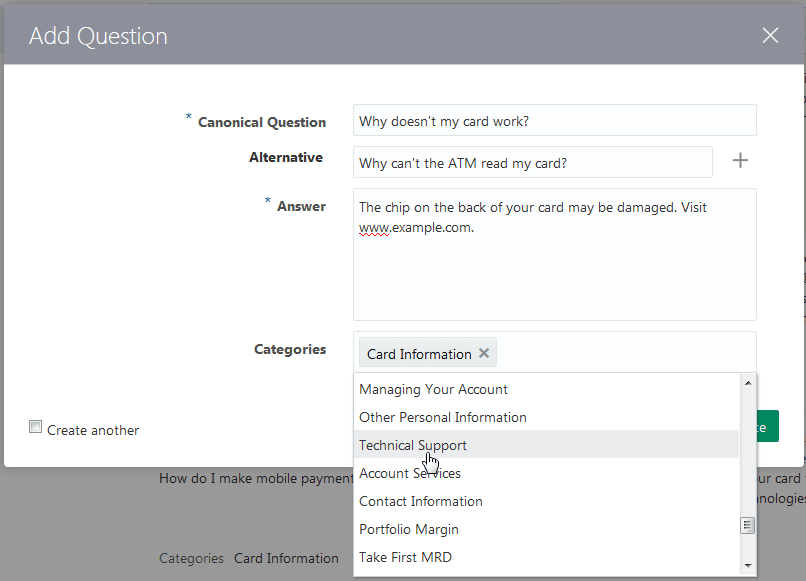
Click Add Question.
-
Complete the dialog as follows and then click Create.
-
Canonical Question—Enter the question that displays by default in the chat.
-
Alternative—Add one or more variations on the canonical question. Keep in mind that you just need to focus on how users might ask the same question in different ways, not on accommodating synonyms or common misspellings.
-
Answer--Add a concise answer. In place of a lengthy explanation, add a URL that points users to more detailed information. This URL will render as plain text in the tester window, but will render as a hyperlink when the skill runs on an actual messaging platform.
-
Categories—If applicable, enter a category or choose one from the menu. (The menu is populated with the categories from your data source file).
-
For hierarchies, enter a string with forward slashes (/).

-
Create another—Select this option to open a new dialog after you click Create.
-
-
Retrain Q&A.
-
Click Close in the Data Sources tab.
Remember that these question and answer pairs display within the confines of a chat window, so keep them short. See The Data Source Guidelines.
Edit Questions and Answers One-by-One
-
In the Data Sources tab, page to the question, or locate it using one of the search fields (categories and question and answers).
-
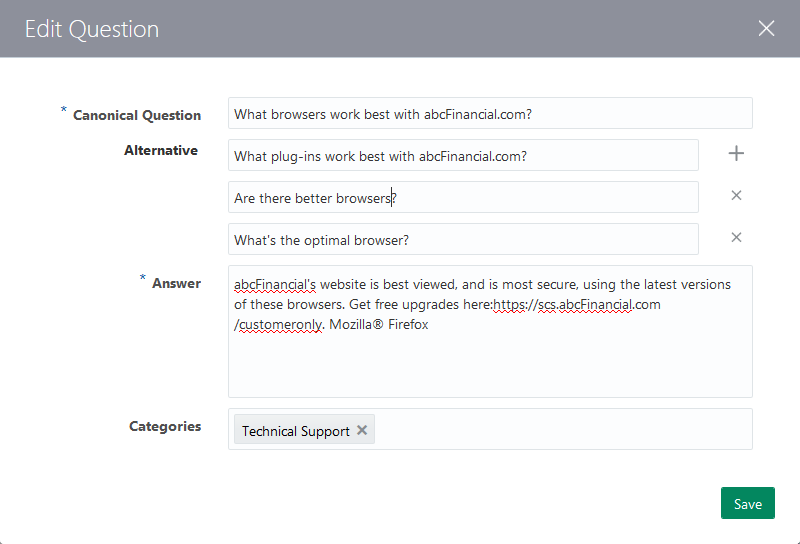
Hover over the question and then click Edit.
-
Use the Edit Question dialog to:
-
Change the canonical question.
-
Add more alternative questions.
-
Edit the answer.
-
Add or remove categories.
-
-
Click Save.
-
Retrain the Q&A module.
-
Click Close in the Data Sources tab.
You can also add alternate questions using the tester.
Improved Accuracy with Abbreviations and Ignored Words
We include built-in sets of ignored words, abbreviations, and synonyms to improve the accuracy of the Q&A capability. Ignored words are excluded from the matching algorithm so that they don’t reduce accuracy. The abbreviation and synonym lists are used to match the user questions that contain these words. While the built-in sets may be sufficient for many skills, you can add to these sets for unique situations.
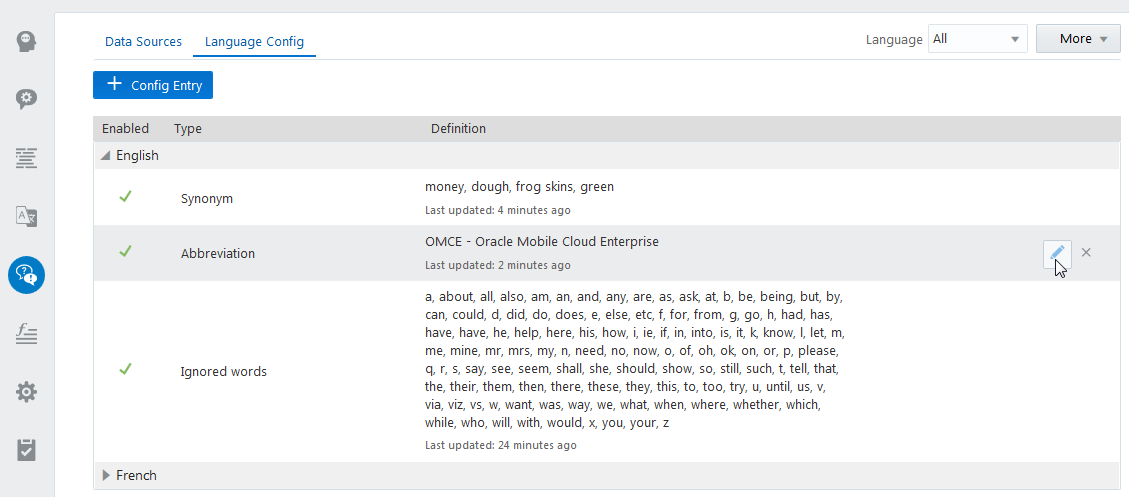
Additions to these sets are made using the Language Configuration page. From this page, you can edit the lists of ignored words, abbreviations, and synonyms.
Add Ignored Words, Synonyms, and Abbreviations
-
Select the Language Config tab.
-
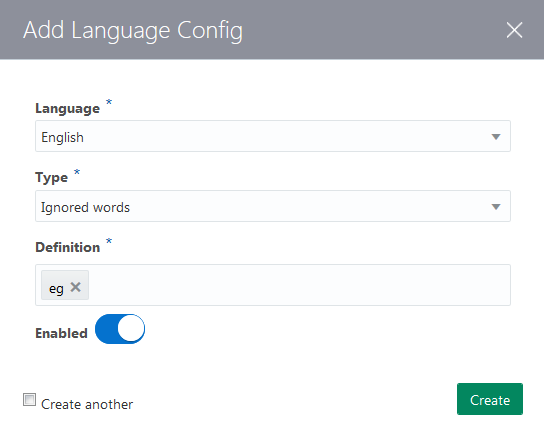
Click Add Config Entry.
-
Complete the dialog:
-
Language—Select from the available languages (made available by your data sources).
-
Type:
-
Ignored words—Add words that don’t add value to the questions. The words must be in lower case.
-
Synonyms—Include slang terms and alternate words for each key word in the data source. Create a separate entry for each set of synonyms. For example, money, moolah, green is a separate entry from spouse, wife, husband, partner.

Description of the illustration synonym-entries.png -
Abbreviations—Keep in mind that canonical questions may not expect abbreviations.
-
-
Definition—Enter terms that are specific to the type (synonyms, ignored words, or abbreviations).
-
Enabled—Enables (or disables) the additions made to the Ignored Words, Abbreviations, or Synonym sets. Use this option when you test out language configurations.
-
Create another—Select to return to this dialog after you click Create.
-
-
Click Create.
-
Retrain the Q&A Module.
Q&A Testing
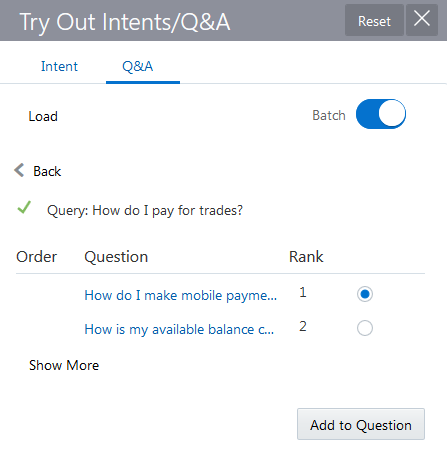
The Tester’s Q&A window enables you to test out your questions one at a time, or as a batch.
After you train the Q&A module, you can test it using the Try Out Intents/Q&A tester (accessed by clicking Try It Out!). The skill response may include a carousel of multiple answers. Unlike the testing of intents, responses to Q&A questions are not intent categories (for example, balances), but are instead textual answers provided by the content row in the CSV file.
The Q&A capability (not the Intent Engine) handles the responses to the
utterances that you enter. These responses consist of a set canonical questions that
represent the best-fitting topics (the answers provided from the
content column in the CSV file). These canonical questions are the
first questions entered in the CSV’s questions field that are
associated with each topic (that is, the answer in the content field in
the CSV file).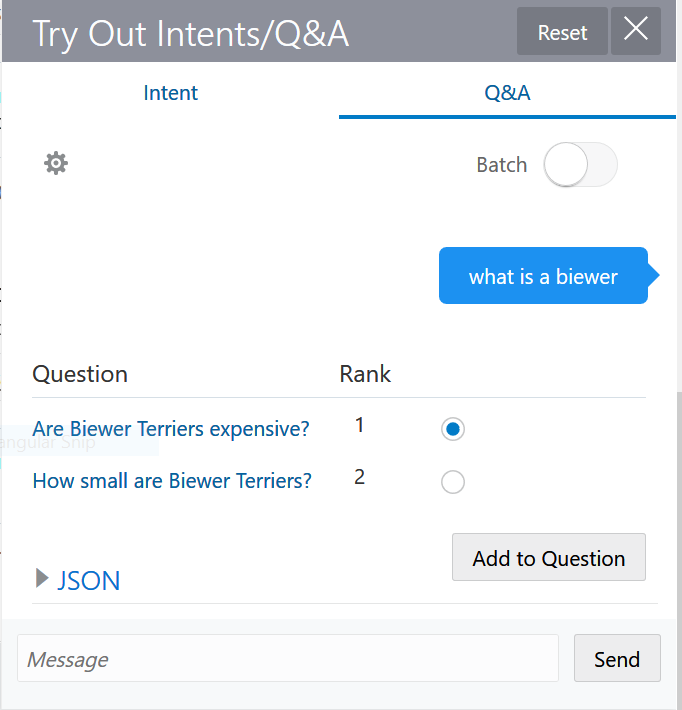
Description of the illustration qna-tester-w-precision.png
Test a Q&A Match
-
Train the Q&A module.
-
Open the tester by clicking Try it Out! and then choosing Q&A.
-
Click Q&A.
-
Optionally, click
 to set the options for language and matching precision:
- Language—Choose a language (if multi-lingual data sources exist).
- Match Thresholds—Click Edit to set the minimum and maximum percentage of tokens that a question and answer pair must contain to be considered a match (that is, a Q&A match).
- Match Fields—Click
Edit to select the Q&A field (or
fields) that must match the user message. The options are:
- All—Returns the Q&A where the keywords from the user input match any Q&A category, question, or answer.
- Questions—Returns the Q&A where the keywords from the user input match the Q&A questions.
- Answers—Returns the Q&A where the keywords in the user input match the Q&A answer.
- Categories—Returns the Q&A where the keywords in the user input match a Q&A category.
- Questions & Categories—Returns the Q&A where the keywords in the user input match either the Q&A category or the Q&A answer.
-
Enter an utterance and then click Send.
-
If needed, click Add to Question and then retrain the Q&A module.
Create the CSV File for Batch Testing
languageTag,
question,
match-1,
match-2, match-3
and so on.
-
languageTag—A five-letter code that represents the language and locale in which the test question and match questions are expressed. For example,en-US. -
question—The test question. This question doesn’t need to match any of the training questions, but should represent a typical question that a user might ask for the given topic. -
match-1match-2 …— The first of the canonical questions that you think the test question should retrieve. We display the canonical questions for all Q&A matches. If the test question must return only a single Q&A match, then enter the question in the match-1 column and leave the remaining match columns empty. -
queryInfo—A JSON object where that usesoffsetandcategoryPathfor a category drill down and offset and limit for pagination."{""offset"":0,""categoryPath"":[""General Account Information""],""limit"":3}"
Batch Test the Q&A Module
-
Add and configure the System.Qna component in the dialog flow and then chat with the skill to create a conversation history.
-
Chat with the skill to create the conversation history.
-
Export the QnA Conversation log using the menu in the skill’s tile by choosing the QnA Conversation Log option in the Export Conversation Log dialog.
-
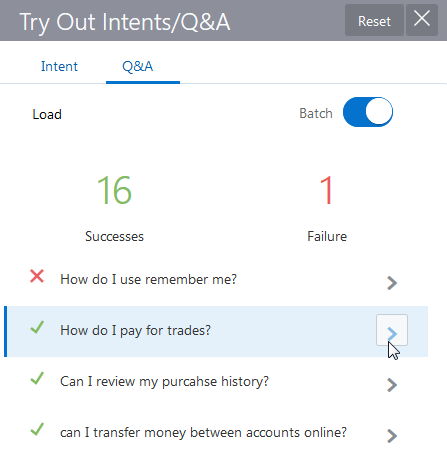
In the Q&A test window, switch on the Batch toggle.
-
Select the language.
-
Click Load.
-
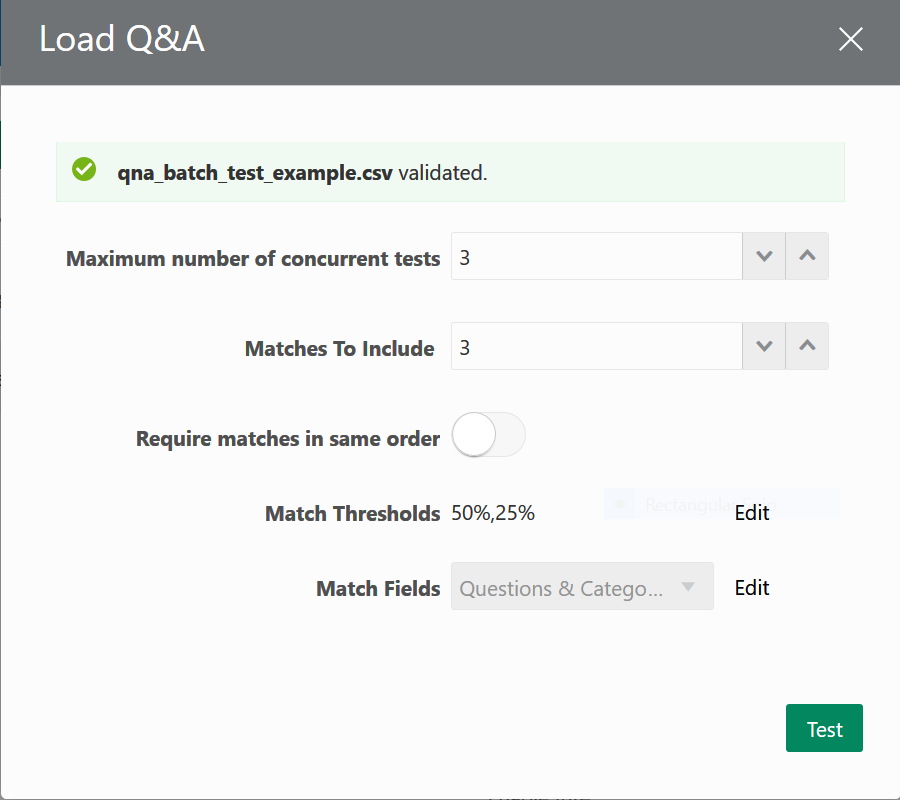
Set the test options in the Load QnA dialog and then click Test.
-
Maximum number of concurrent tests—The number of tests running in parallel. Increasing the number of concurrent tests may speed up testing, but may also burden the system.
-
Matches to Include—Sets the number of Q&A matches that get included in the test.
-
Require matches in same order—Enables you to pass or fail a match depending on either its inclusion, or its position, within the top-ranked matches.
-
In its off position, this option lets you verify matches when users enter keywords instead of complete questions.
-
Match Thresholds—Click Edit to set the minimum and maximum percentage of tokens that a question and answer pair must contain to be considered a match (that is, a Q&A match).
Tip:
Set the same value here as the one that you set for theqnaMiniumumMatchandminimumMatchproperties. To find out more about setting the various levels, see System.Intent and System.Qna. - Match Fields—Click
Edit to select the Q&A field (or fields)
that must match the user message. The options are:
- All—Returns the Q&A where the keywords from the user input match any Q&A category, question, or answer.
- Questions—Returns the Q&A where the keywords from the user input match the Q&A questions.
- Answers—Returns the Q&A where the keywords in the user input match the Q&A answer.
- Categories—Returns the Q&A where the keywords in the user input match a Q&A category.
- Questions & Categories—Returns the Q&A where the keywords in the user input match either the Q&A category or the Q&A answer.
The failed tests display at the top of the results.
-
-
For the Q&A matches that pass, you can drill down and add alternate questions, modify the answers, and then retrain Q&A module. These additions are made to the data source that seeds the skill, not to the testing data.
How Do I Configure the Dialog Flow for Q&A?
-
Intent and QnA—Adds the
System.Intentcomponent but with properties that set the transition routing to the Q&A component when the utterance is determined to be a question, not a transactional request. Q&A Properties for the System.Intent Component describes these properties and Creating a Skill with Intent and Q&A Flows describes the overall process for creating a skill with intent and Q&A functions. -
QnA—Adds a minimally configured template for a System.Intent component.
-
QnA Advanced—Same as the QnA template, but provides optional properties for more fine-grained control:
-
keepTurnconfiguration for relinquishing or retaining the skill’s control of the dialog flow. -
Modularity (calling a dedicated Q&A skill). See Reusable Q&A Skills.
-
QnA sizing and pagination.
-
-
Click Flows in the left navbar.
-
Click Add Components in the upper left corner of the page. (You may need to scroll up if this button’s not visible).
-
Choose the Language components palette.
-
Choose one of the three Q&A templates and then use the Insert After menu to position it within the dialog flow definition. Click Apply.Note
To implement Q&A support, you need to either add a newSystem.Intentcomponent (using the Intent and QnA template) to the dialog flow definition, or modify an existingSystem.Intentcomponent to enable transitions to the Q&A component.
Creating a Skill with Intent and Q&A Flows
-
Add the Intent with QnA template to the dialog flow (accessed from Language).
-
For the
System.Intentcomponent, define the following:-
Add
qnaEnable: trueto enable the router:intent: component: "System.Intent" properties: variable: "iResult" qnaEnable: true -
Set a transition action to the QnA state:
If the intent resolution is below the confidence threshold, then the skill triggers thetransitions: actions: Balances: "startBalances" Transactions: "startTxns" Send Money: "startPayments" Track Spending: "startTrackSpending" Dispute: "setDate" unresolvedIntent: "unresolved" qna: "qna"qnaaction which the Dialog Engine to theqnastate. In this case, the skill’s message includes the View Answers link only.
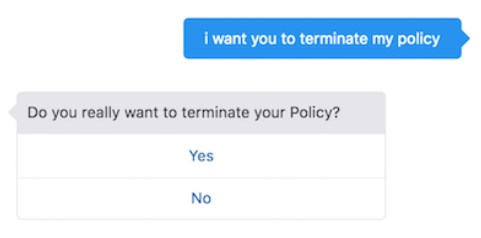
But when the Intent Engine can both resolve the message above the confidence threshold and match a Q&A, the skill’s message includes links for the intent and the Q&A response.However, when the Intent Engine classifies the message as a request instead of a question, the skill bypasses Q&A and routes to the intent flow. In this case, the message only includes the intent option.qna: component: "System.QnA" transitions: actions: none: "unresolved" next: "intent" unresolved: component: "System.Output" properties: text: "Sorry I don't understand that question!" transitions: return: "unresolved"You can modify this behavior by adding words and phrases that clarify the intent routing and by setting the System.Intent’s
qnaSkipIfIntentFoundproperty.
-
Q&A Dialog Examples
Q&A Routing for the System.Intent Component
System.Intent component’s qnaEnable property. It also
shows the transition to the state with Q&A module, and the Q&A state
itself.
...
mainIntent:
component: "System.Intent"
properties:
variable: "userInput"
sourceVariable: "translated"
qnaEnable: true
qnaMatchFields: "categories+questions"
transitions:
actions:
Greeting: "greeting"
Inspire Me: "recommendCategories"
Returns: "startReturn"
qna: "qna"
View Reports: "setMobilePhone"
TrackOrders: "showOrderStatus"
unresolvedIntent: "unresolved"
Vision: "visionBasedProducts"
Shipping: "startShipping"
...
qna:
component: "System.QnA"
Foreign and Multi-Language Support for Q&A
-
Create a data source file specific to the target language.Note
We don’t support Chinese language data sources. -
If needed, add any synonyms or update the ignored words.
-
Configure a translation service. See Add a Translation Service to Your Skill.
-
If the skill also includes transactional functions, adjust the routing configuration.
-
Configure the dialog flow for multi-language support. For example:
metadata: platformVersion: "1.0" main: true name: "ChipCardMultipleLingualQnA" context: variables: greeting: "string" name: "string" cancelChoice: "string" rb: "resourcebundle" states: detect: component: "System.DetectLanguage" properties: ... transitions: ... qna: component: "System.QnA" properties: botName: "ChipCardMultipleLingualQnA" matchFields: "categories+questions" viewAnswerLabel: "${rb.viewAnswerLabel}" moreAnswersLabel: "${rb.moreAnswersLabel}" transitions: actions: none: "unresolved" next: "detect" unresolved: component: "System.Output" properties: text: "${rb.NoMatch}" transitions: return: "done"
Reusable Q&A Skills
You can modularize your dialog flow definitions by creating reusable Q&A skills that can be called using the botName and QnaBotName properties that belong to the System.Intent and System.QnA components.
Example: botName property
...
states:
qna:
component: "System.QnA"
properties:
botName: "FinancialQnABot"
transitions:
actions:
none: "unresolved"
next: "qna"
unresolved:
component: "System.Output"
properties:
text: "Sorry, I did not find any match. Can you rephrase the question?"
transitions:
return: "done"Example: botName and QnABotName
botName and QnABotName both
have the same
value.states:
intent:
component: "System.Intent"
properties:
botName: "FinancialQnABot"
qnaMatchFields: "categories+questions"
variable: "iResult"
qnaEnable: true
    transitions:
      actions:
        Balances: "startBalances"
        Transactions: "startTxns"
        Send Money: "startPayments"
        Track Spending: "startTrackSpending"
        Dispute: "setDate"
        unresolvedIntent: "unresolved"
        qna: "qna"
...
qna:
component: "System.QnA"
properties:
botName: "FinancialQnABot"
matchFields: "categories+questions"
transitions:
actions:
none: "unresolved"
next: "intent"
Example: botName and qnaBotName in System.Intent
botName property in two different contexts: in the System.Intent component, where it calls a transactional skill and in the System.Qna component, where it calls a Q&A skill.states:
intent:
component: "System.Intent"
properties:
botName: "FinancialBot"
qnaBotName: "FinancialQnABot"
variable: "iResult"
qnaEnable: true
transitions:
actions:
Balances: "startBalances"
Transactions: "startTxns"
Send Money: "startPayments"
Track Spending: "startTrackSpending"
Dispute: "setDate"
unresolvedIntent: "unresolved"
qna: "qna"
...
qna:
component: "System.QnA"
properties:
botName: "FinancialQnABot"
transitions:
actions:
none: "unresolved"
next: "intent"Configure the Intent and Q&A Routing
We provide commonly used words and opening phrases that indicate commands or questions in the Q&A Routing Config page. You can add the domain-specific content to this page that enables the router to discern between Q&A and intents. To do this:
-
Click Settings (
 ) in the left navbar.
-
Click Q&A Routing Config.
-
Select a language.
-
Add or remove words and phrases in the following categories that impact the intent routing.
-
Transaction Config—You can add verbs and phrases that help the Intent engine identify a message as a transaction.
-
Additional Request Verbs—Messages beginning with requests or commands like buy, check, or cancel are considered transactional and get routed to an intent. These words, which are in the imperative mood, indicate a transaction, not a question.
We maintain a library of widely used imperative verbs for each supported language. Among them are words like pay, remove, and terminate. You can add company- or audience-specific request verbs.
-
Request Verb Expansion—A set of prefixes (un, dis, re) that, when applied request verbs that you added in the Additional Request Verbs field, increase the vocabulary that identifies a message as intent-bound.
-
Request Sentence Prefix—Words and phrases that are associated with requests, like Can you and Do not. Messages that begin with these words get routed as intents. We maintain a library of these transaction-oriented words and phrases which you can update.
-
-
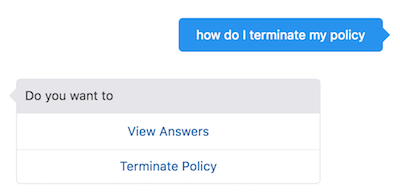
Question Config—A set of commonly used words and phrases that are typically used in questions. These include phrases like how do I and I need to know. They indicate that a user is asking a question, not requesting a transaction. When a skill receives a message that begins with one of these, it optimizes its response by prioritizing the link for the Q&A response over the link for the intent response. Usually, the behavior is the reverse: the skill gives the top spot to intents that score above the configured confidence threshold. For example, when a skill receives How do I terminate my policy, it can easily discern that the user is looking for information and places the View Answers link first.
When the user input is ambiguous, the Q&A link may not get the top ranking. For example, the router may not be able to identify can I terminate my policy as either an intent or Q&A. The skill shows both options because there is an intent scoring above the confidence threshold and a matching question, but ranks the intent first.
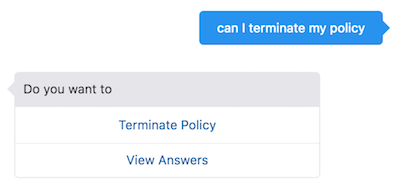
Description of the illustration prioritized-intent-response.png
-
