Using the CLI to Manage Compute Cloud@Customer Resources
You can use the OCI CLI to manage resources (compute, storage, and networking) on Compute Cloud@Customer the same way you use the OCI CLI to manage your tenancy resources.
To simplify the use the CLI on Compute Cloud@Customer, update your OCI CLI configuration as described in the following procedure.
Updating Your CLI Configuration to Access Compute Cloud@Customer
This procedure assumes that you already have the OCI CLI installed and configured for use in your OCI tenancy. These instructions describe how to update your OCI CLI environment to run OCI CLI commands on the Compute Cloud@Customer infrastructure.
The CLI environment can be configured in many different ways. This procedure describes only the key configuration items that enable CLI commands to run on the infrastructure. If you're familiar with configuring the CLI environment, you can adjust the steps to suit your CLI configuration practices.
Before You Begin
-
The OCI CLI must be installed on a Linux, macOS, or Microsoft Windows system that you use to run CLI commands. If the OCI CLI isn't installed, install and configure it to run in your tenancy before you perform the steps in this procedure. For instructions, see Command Line Interface (CLI).
-
You have an OCI configuration file that's configured to run CLI commands on your tenancy. The configuration file path name is
<home>/.oci/config. For more information, see Setting up the Configuration File and Configuration File Entries.
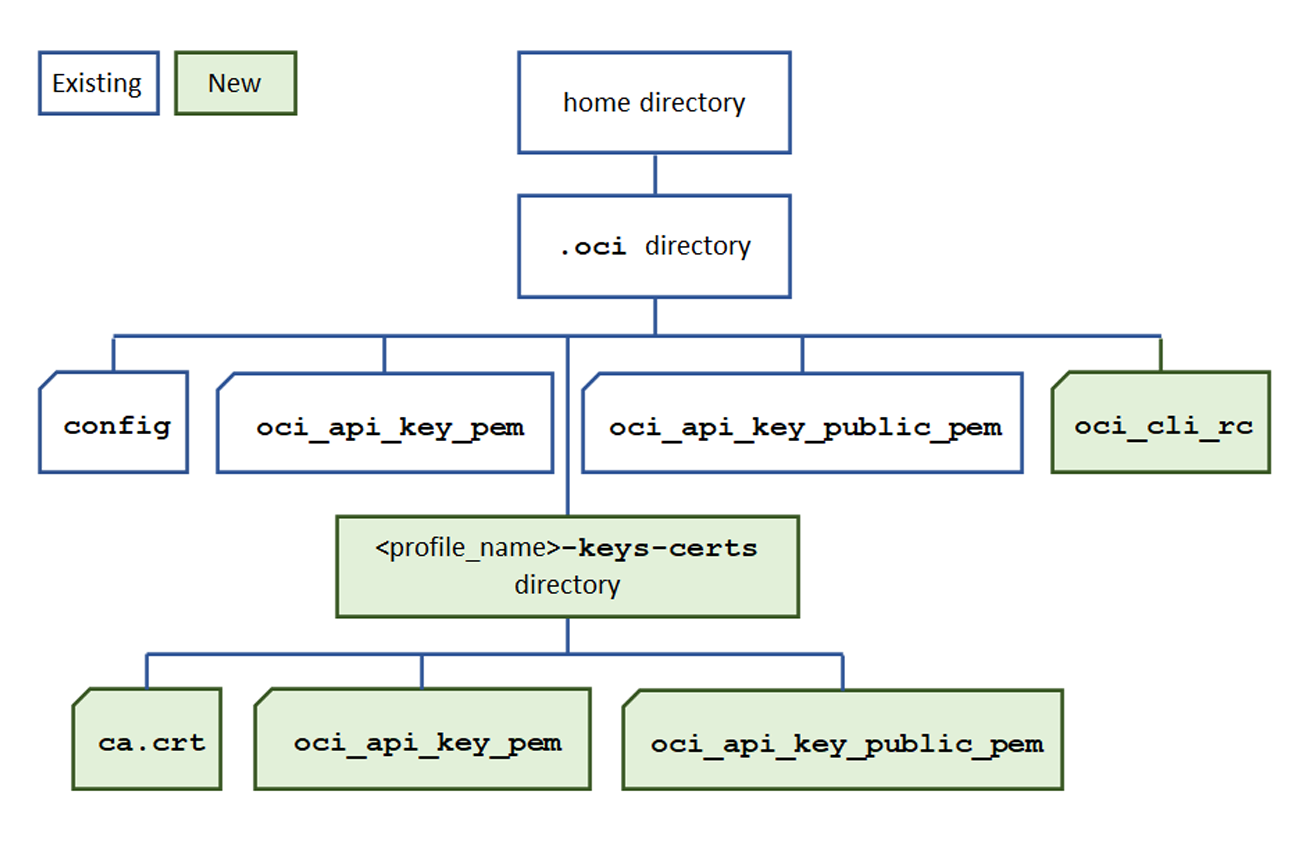
By the end of this procedure, the following updates are made to your CLI configuration:
- Creates a new directory for storing your API keys and ca.cert file.
- Adds a new
ca.crtcertificate file to enable the CLI to access the infrastructure. - Copies your API keys to a new directory.
- Creates a new CLI profile in the
configfile for running CLI commands on the infrastructure. - Adds the new profile to the
oci_cli_rcfile.
Your .oci directory will have the following structure:

The examples are for Linux. If you're using Microsoft Windows, use backslash as the directory separator in path names, instead of the forward slash.
-
Create a new directory in your
<home>/.ocidirectory for API key and certificate files.Suggestion: Include the new profile name (will be defined in the
configfile in a later step) in the directory name as shown in this example:cd ~/.oci mkdir cccadmin-keys-certs -
Copy your private and public API keys to the new directory.
Example:
cp oci_api_key.pem oci_api_key_public.pem ./cccadmin-keys-certsNote: The original key pair must remain in the
.ocidirectory to keep your tenancy authentication functional. -
Obtain the infrastructure's certificate authority (CA) chain file that's provided in the certificate bundle.
Obtain the certificate bundle using the following URL:
https://iaas.<system_name>.<domain_name>/cachainWhere
<system_name>is the name of the infrastructure, typically the same as the display name. And<domain_name>is the domain the infrastructure is in.Save the CA chain in a file with this path name:
<home>/.oci/<profile_name>-keys-certs/ca.cert -
Edit your
<home>/.oci/configfile, and copy and paste your current OCI profile so that it appears twice in the file.Example:
[DEFAULT] user=ocid1.user...unique_id fingerprint=xx:xx:xx:xx:xx:xx:xx:xx:xx:xx:xx:xx:xx:xx:xx:xx key_file=/home/.oci/oci_api_key.pem tenancy=ocid1.tenancy...unique_ID region=tenancy_region [DEFAULT] user=ocid1.user...unique_id fingerprint=xx:xx:xx:xx:xx:xx:xx:xx:xx:xx:xx:xx:xx:xx:xx:xx key_file=/home/.oci/oci_api_key.pem tenancy=ocid1.tenancy...unique_ID region=tenancy_region - In the copied profile, change these parameters:
Parameter Value Profile name
(such as
[DEFAULT])Change the this to a unique profile name, for example: [CCCADMIN].userNo change needed. fingerprintNo change needed. key_fileChange the path to /home/.oci/<profile_name>-keys-certstenancyNo change needed. regionChange the region so that it points to the Compute Cloud@Customer infrastructure using this format: region=<compute-cloud-customer_system_name>.<domain_name>where <compute-cloud-customer_system_name> is the name of the Compute Cloud@Customer infrastructure, and <domain_name> is the domain the infrastructure is in. Example:
region=ccc1.us.example.comNote
YouruserOCID andtenancyinformation is part of your IAM configuration in OCI. If you change any of these parameters, you might need to wait 10 to 15 minutes for the changes to be synchronized on the infrastructure. See Where to Manage IAM. -
Modify or create a
<home>/.oci/oci_cli_rcfile.If you don't have an
oci_cli_rcfile, you can create one with a text editor, or use theoci-cli-rccommand. See oci-cl-rc CLI Reference page.You must specify the same profiles in your
oci_cli_rcfile that you have specified in yourconfigfile.The following example shows the addition of the
CCCADMINprofile with the path to the newca.crtfile.[DEFAULT] cert-bundle=/home/username/.oci/ca.crt [CCCADMIN] cert-bundle=/home/username/.oci/cccadmin-keys-certs/ca.crtNote
The
oci_cli_rcfile is used to provide various OCI CLI default values and other configuration information. If you have other parameters specified for your tenancy profile, you can include them for the new profile that you're adding to theoci_cli_rcfile. -
Verify your changes, then save the
configfile.Example
configfile:[DEFAULT] user=ocid1.user...unique_id fingerprint=xx:xx:xx:xx:xx:xx:xx:xx:xx:xx:xx:xx:xx:xx:xx:xx key_file=/home/.oci/oci_api_key.pem tenancy=ocid1.tenancy...unique_ID region=tenancy_region [CCCADMIN] user=ocid1.user...unique_id fingerprint=xx:xx:xx:xx:xx:xx:xx:xx:xx:xx:xx:xx:xx:xx:xx:xx key_file=/home/.oci/oci_api_key.pem tenancy=ocid1.tenancy...unique_ID region=ccc1.us.example.comYou can create as many profiles as you like. For example, if you have several infrastructures, you can create a profile for each infrastructure.
-
Test your new OCI CLI profile by specifying the
--profile <profile_name>option with a command.Example:
oci iam user list --profile CCCADMINNote
You might encounter a warning message stating the permissions on theconfigoroci_cli_rcfile are too open. If this happens, follow the instructions in the warning message to resolve the issue.
Running CLI Commands on the Infrastructure
The required CLI arguments you need to use to reach the Compute Cloud@Customer infrastructure depend on how you've configured your CLI environment. Here are some common scenarios:
-
If you updated your CLI configuration to access Compute Cloud@Customer, use the (
--profile
                profile_name
) option on the command line. The profile provides the CLI with the infrastructure's region and certificate information.Example of listing images in a compartment on an infrastructure:
oci compute image list --compartment-id ocid.compartment...uniqueID --profile CCCADMIN -
If you didn't update your CLI configuration, you might need to include these CLI arguments:
--region
                  <compute-cloud-customer_system_name>.<domain_name>
--cert-bundle <full_path_to_CA_certificate_bundle>
Example of listing images in a compartment on an infrastructure:
oci compute image list --compartment-id ocid.compartment...uniqueID --region ccc1.us.example.com --cert-bundle <path_to_cert_file>
-
Get help on the command line:
oci --help oci network --help oci network vcn create --help - Get Started with the Command Line Interface
- Command Line Reference
- Compute Cloud@Customer CLI Reference Section