Integrating Vision with Oracle Analytics Cloud (OAC)
Create a Data Integration flow that uses the Vision SDK to detect objects in images and project that information into a table in a data warehouse. This output data is then used by Oracle Analytics Cloud to create visualizations and find patterns.
This is the high-level flow of the system between Vision and OAC: 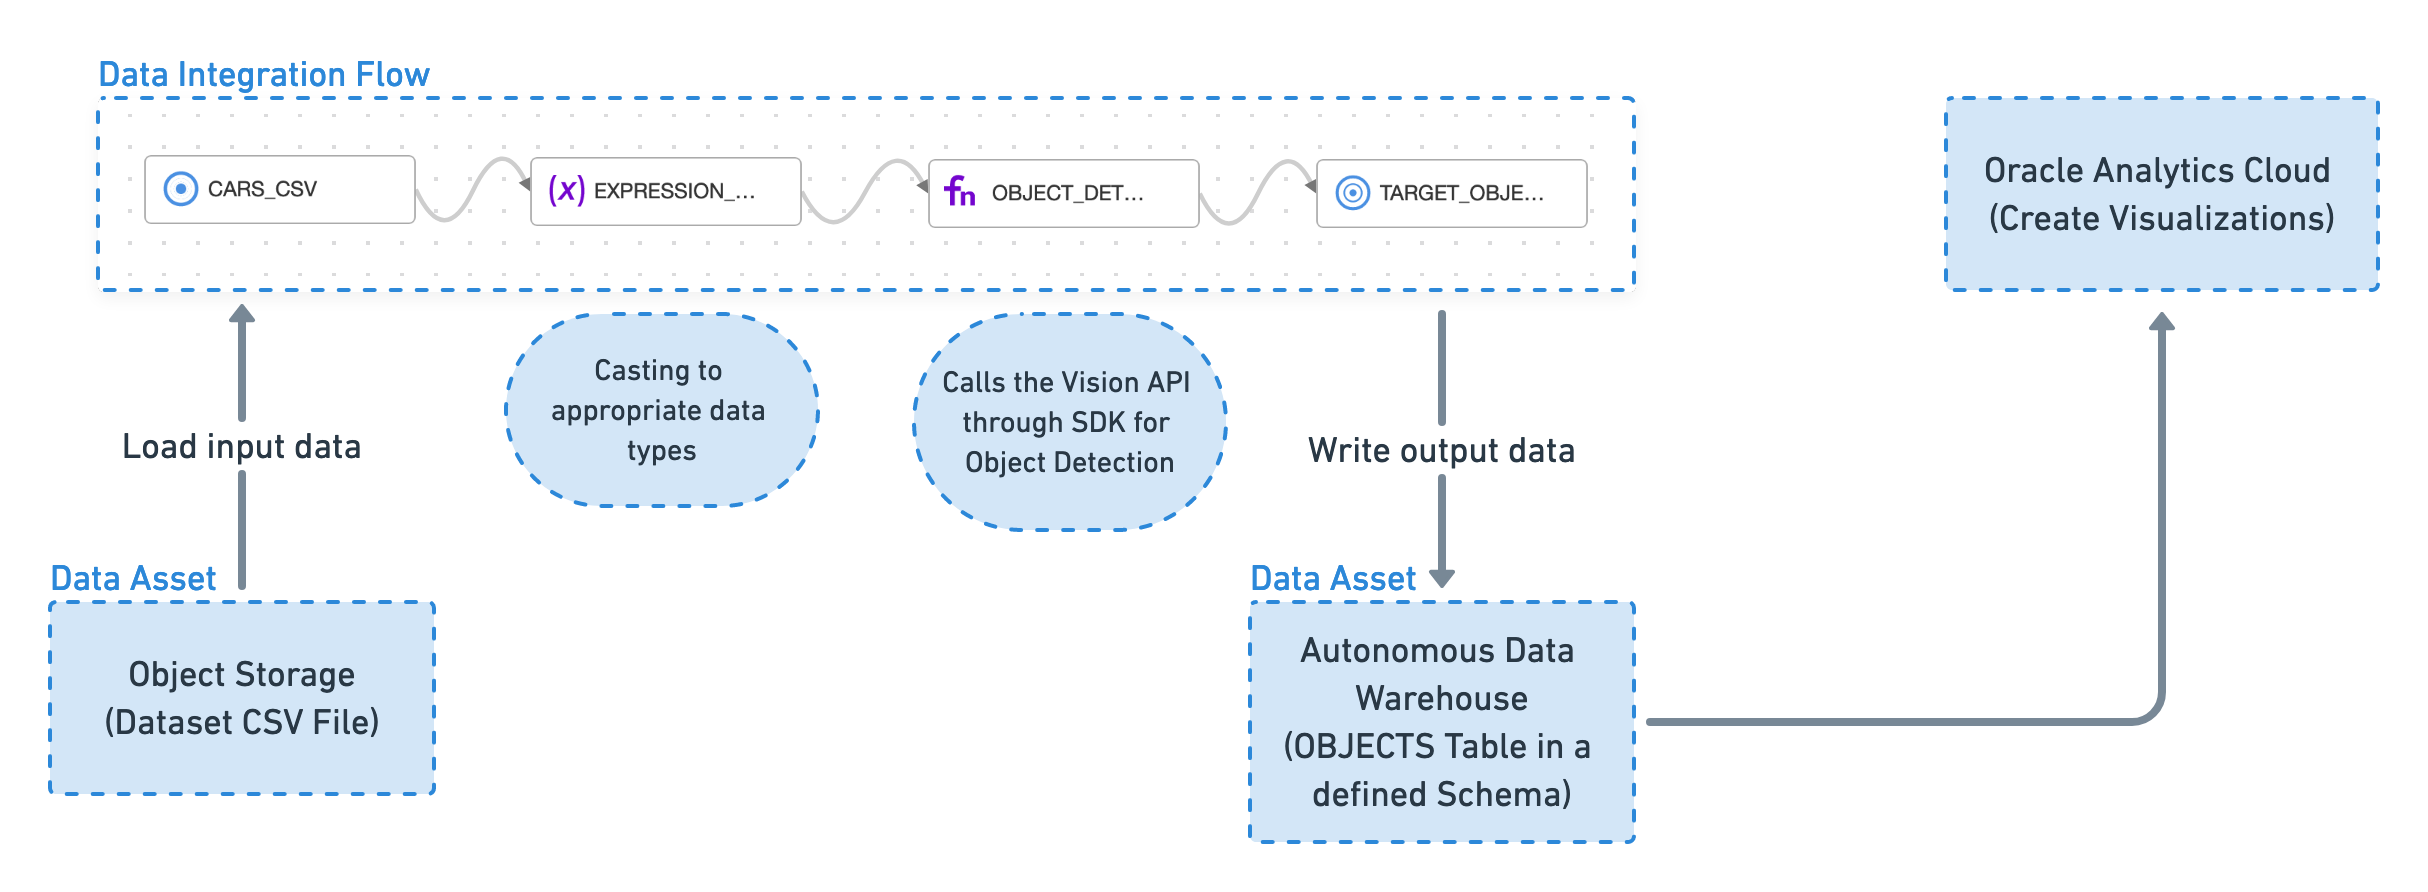
Before You Begin
To follow this tutorial, you must be able to create VCN networks, functions, and API gateways, and use Data Integration and Vision.
Talk to your administrator about the policies required.
Setting Up the Required Policies
Follow these steps to set up the required policies.
1. Create a Virtual Cloud Network
Create a VCN to serve as the home for the serverless function and the API gateway created later in the tutorial.
1.1 Creating a VCN with Internet Access
Follow these steps to create a VCN with internet access.
- In the navigation menu, select Networking.
- Select Virtual Cloud Networks.
- Slick Start VCN Wizard.
- Select Create VCN with Internet Connectivity.
- Select Start VCN Wizard.
- Enter a name for the VCN. Avoid entering confidential information.
- Select Next.
- Select Create.
1.2 Accessing your VCN from the Internet
You must add a new stateful ingress rule for the public regional subnet to allow traffic on port 443.
Complete 1.1 Creating a VCN with Internet Access before trying this task.
The API Gateway communicates on port 443, which isn't open by default.
2. Creating an API Gateway
An API Gateway lets you to aggregate all the functions you created into a single end-point that can be consumed by your users.
Complete 1. Create a Virtual Cloud Network before trying this task.
3. Create an Enrichment Function
Follow these steps to create an enrichment function than can be called from Oracle Cloud Infrastructure Data Integration.
Create a serverless function that only runs on demand. The function conforms to the schema required to be consumed by Data Integration. The serverless function calls Vision's API through Python SDK.
3.1 Creating an Application
To add a function, first we need to create an application.
Complete 2. Creating an API Gateway before trying this task.
3.2 Creating a Function
Follow these steps to create a function in your application.
Complete 3.1 Creating an Application before trying this task.
The fastest way is to have the system generate a Python template.
Recommended content for func.yaml.
schema_version: 20180708
name: object-detection
version: 0.0.1
runtime: python
build_image: fnproject/python:3.8-dev
run_image: fnproject/python:3.8
entrypoint: /python/bin/fdk /function/func.py handler
memory: 256
timeout: 300Recommended content for requirements.txt.
fdk>=0.1.40
oci
https://objectstorage.us-ashburn-1.oraclecloud.com/n/axhheqi2ofpb/b/vision-oac/o/vision_service_python_client-0.3.9-py2.py3-none-any.whl
pandas
requestsRecommended content for func.py.
import io
import json
import logging
import pandas
import requests
import base64
from io import StringIO
from fdk import response

import oci
from vision_service_python_client.ai_service_vision_client import AIServiceVisionClient
from vision_service_python_client.models.analyze_image_details import AnalyzeImageDetails
from vision_service_python_client.models.image_object_detection_feature import ImageObjectDetectionFeature
from vision_service_python_client.models.inline_image_details import InlineImageDetails

def handler(ctx, data: io.BytesIO=None):
    signer = oci.auth.signers.get_resource_principals_signer()
    resp = do(signer,data)
    return response.Response(
        ctx, response_data=resp,
        headers={"Content-Type": "application/json"}
    )

def vision(dip, txt):
    encoded_string = base64.b64encode(requests.get(txt).content)

    image_object_detection_feature = ImageObjectDetectionFeature()
    image_object_detection_feature.max_results = 5
    features = [image_object_detection_feature]
    analyze_image_details = AnalyzeImageDetails()
    inline_image_details = InlineImageDetails()
    inline_image_details.data = encoded_string.decode('utf-8')
    analyze_image_details.image = inline_image_details
    analyze_image_details.features = features
    try:
        le = dip.analyze_image(analyze_image_details=analyze_image_details)
    except Exception as e:
        print(e)
        return ""
    if le.data.image_objects is not None:
      return json.loads(le.data.image_objects.__repr__())
    return ""


def do(signer, data):
    dip = AIServiceVisionClient(config={}, signer=signer)

    body = json.loads(data.getvalue())
    input_parameters = body.get("parameters")
    col = input_parameters.get("column")
    input_data = base64.b64decode(body.get("data")).decode()
    df = pandas.read_json(StringIO(input_data), lines=True)
    df['enr'] = df.apply(lambda row : vision(dip,row[col]), axis = 1)
    #Explode the array of aspects into row per entity
    dfe = df.explode('enr',True)
    #Add a column for each property we want to return from imageObjects struct
    ret=pandas.concat([dfe,pandas.DataFrame((d for idx, d in dfe['enr'].iteritems()))], axis=1)


    #Drop array of aspects column
    ret = ret.drop(['enr'],axis=1)
    #Drop the input text column we don't need to return that (there may be other columns there)
    ret = ret.drop([col],axis=1)
    if 'name' not in ret.columns:
        return pandas.DataFrame(columns=['id','name','confidence','x0','y0','x1','y1','x2','y2','x3','y3']).to_json(orient='records')
    for i in range(4):
        ret['x' + str(i)] = ret.apply(lambda row: row['bounding_polygon']['normalized_vertices'][i]['x'], axis=1)
        ret['y' + str(i)] = ret.apply(lambda row: row['bounding_polygon']['normalized_vertices'][i]['y'], axis=1)
    ret = ret.drop(['bounding_polygon'],axis=1)

    rstr=ret.to_json(orient='records')
    return rstr
3.3 Deploying the Function
3.4 Invoking the Function
Test the function by calling it.
Complete 3.3 Deploying the Function before trying this task.
{"data":"eyJpZCI6MSwiaW5wdXRUZXh0IjoiaHR0cHM6Ly9pbWFnZS5jbmJjZm0uY29tL2FwaS92MS9pbWFnZS8xMDYxOTYxNzktMTU3MTc2MjczNzc5MnJ0czJycmRlLmpwZyJ9", "parameters":{"column":"inputText"}}{"id":1,"inputText":"https://<server-name>/api/v1/image/106196179-1571762737792rts2rrde.jpg"}echo '{"data":"<data-payload>", "parameters":{"column":"inputText"}}' | fn invoke <application-name> object-detection[{"id":1,"confidence":0.98330873,"name":"Traffic Light","x0":0.0115499255,"y0":0.4916201117,"x1":0.1609538003,"y1":0.4916201117,"x2":0.1609538003,"y2":0.9927374302,"x3":0.0115499255,"y3":0.9927374302},{"id":1,"confidence":0.96953976,"name":"Traffic Light","x0":0.8684798808,"y0":0.1452513966,"x1":1.0,"y1":0.1452513966,"x2":1.0,"y2":0.694972067,"x3":0.8684798808,"y3":0.694972067},{"id":1,"confidence":0.90388376,"name":"Traffic sign","x0":0.4862146051,"y0":0.4122905028,"x1":0.8815201192,"y1":0.4122905028,"x2":0.8815201192,"y2":0.7731843575,"x3":0.4862146051,"y3":0.7731843575},{"id":1,"confidence":0.8278353,"name":"Traffic sign","x0":0.2436661699,"y0":0.5206703911,"x1":0.4225037258,"y1":0.5206703911,"x2":0.4225037258,"y2":0.9184357542,"x3":0.2436661699,"y3":0.9184357542},{"id":1,"confidence":0.73488903,"name":"Window","x0":0.8431445604,"y0":0.730726257,"x1":0.9992548435,"y1":0.730726257,"x2":0.9992548435,"y2":0.9893854749,"x3":0.8431445604,"y3":0.9893854749}]4. Adding a Functions Policy
Create a policy so that the function can be used with Vision.
Complete 3. Create an Enrichment Function before trying this task.
5. Creating an Oracle Cloud Infrastructure Data Integration Workspace
Before you can use Data Integration, ensure you have the rights to use the capability.
Complete 4. Adding a Functions Policy before trying this task.
Create the policies that let you to use Data Integration.
6. Adding Data Integration Policies
Update your policy so you can use Data Integration.
Complete 5. Creating an Oracle Cloud Infrastructure Data Integration Workspace before trying this task.
7. Prepare the Data Sources and Sinks
You're using car parking images along with the date the images were taken as sample data.
Gather 10 images (or more) of parked cars as the data source on which you perform object detection analysis using Data Integration and Vision.
7.1 Loading Sample Data
Load the parked car images sample data to your bucket.
Complete 6. Adding Data Integration Policies before trying this task.
7.2 Creating a Staging Bucket
Data Integration needs a staging location to dump intermediate files in, before publishing data to a data warehouse.
Complete 7.1 Loading Sample Data before trying this task.
- In the Console navigation menu, select Storage.
- Select Buckets.
- Select Create Bucket.
-
Give it a suitable Name, for example,
data-staging. Avoid entering confidential information. - Select Create.
- Accept all default values.
7.3 Preparing the Target Database
Configure your target Autonomous Data Warehouse database to add a schema and a table.
Complete 7.2 Creating a Staging Bucket before trying this task.
7.4 Creating a Table to Project the Analyzed Data
Create a table to store any information about the detected objects.
Complete 7.3 Preparing the Target Database before trying this task.
8. Use a Data Flow in Data Integration
Create the components necessary to create a data flow in Data Integration.
The data flow is: 
All the underlying storage resources were created in earlier chapters. In Data Integration, you create the data assets for each of the elements of the data flow.
8.1 Creating a Data Asset for your Source and Staging
Create a data asset for your source and staging data.
Complete 7. Prepare the Data Sources and Sinks before trying this task.
8.2 Creating a Data Asset for your Target
Create a data asset for the target data warehouse.
Complete 8.1 Creating a Data Asset for your Source and Staging before trying this task.
8.3 Creating a Data Flow
Create a data flow in Data Integration to ingest the data from file.
Complete 8.2 Creating a Data Asset for your Target before trying this task.
- On the vision-lab project details page, select Data Flows.
- Select Create Data Flow.
- In the data flow designer, select the Properties panel.
-
For Name, enter
lab-data-flow. - Select Create.
8.4 Adding a Data Source
Now add a data source to your data flow.
Complete 8.3 Creating a Data Flow before trying this task.
Having created the data flow in 8.3 Creating a Data Flow, the designer remains open and you can add a data source to it using the following steps:
8.5 Adding an Expression
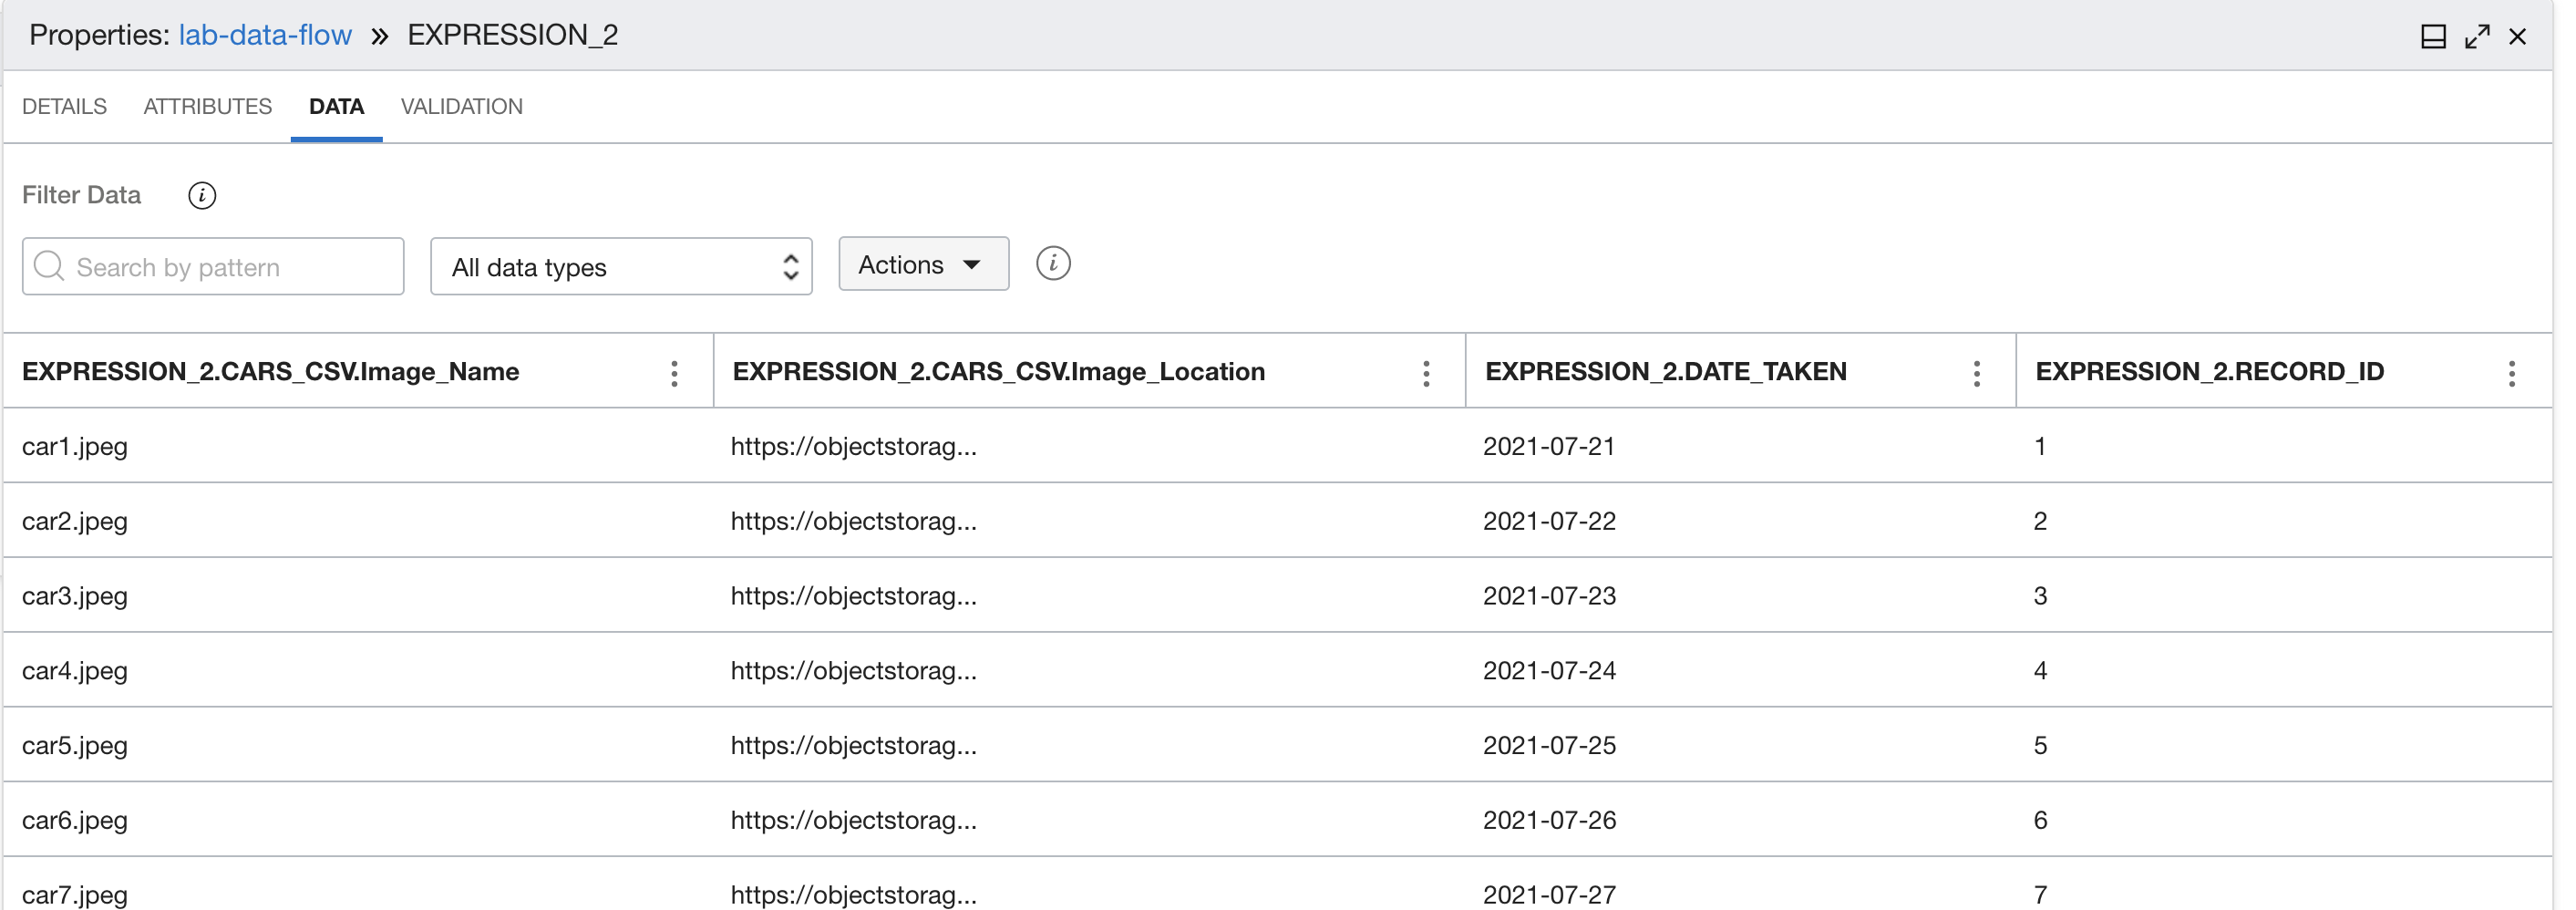
Add an expression to change the format of the ID to integer, and
the format of the date_taken field to a date.
Complete 8.4 Adding a Data Source before trying this task.
8.6 Adding a Function
Add a function to the Data Flow to extract objects from the input images.
Complete 8.5 Adding an Expression before trying this task.
8.7 Mapping the Output to the Data Warehouse Table
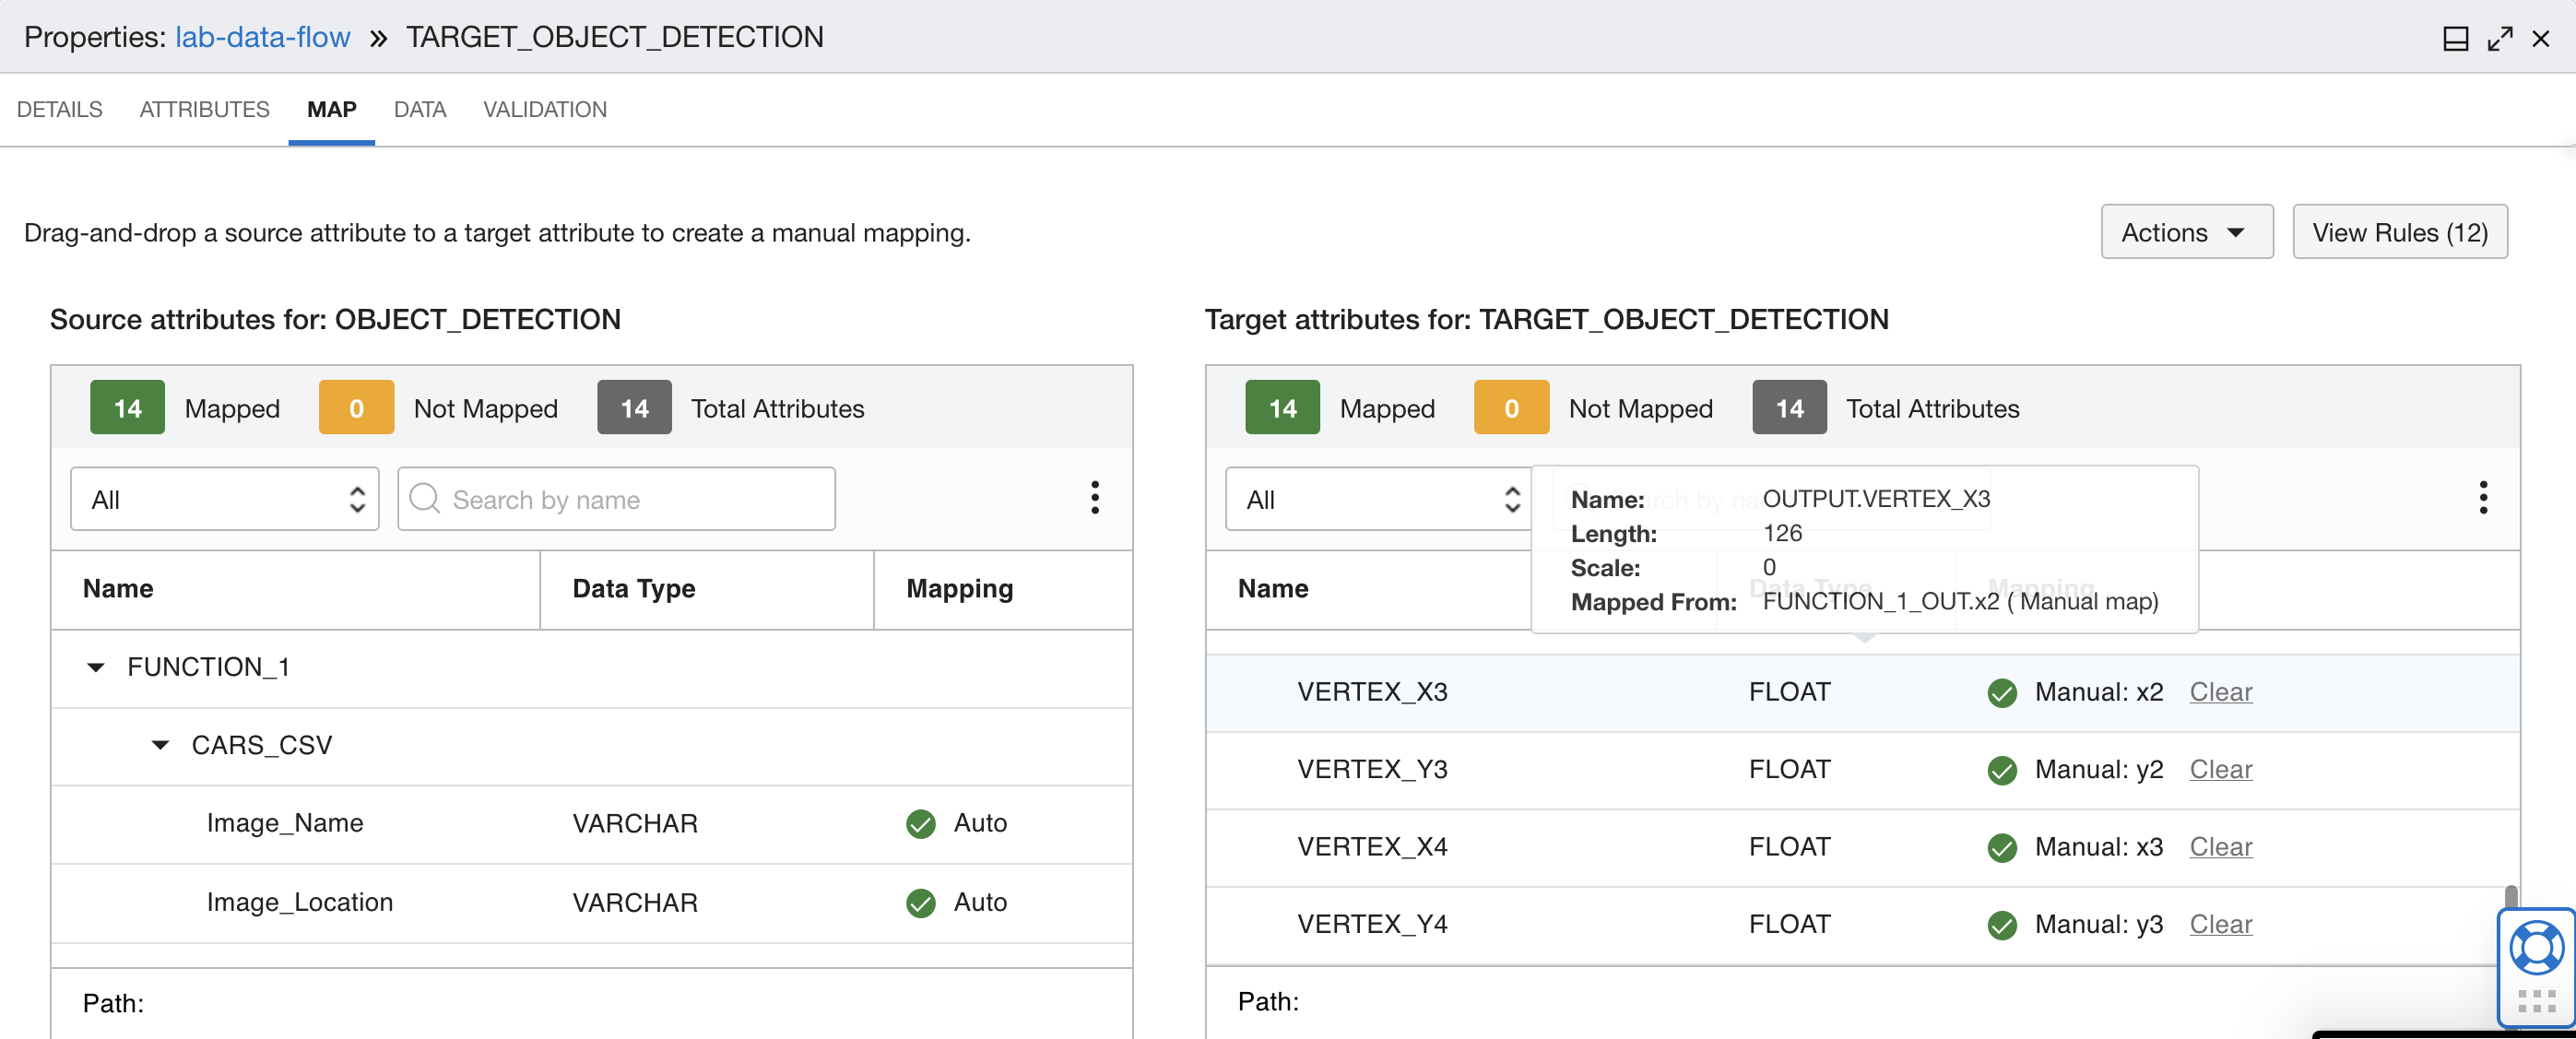
Map the output of the sentiment analysis to the Data Warehouse Table.
Complete 8.6 Adding a Function before trying this task.
8.8 Running the Data Flow
Run the data flow to populate the target database.
Complete 8.7 Mapping the Output to the Data Warehouse Table before trying this task.
9. Visualize the Data in Analytics Cloud
Display the data you created using Analytics Cloud.
You need access to Analytics Cloud and to create an Analytics Cloud instance.
9.1 Creating an Analytics Cloud Instance
Follow these steps to create an Analytics Cloud instance.
Complete 8. Use a Data Flow in Data Integration before trying this task.
- From the Console navigation menu, select Analytics & AI.
- Select Analytics Cloud.
- Select the Compartment,
- Select Create Instance.
- Enter a Name. Don't enter confidential information
-
Select
2 OCPUs. The other configuration parameters keep as the default values. - Select Create.
9.2 Creating a Connection to the Data Warehouse
Follow these steps to set up a connection from your Analytics Cloud instance to your data warehouse.
Complete 9.1 Creating an Analytics Cloud Instance before trying this task.
9.3 Creating a Dataset
Follow these steps to create a dataset.
Complete 9.2 Creating a Connection to the Data Warehouse before trying this task.
- Select Data.
- Select Create.
- Select Create a New Dataset.
- Select your data warehouse.
- From USER1 database, drag the OBJECTS table onto the canvas.
- Save your dataset.
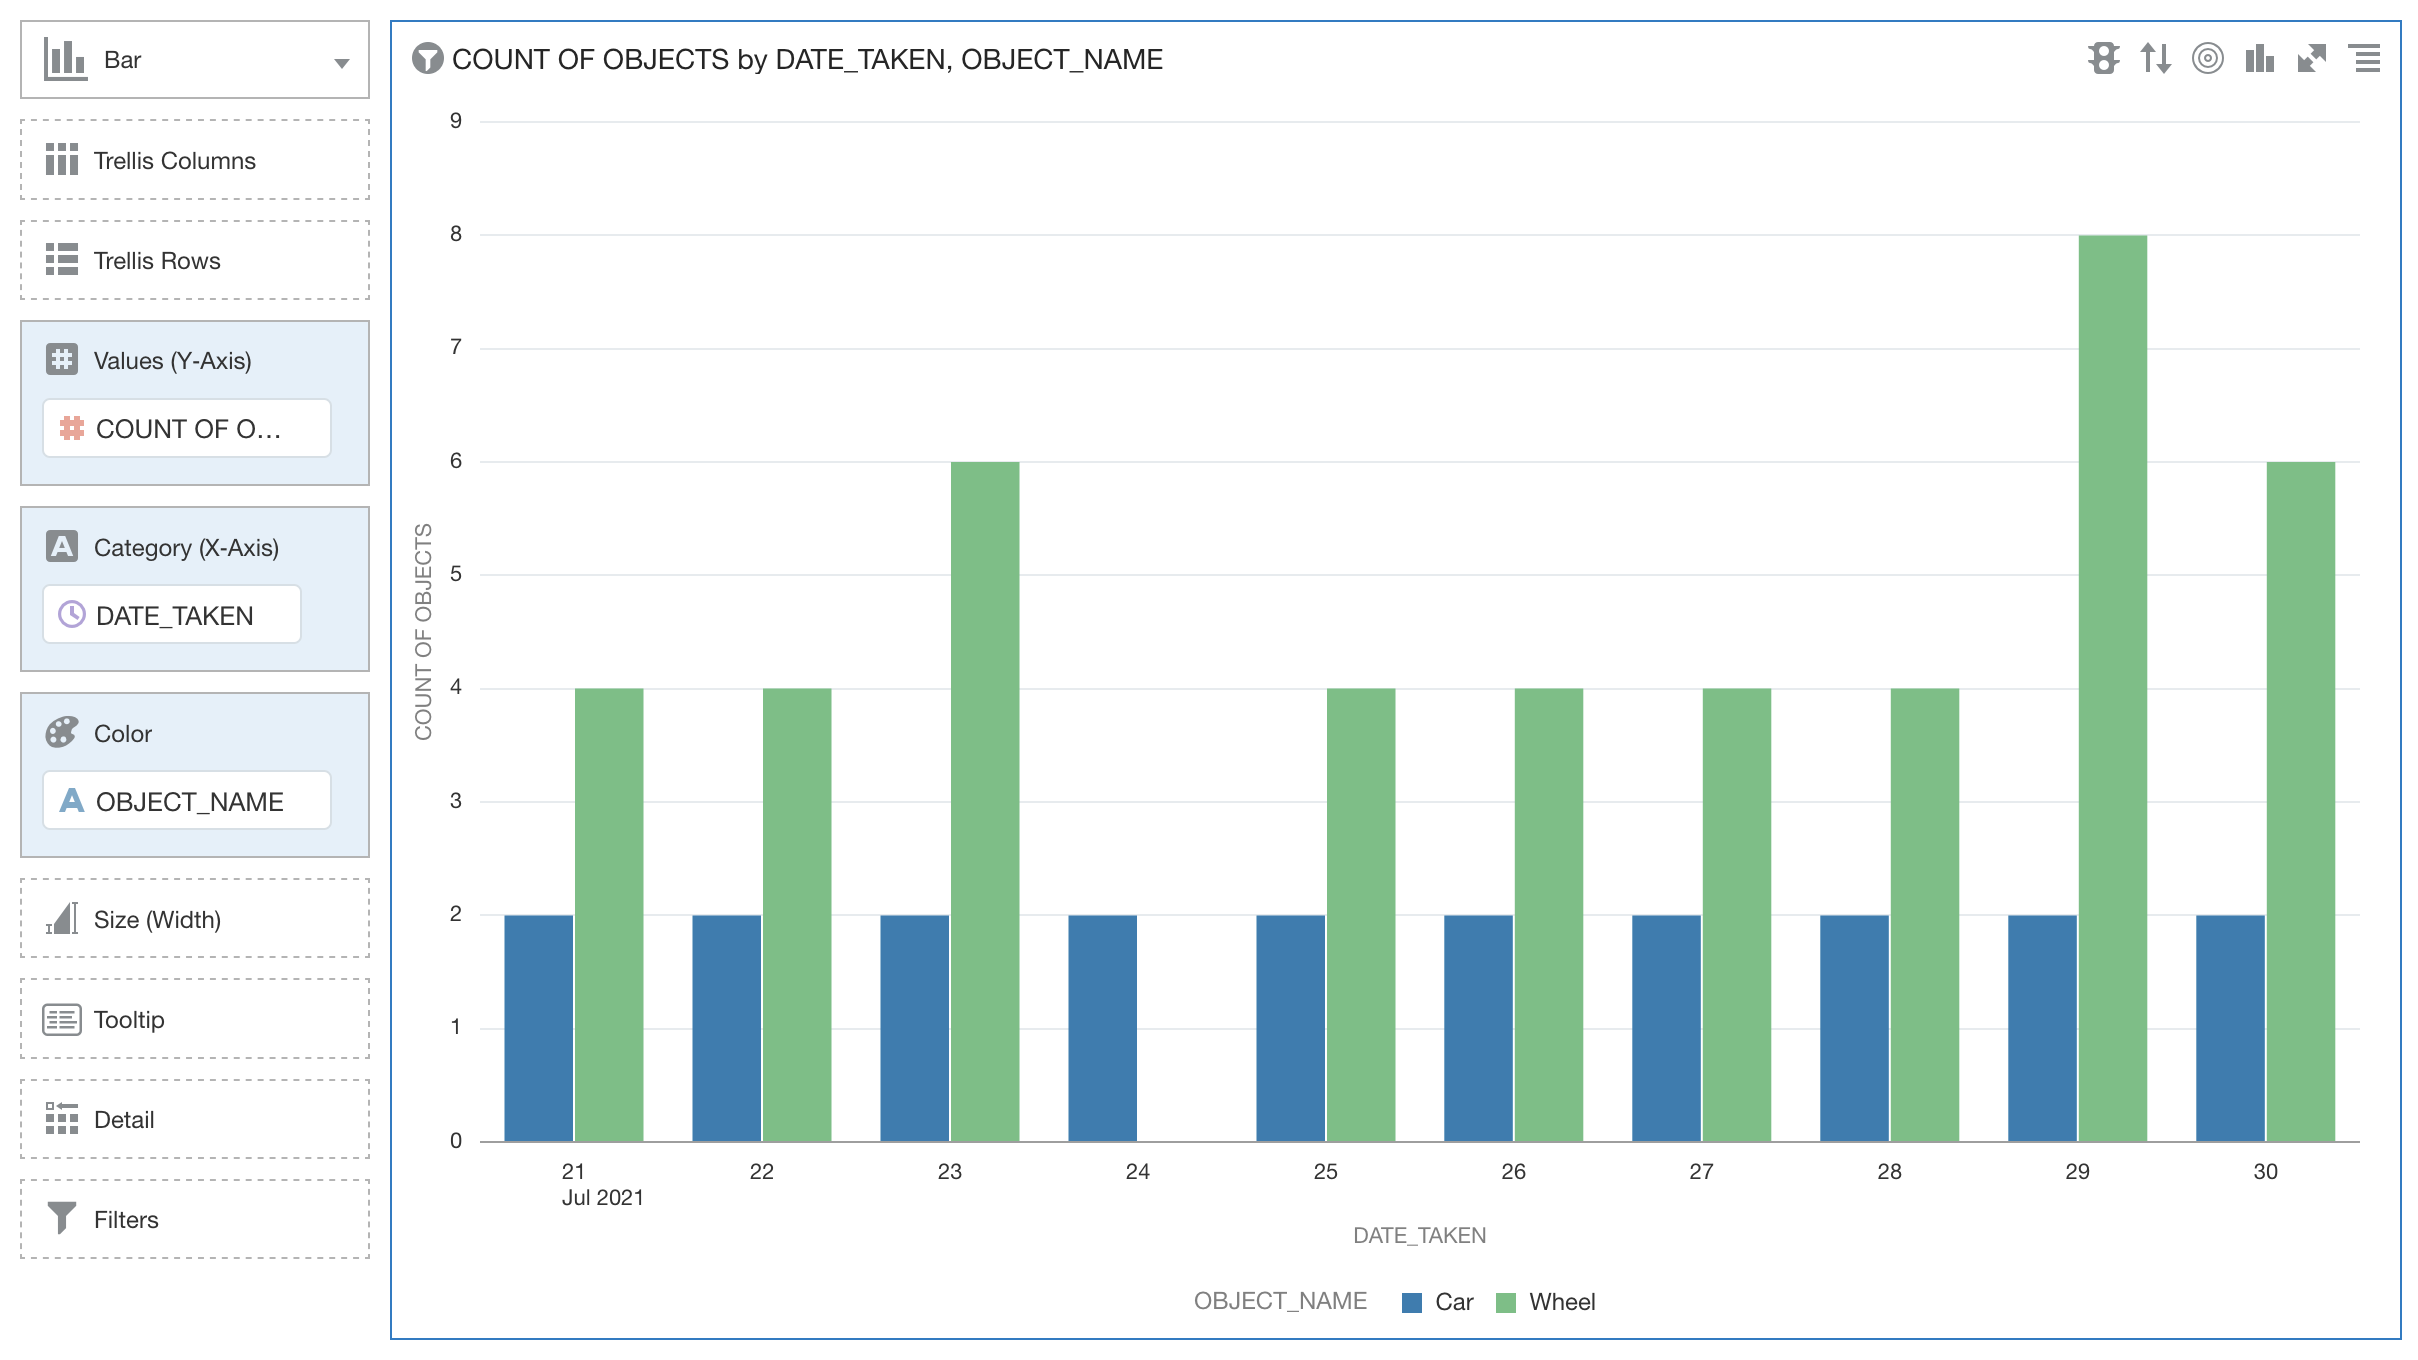
9.4 Creating a Visualization
Follow these steps to display your data in Analytics Cloud.
Complete 9.3 Creating a Dataset before trying this task.

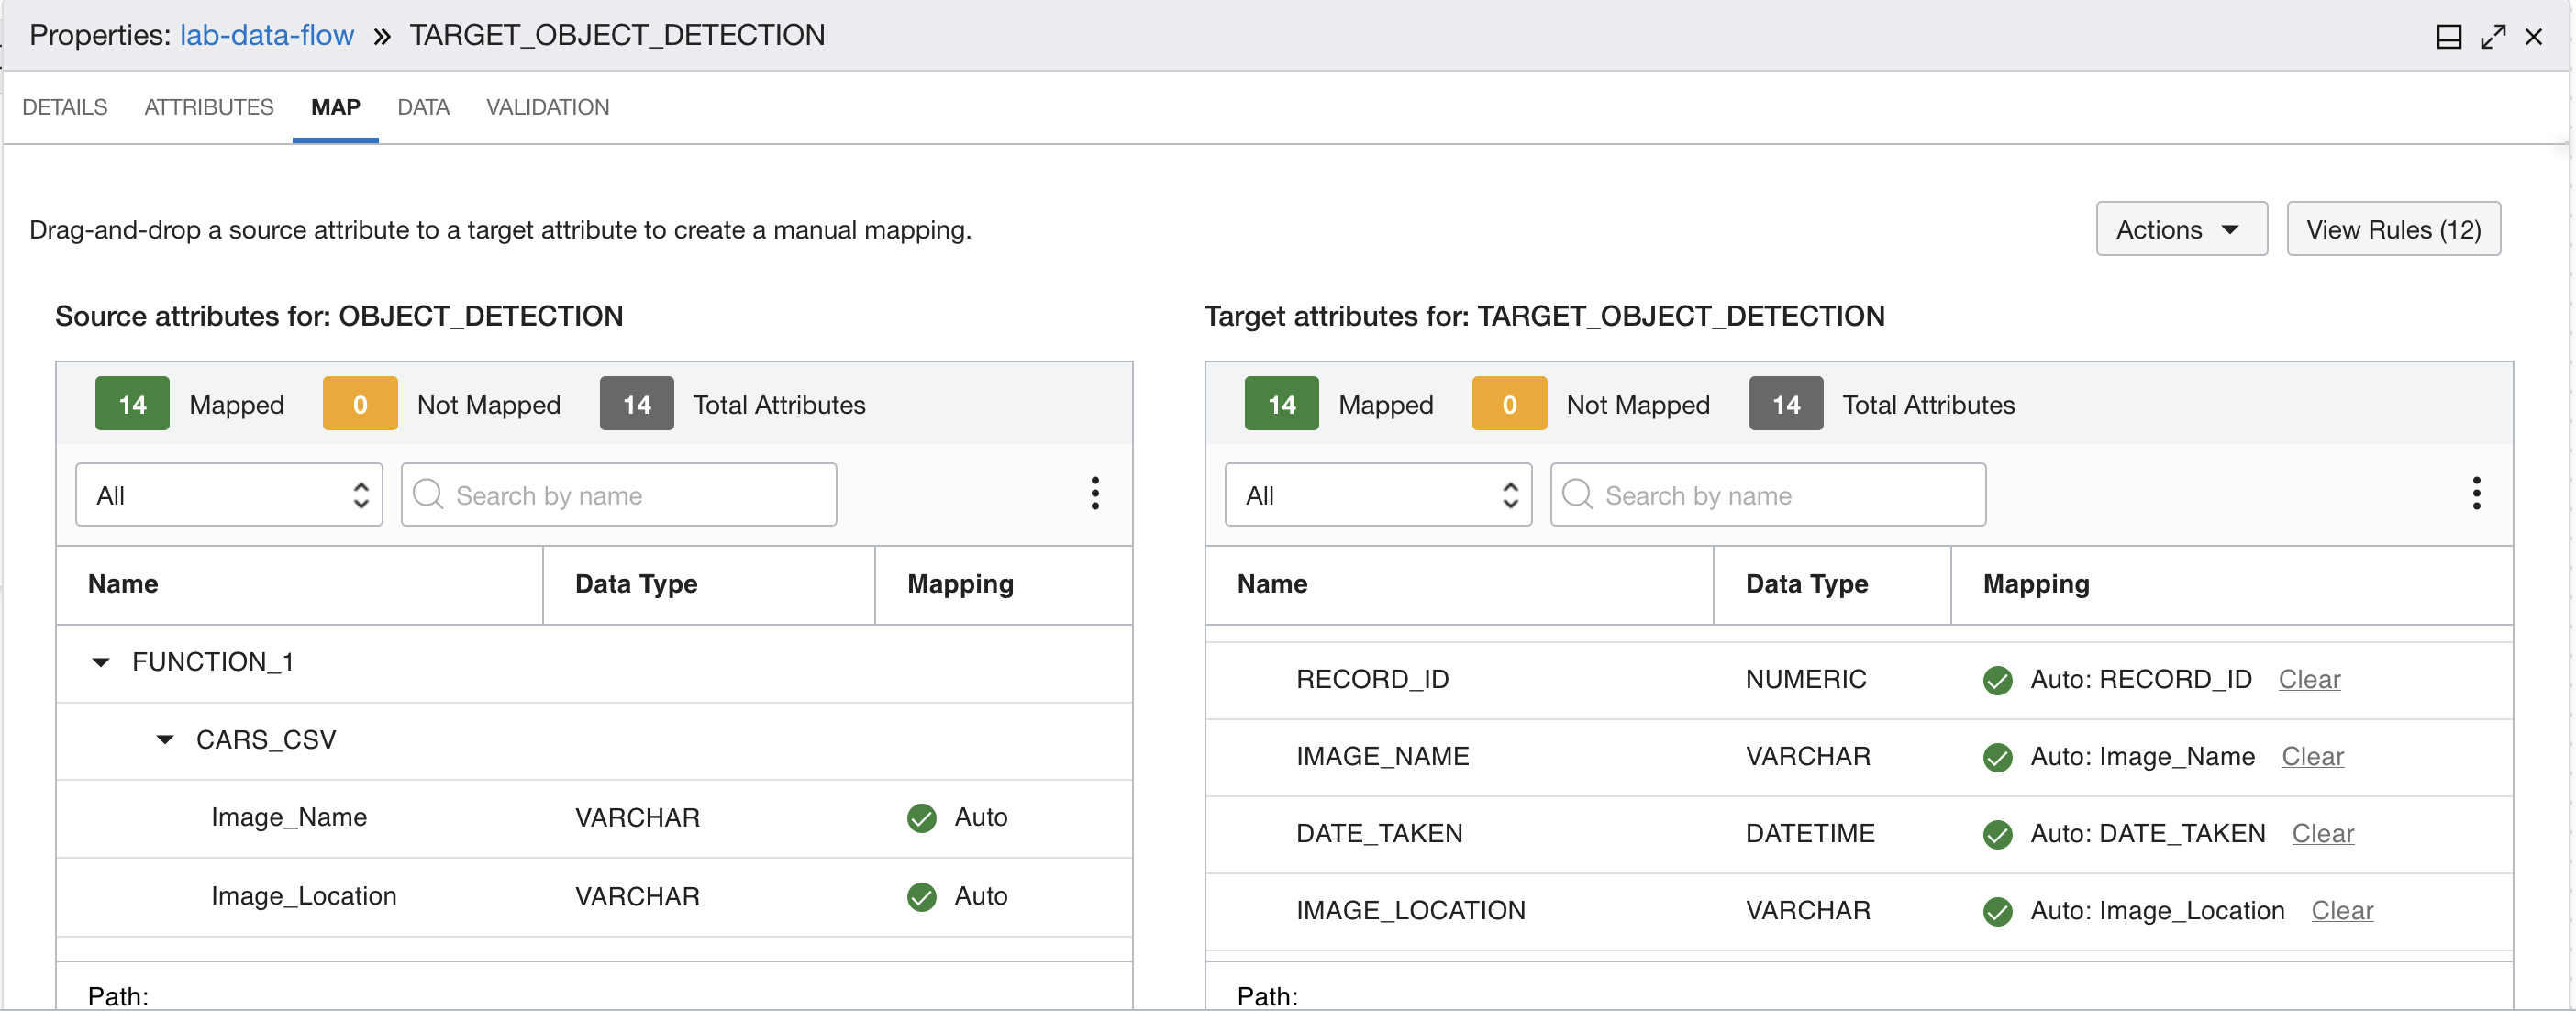 Mappings Five to Eight
 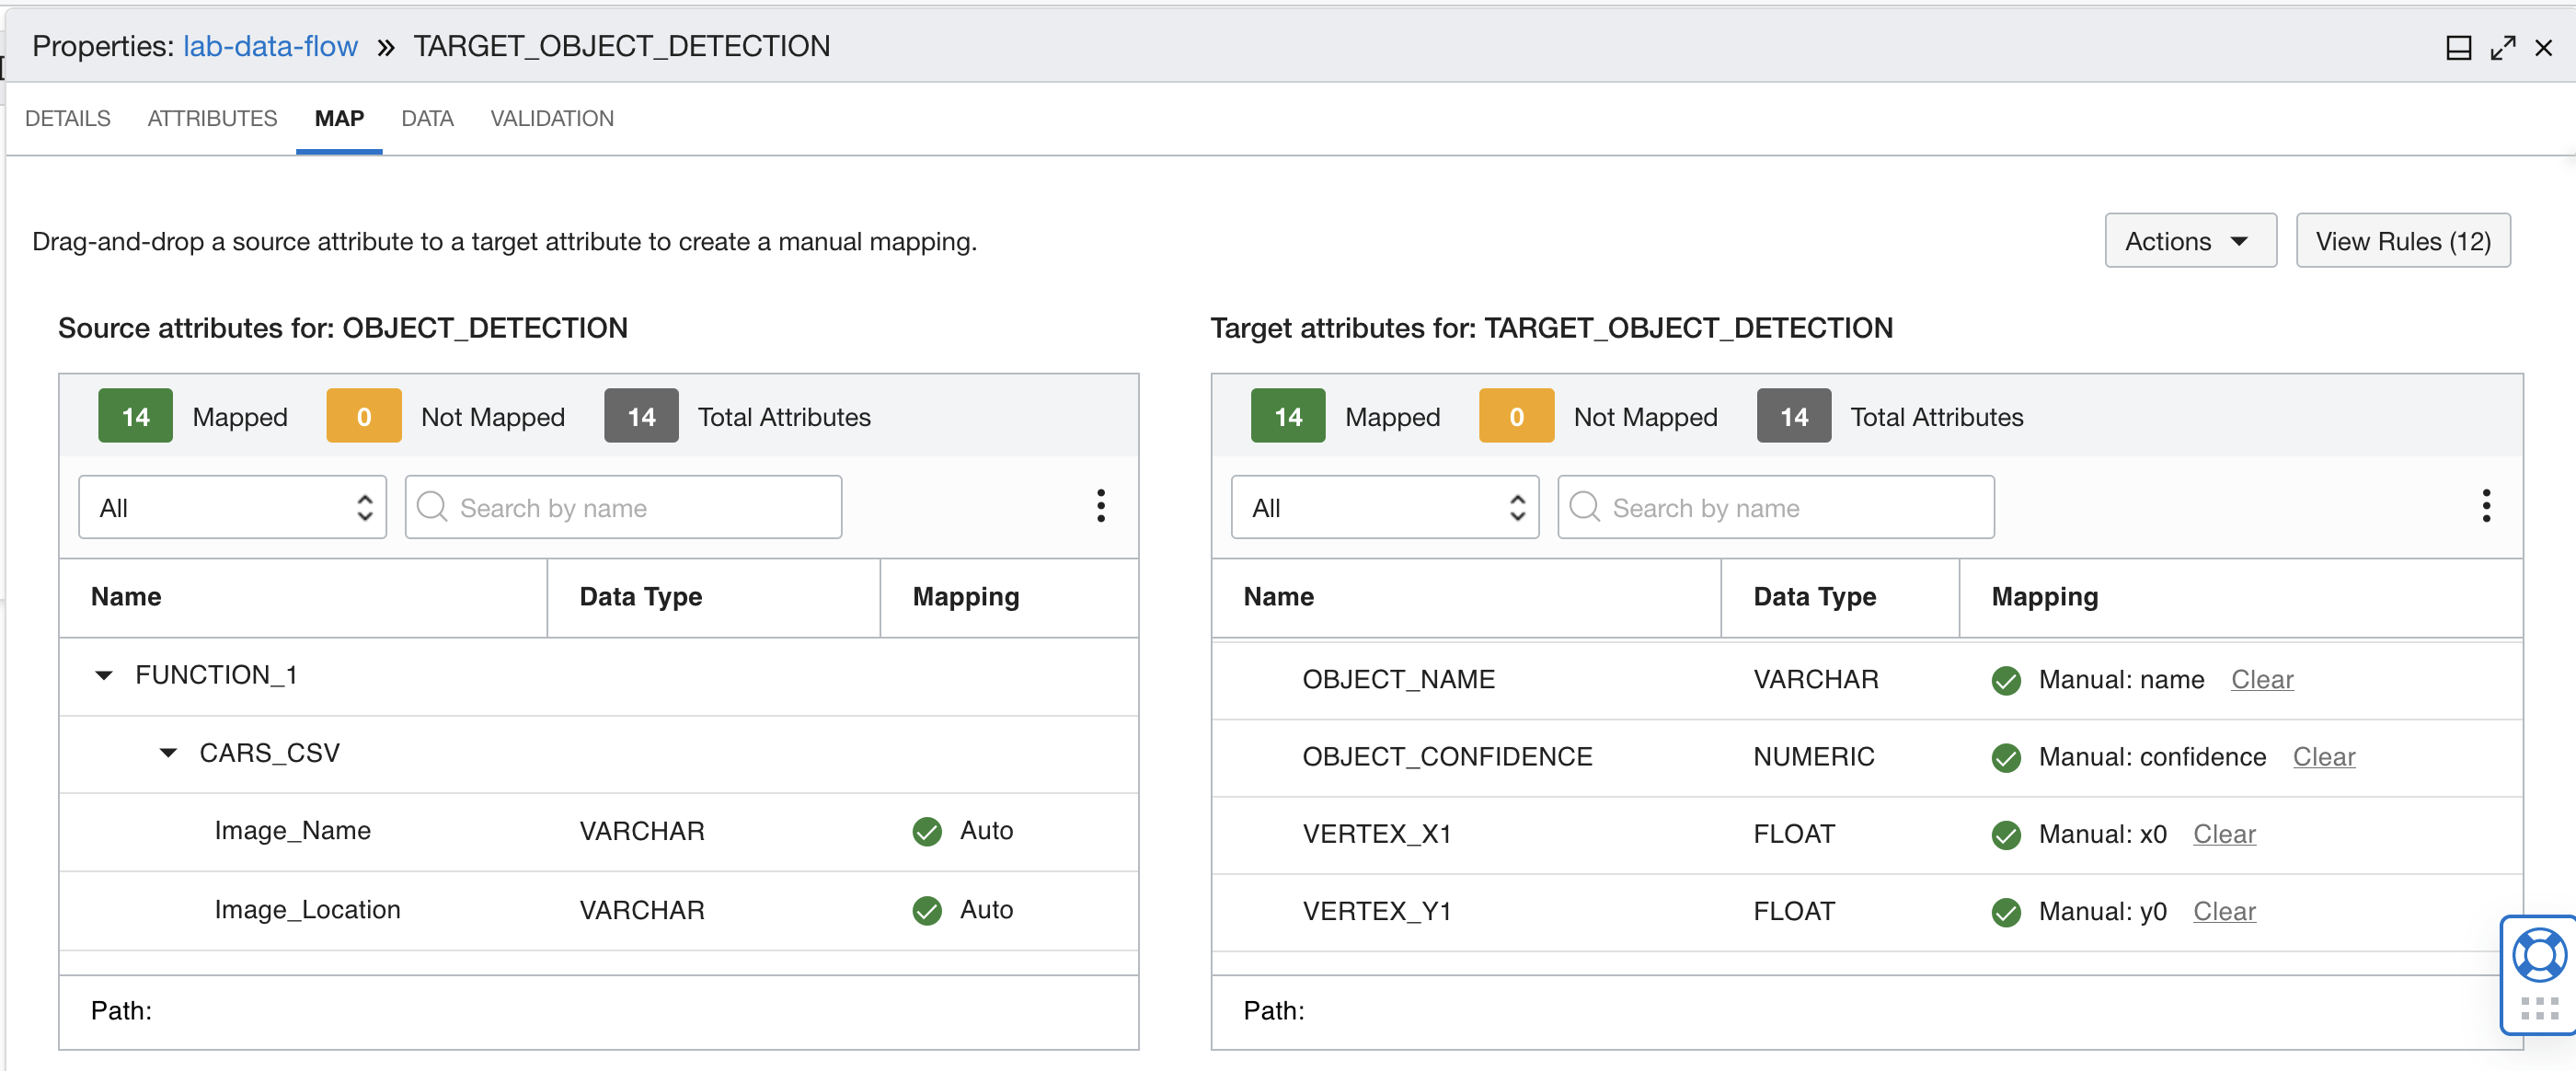 Mappings Nine to Twelve
 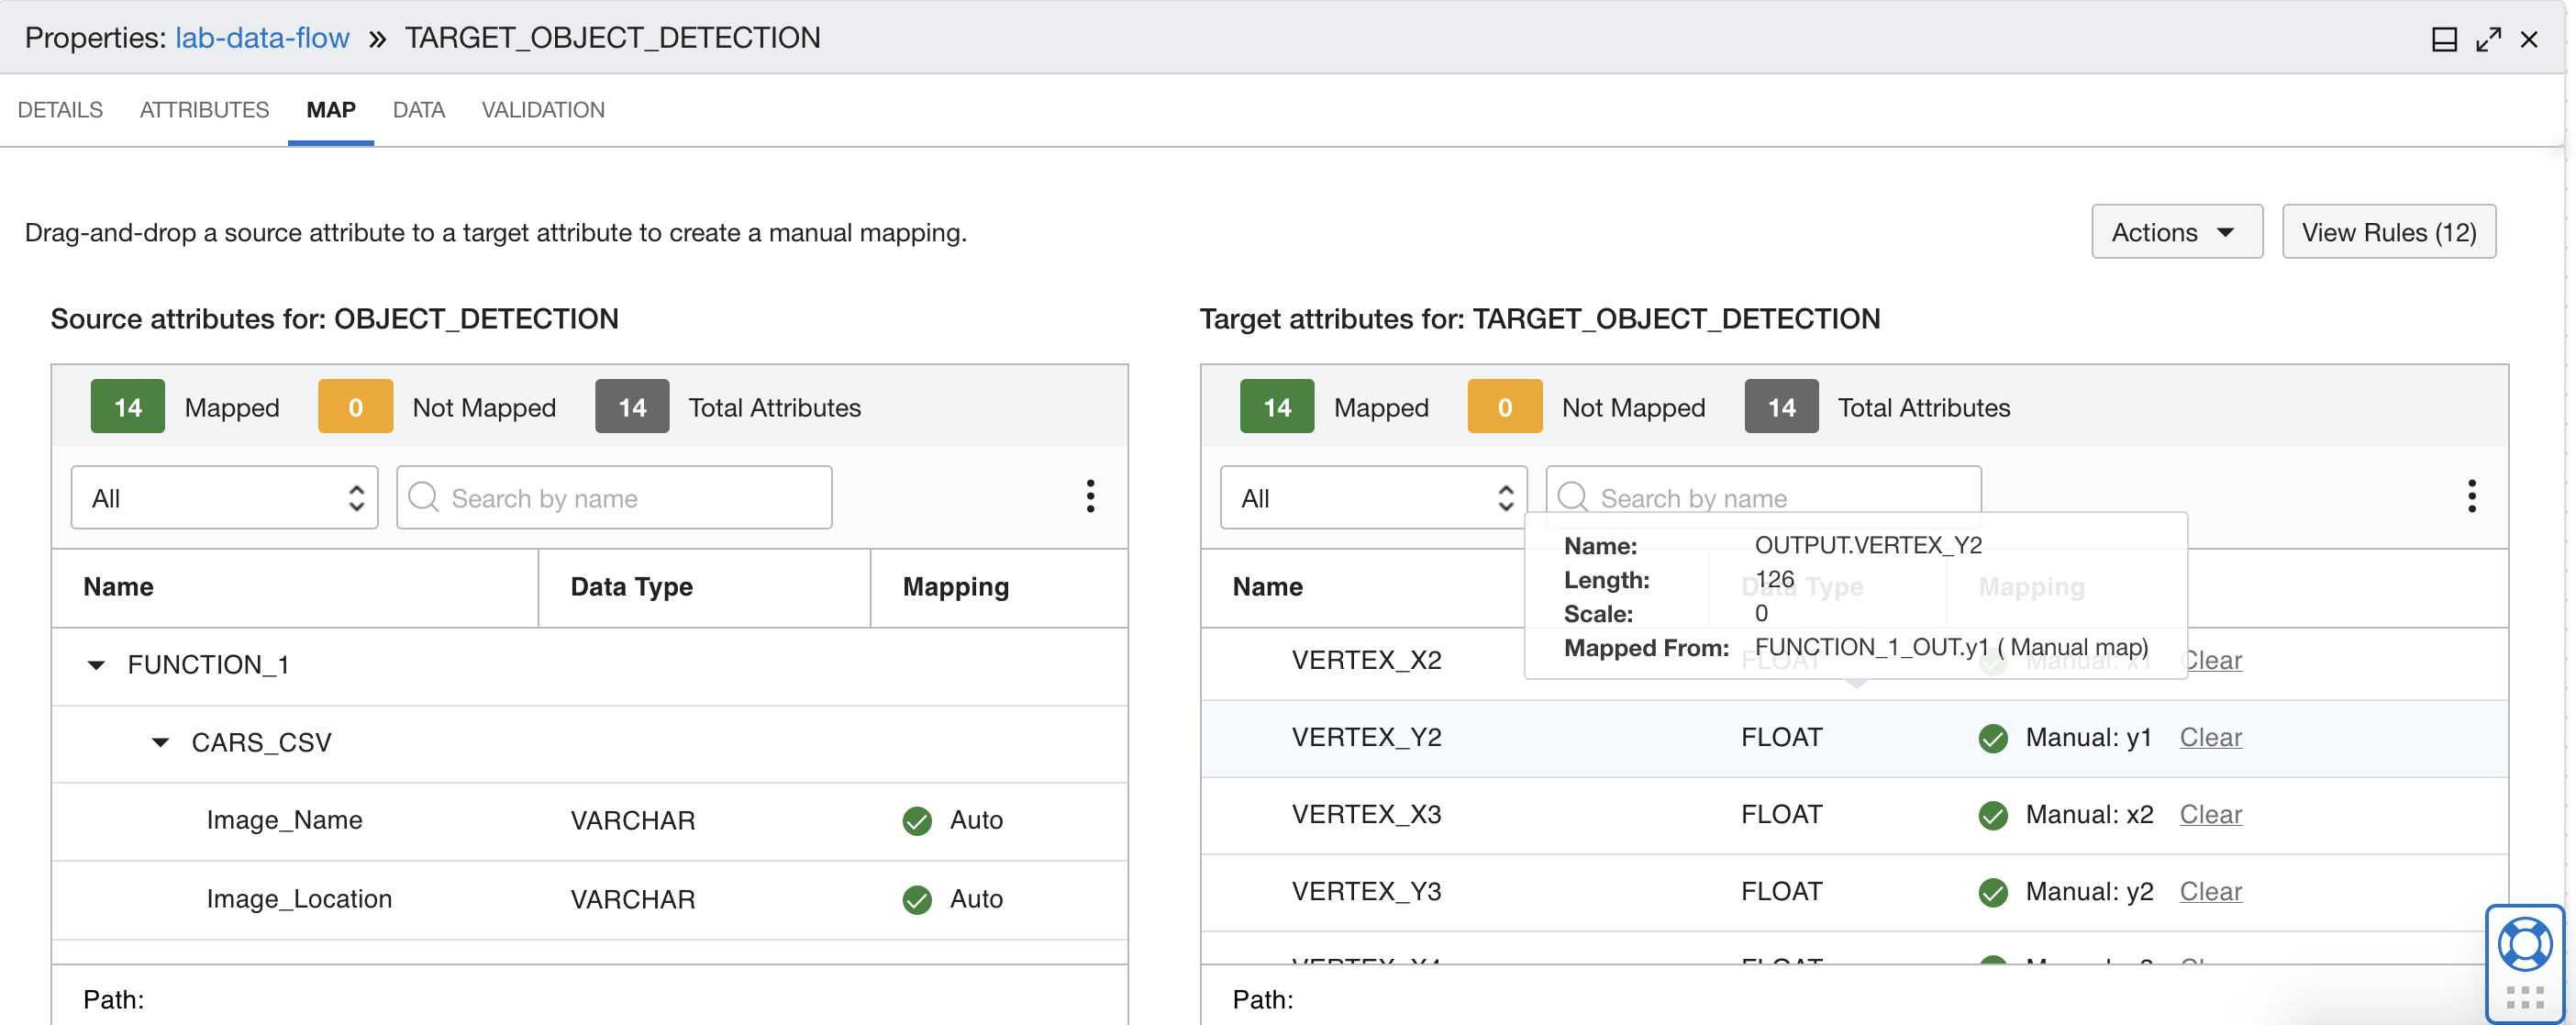 Mappings Thirteen and Fourteen