Adding Nodes to a Cluster
Learn how to add extra nodes to a Red Hat OpenShift cluster deployed in OCI.
Prerequisites
Before you begin, ensure you have the following:
-
A functioning OpenShift cluster in OCI.
-
Access to the OpenShift Console and the cluster provisioned in OCI, including its
kubeconfigfile. -
Permissions to manage OCI Compute instances and load balancers. See the Overview of IAM and Common Policies for more information.
Part 1: Generate and Upload ISO Image
To add nodes to an existing OpenShift cluster, you must first generate a bootable ISO image for node provisioning, upload it to OCI Object Storage, and generate a pre-authenticated request (PAR) URL to use in the Terraform configuration.
- For Assisted Installer: You can use either the Red Hat Hybrid Cloud Console or the OpenShift CLI version 4.17 or later. For more information, see Adding hosts with the web console and Use the OpenShift CLI (oc) to generate an ISO image in Red Hat documentation.
- For Agent-based Installer: You must use the OpenShift CLI (oc) version 4.17 or later to create the image. For more information, see Use the OpenShift CLI (oc) to generate an ISO image in Red Hat documentation.
To upload the ISO image to the object storage bucket and generate pre-authenticated request URL, see Uploading Red Hat ISO Image to Object Storage. You need to provide this pre-authenticated request URL when entering the OpenShift Image Source URI.
Part 2: Provision Compute Nodes in OCI
Follow the instructions in this section to provision OCI
Compute nodes using the add-nodes.zip file in the Resource Manager service.
-
Navigate to the oci-openshift-releases page in GitHub. From the Assets section of the required release, download the
add-nodes.zipfile. Previous versions of the file are also available. - Sign in to the OCI Console. If you need instructions, see Sign In to the Console in the OCI Getting Started guide.
- Open the navigation menu and select Developer Services. Under Resource Manager, select Stacks.
- Select Create stack
-
In the Stack information section, select the My configuration. Select .zip file and upload the
add-nodes.zipfile. After specifying the configuration source, select Next. - In the OpenShift Cluster Configuration section, provide your tenancy and compartment OCIDs. For the OpenShift Image Source URI, paste the pre-authenticated request URL of the ISO image you uploaded in part 1.
- In the Networking Configuration section, specify the networking compartment, existing VCN, existing private subnet for OCP and bare metal, and existing public subnet.
- In the Control Plane Node Configuration section, specify the details for the control plane nodes you want to add to the cluster. For details on the node variables, including shape, OCPU, memory, boot volume size, and volume performance units (VPUs), see the Creating OpenShift Container Platform Infrastructure topic.
- In the Compute Node Configuration section, specify the details for the compute nodes you want to add to the cluster.
- Select Create to create the stack. The Console redirects to the stack details page for the new stack.
-
On the stack details page, select Apply to create an apply job and provision the new nodes for the cluster. After running an apply job, get the job's details to check its status. Succeeded (
SUCCEEDED) indicates that the job has completed.
Part 2: Add Nodes to Cluster
After you complete the steps in Provision Compute Nodes for an OpenShift Cluster section, your new nodes are ready to be added to your OpenShift cluster. Follow the instructions based on your cluster type.
Assisted Installer Cluster Instructions (Console)
If you created your cluster with the Assisted installer, you can use the Red Hat Hybrid Cloud Console and the cluster console to add your new nodes to the cluster and approve their certificate signing requests (CSRs).
Alternately, you can perform these tasks using the OpenShift CLI (oc) version 4.17 or later. To use the CLI, follow the instructions in Add nodes to a cluster with the CLI.
-
Select Compute, then select Nodes to navigate to the list of nodes available to your cluster.
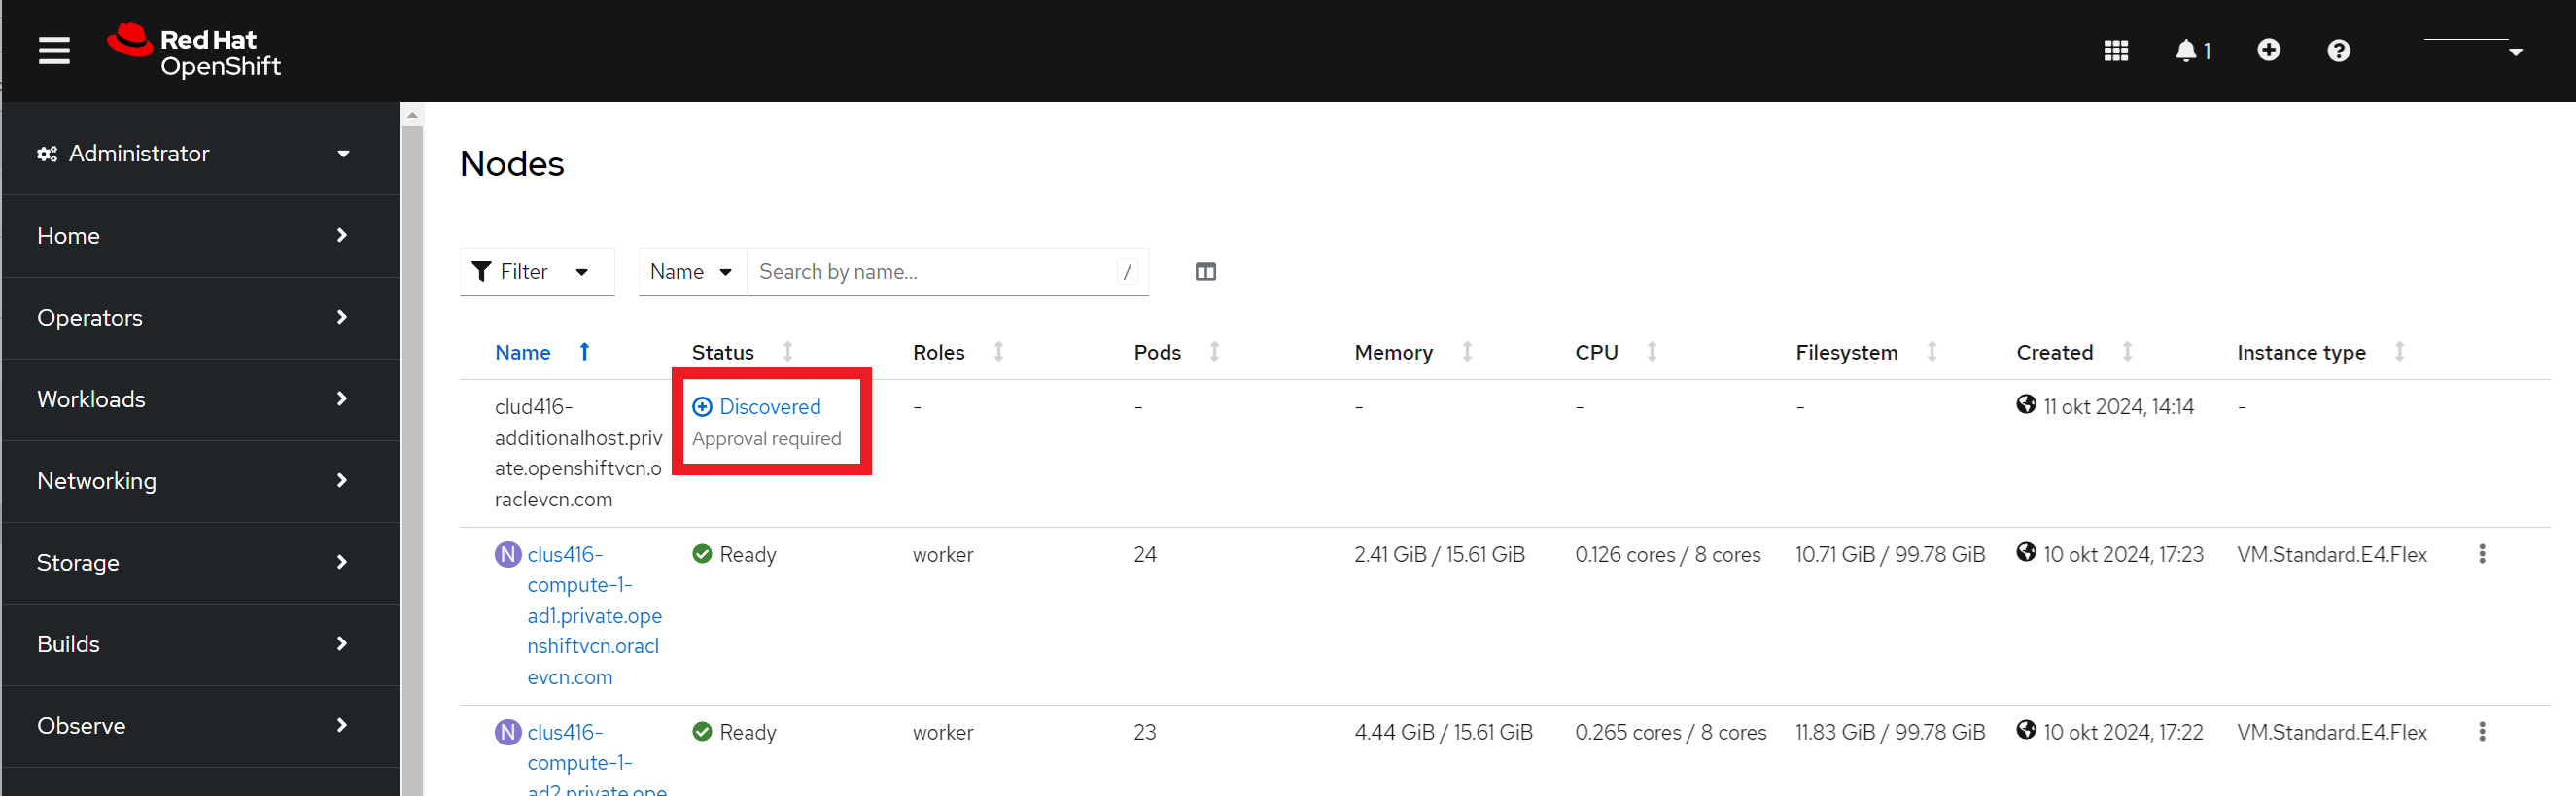
-
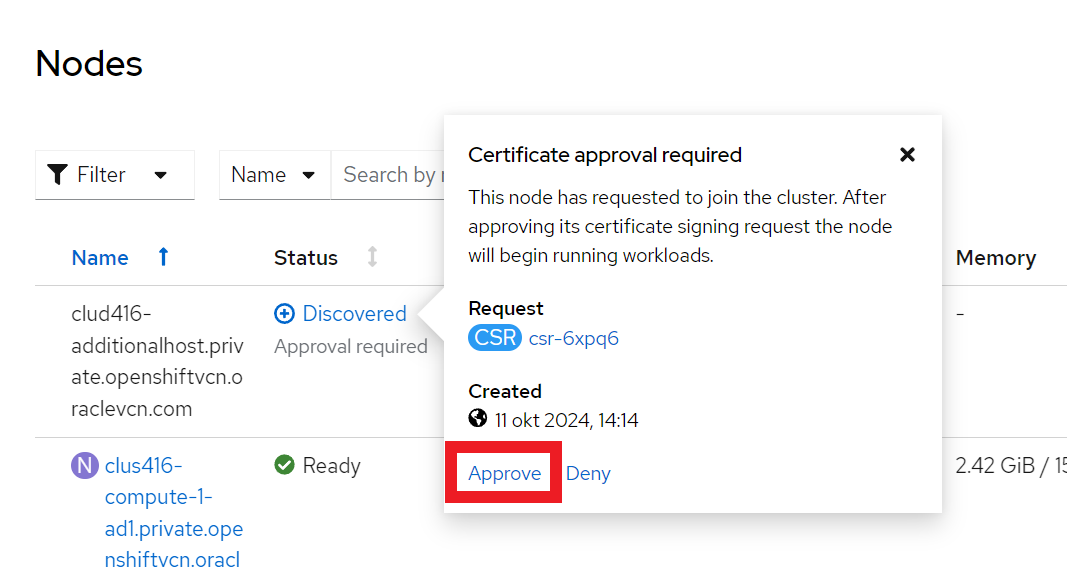
In the Certificate approval required dialog, select Approve to add the node to your cluster. If the node has a pending server certificated signing request, the node status changes to Not Ready.
-
For nodes in the "not ready" state, select the Not Ready link to open the Node status dialog. Review the signing request information, then select Approve to complete the signing process and let the node take workloads within cluster.

Agent-based Installer Cluster Instructions (CLI)
You must have the
kubeconfig file to connect to your target cluster with the CLI. This file is generated during cluster installation. For more information, see Installing OpenShift CLI and Adding nodes to your cluster in Red Hat documentation.- Connect to your target cluster using the
kubeconfigfile. -
Confirm that the nodes are booted and ready to be added to the cluster by running the following command:
$ oc adm node-image monitor --ip-addresses <ip_addresses>where
<ip_addresses>specifies a list of the IP addresses of the nodes that are being added. -
Approve the CSRs by running the following command for each CSR:
$ oc adm certificate approve <csr_name>If you need information about pending CSRs, run the following command:
$ oc get csr