Scenario: Sending Unstructured Data Using HTTPs
This scenario explains how to use the Internet of Things Platform to connect a device to send unstructured telemetry data to the cloud using HTTPs, and how to view the data in APEX.
- Create an IoT domain group
- Create an IoT domain
- Create a digital twin instance
- Send data
- Configure IoT domain to access APEX
- Access IoT data in APEX
Before you Begin
Make sure you have the required permissions. An administrator grants access by creating the required policies. For more information, see Prerequisites for the policies required for certificates and Policy Details for the Internet of Things (IoT) Platform for policies required for IoT resources.
For each device you want to connect to your Internet of Things, complete the following steps:
Step 1: Create an IoT Domain Group
Use the oci iot domain-group create command and the <compartment-OCID> and the <domain-group-name> required parameters to create an IoT domain group in a specific compartment. Replace the <compartment-OCID>, with the OCID for the compartment where you want to create the domain group. Replace the <domain-group-name> with your domain group name, and optionally replace the <your-sample-description> with a description:
oci iot domain-group create --compartment-id <compartment-OCID> --display-name <domain-group-name> --description <your-sample-description>Creating a IoT domain group can take a few minutes. This example response shows the domain group is creating and uses this data host URL:
wtmn2xs4ifkba.data.iot.us-phoenix-1.oci.oraclecloud.com
domain group short id: wtmn2xs4ifkba
data-host:<domain-group-short-id>.data.iot.<region>.oci.oraclecloud.com
{
  "data": {
    "compartment-id": "<compartment-OCID>",
    "data-host": "wtmn2xs4ifkba.data.iot.<region>.oci.oraclecloud.com",
    "db-allow-listed-vcn-ids": null,
    "db-connection-string": null,
    "db-token-scope": null,
    "defined-tags": {
      "Oracle-Tags": {
        "CreatedBy": "default/user@oracle.com",
        "CreatedOn": "2025-08-14T16:43:02.950Z"
      }
    },
    "description": "<your-domain-group-description>",
    "display-name": "<your-domain-group-name>",
    "freeform-tags": {},
    "id": "<domain-group-OCID>",
    "lifecycle-state": "CREATING",
    "system-tags": {},
    "time-created": "2025-08-14T16:43:03.307000+00:00",
    "time-updated": "2025-08-14T16:43:03.307000+00:00"
  },
  "etag": "<unique-id>",
  "opc-work-request-id": "<work-request-OCID>"
}
oci iot work-request get command and required parameter to get the work request updates for the creating a domain group process. Replace the <work-request-id> with the work request OCID from the creating an IoT domain group response:oci iot work-request get --work-request-id <work-request-OCID>This example response shows the creating a domain group operation is in progress.
{
  "data": {
    "compartment-id": "<compartment-OCID>",
    "id": "<work-request-OCID>",
    "operation-type": "CREATE_IOT_DOMAIN_GROUP",
    "percent-complete": 50.0,
    "resources": [
      {
        "action-type": "IN_PROGRESS",
        "entity-type": "iotDomainGroup",
        "entity-uri": "/20250531/iotDomainGroups/<iot-domain-group-OCID>",
        "identifier": "<work-request-OCID>",
        "metadata": null
      }
    ],
    "status": "ACCEPTED",
    "time-accepted": "2025-08-14T16:43:03.327000+00:00",
    "time-finished": null,
    "time-started": null,
    "time-updated": "2025-08-14T16:43:22.121000+00:00"
  },
  "etag": "<unique-id>"
}
oci iot work-request list-errors command and the required parameter to list any work requests errors for the process of creating a domain group:oci iot work-request list-errors --work-request-id <work-request-OCID>{
"data": {
"items": []
}
}oci iot work-request list-logs command and the required parameter to list log entries for the work request:oci iot work-request list-logs --work-request-id <work-request-OCID>This example response shows the steps to create the IoT domain group and that it's finishing:
{
  "data": {
    "items": [
      {
        "message": "Generating database credentials",
        "timestamp": "2025-08-14T16:43:12.150000+00:00"
      },
      {
        "message": "Creating database",
        "timestamp": "2025-08-14T16:43:18.156000+00:00"
      },
      {
        "message": "Provisioning database",
        "timestamp": "2025-08-14T16:43:22.121000+00:00"
      },
      {
        "message": "Enabling data guard",
        "timestamp": "2025-08-14T16:48:25.138000+00:00"
      },
      {
        "message": "Configuring admin secret rotation ",
        "timestamp": "2025-08-14T16:53:59.878000+00:00"
      },
      {
        "message": "Generating DNS record(s)",
        "timestamp": "2025-08-14T16:54:05.318000+00:00"
      },
      {
        "message": "Configuring routing policy",
        "timestamp": "2025-08-14T16:54:06.455000+00:00"
      },
      {
        "message": "Finishing work request",
        "timestamp": "2025-08-14T16:54:58.139000+00:00"
      }
    ]
  }
}
- Optional. Use the
oci iot work-request getcommand and the required parameter to get the work request update for the domain group. Replace the <work-request-id> with the work request OCID:oci iot work-request get --work-request-id <work-request-OCID>This example response shows creating the IoT domain group is successful.
{
  "data": {
    "compartment-id": "<compartment-OCID>",
    "id": "<work-request-OCID>",
    "operation-type": "CREATE_IOT_DOMAIN_GROUP",
    "percent-complete": 100.0,
    "resources": [
      {
        "action-type": "CREATED",
        "entity-type": "iotDomainGroup",
        "entity-uri": "/20250531/iotDomainGroups/<domain-group-OCID>",
        "identifier": "<domain-group-OCID>",
        "metadata": null
      }
    ],
    "status": "SUCCEEDED",
    "time-accepted": "2025-08-14T16:43:03.327000+00:00",
    "time-finished": "2025-08-14T16:54:58.139000+00:00",
    "time-started": "2025-08-14T16:43:12.131000+00:00",
    "time-updated": "2025-08-14T16:54:58.139000+00:00"
  },
  "etag": "<unique-id>"
}
Optional Step: Get the IoT Domain Group Details
Use the oci iot domain-group get command and the required parameter to get the IoT domain group details including the domain group's database connection details, if configured. Replace the <iot-domain-group-OCID> with the OCID for your IoT domain group:
oci iot domain-group get --iot-domain-group-id <iot-domain-group-OCID>"lifecycleState": "ACTIVE" and uses the following data host: wtmn2xs4ifkba.data.iot.us-phoenix-1.oci.oraclecloud.com. In this example, the wtmn2xs4ifkba is the IoT domain group short id. {
"data": {
"compartment-id": "<compartment-OCID>",
"data-host": "wtmn2xs4ifkba.data.iot.<region>.oci.oraclecloud.com",
"db-allow-listed-vcn-ids": null,
"db-connection-string": null,
"db-token-scope": null,
"defined-tags": {
"Oracle-Tags": {
"CreatedBy": "default/user@oracle.com",
"CreatedOn": "2025-08-14T16:43:02.950Z"
}
},
"description": "This is a sample domain group",
"display-name": "Sample Domain Group",
"freeform-tags": {},
"id": "<iot-domain-group-OCID>",
"lifecycle-state": "ACTIVE",
"system-tags": {},
"time-created": "2025-08-14T16:43:03.307000+00:00",
"time-updated": "2025-08-14T16:54:58.187000+00:00"
},
"etag": "<unique-id>"
}Step 2: Create an IoT Domain
Use the oci iot domain create command and the required <domain-group-OCID> and <compartment-OCID> parameters to create an Internet of Things domain. Replace the <domain-group-OCID> with the OCID for the domain group that you want to associate with this IoT domain. Replace <your-sample-description> with a description for your IoT domain.
oci iot domain create --compartment-id <compartment-OCID> --iot-domain-group-id <domain-group-OCID> --display-name <your-iot-domain-name> --description <your-iot-domain-description>Creating a domain can take a few minutes. In this example response, you see the device host URL with the domain short id:
"device-host": "cuay2mrhlgrrg.device.iot.<region>.oci.oraclecloud.com"
domain short id: cuay2mrhlgrrg
"device-host": "<domain-short-id>.device.iot.<region>.oci.oraclecloud.com"
{
  "data": {
    "compartment-id": "<compartment-OCID>",
    "data-retention-periods-in-days": {
      "historized-data": 30,
      "raw-command-data": 16,
      "raw-data": 16,
      "rejected-data": 16
    },
    "db-allow-listed-identity-group-names": null,
    "db-allowed-identity-domain-host": null,
    "defined-tags": {
      "Oracle-Tags": {
        "CreatedBy": "default/user@oracle.com",
        "CreatedOn": "2025-08-14T16:57:03.140Z"
      }
    },
    "description": "<your-iot-domain-description>",
    "device-host": "cuay2mrhlgrrg.device.iot.<region>.oci.oraclecloud.com",
    "display-name": "<your-iot-domain-name>",
    "freeform-tags": {},
    "id": "<iot-domain-OCID>",
    "iot-domain-group-id": "<iot-domain-group-OCID>",
    "lifecycle-state": "CREATING",
    "system-tags": {},
    "time-created": "2025-08-14T16:57:03.384000+00:00",
    "time-updated": "2025-08-14T16:57:03.384000+00:00"
  },
  "etag": "<unique-id>",
  "opc-work-request-id": "<work-request-OCID>"
}
Optional. During the time it takes to create the domain, use the oci iot work-request get command and the required parameter to get the work request update for creating the domain. Replace the <work-request-id> with the work request id from the previous response:
oci iot work-request get --work-request-id <work-request-OCID>The example response shows the create an IoT domain is accepted and in progress.
{
  "data": {
    "compartment-id": "<iot-domain-OCID>",
    "id": "<work-request-OCID>",
    "operation-type": "CREATE_IOT_DOMAIN",
    "percent-complete": 50.0,
    "resources": [
      {
        "action-type": "IN_PROGRESS",
        "entity-type": "iotDomain",
        "entity-uri": "/20250531/iotDomains/<iot-domain-OCID>",
        "identifier": "<iot-domain-OCID>",
        "metadata": null
      }
    ],
    "status": "ACCEPTED",
    "time-accepted": "2025-08-14T16:57:03.413000+00:00",
    "time-finished": null,
    "time-started": null,
    "time-updated": "2025-08-14T16:57:23.124000+00:00"
  },
  "etag": "<unique-id>"
}
oci iot work-request list-logs command and the required parameter to list log entries for the create an IoT domain work request:oci iot work-request list-logs --work-request-id <work-request-OCID>This example response shows the steps to create the IoT domain and that it's finishing:
{
  "data": {
    "items": [
      {
        "message": "Generating DNS record(s)",
        "timestamp": "2025-08-14T16:57:22.148000+00:00"
      },
      {
        "message": "Onboarding domain schema(s)",
        "timestamp": "2025-08-14T16:57:23.124000+00:00"
      },
      {
        "message": "Successfully onboarded domain schemas",
        "timestamp": "2025-08-14T16:58:43.508000+00:00"
      },
      {
        "message": "Finishing work request",
        "timestamp": "2025-08-14T16:58:43.771000+00:00"
      }
    ]
  }
}
oci iot work-request get command and required parameters to get the work request update for creating the domain. Replace the <work-request-id> with the work request OCID:oci iot work-request get --work-request-id <work-request-OCID>This example response shows creating the IoT domain succeeded.
"status": "SUCCEEDED",
{
  "data": {
    "compartment-id": "<compartment-OCID>",
    "id": "<work-request-OCID>",
    "operation-type": "CREATE_IOT_DOMAIN",
    "percent-complete": 100.0,
    "resources": [
      {
        "action-type": "CREATED",
        "entity-type": "iotDomain",
        "entity-uri": "/20250531/iotDomains/<iot-domain-OCID>",
        "identifier": "<iot-domain-OCID>",
        "metadata": null
      }
    ],
    "status": "SUCCEEDED",
    "time-accepted": "2025-08-14T16:57:03.413000+00:00",
    "time-finished": "2025-08-14T16:58:43.771000+00:00",
    "time-started": "2025-08-14T16:57:22.147000+00:00",
    "time-updated": "2025-08-14T16:58:43.771000+00:00"
  },
  "etag": "<unique-id>"
}
Optional Step: Get the IoT Domain Details
oci iot domain get command and the required parameter to get a domain's details. Replace the <iot-domain-OCID> with the OCID for your IoT domain.oci iot domain get --iot-domain-id <iot-domain-OCID>This example response shows the domain is active: "lifecycle-state": "ACTIVE" and the device host URL with the domain short id:
<domain-short-id>.device.iot.<region>.oci.oraclecloud.com
{
  "data": {
    "compartment-id": "<compartment-OCID>",
    "data-retention-periods-in-days": {
      "historized-data": 30,
      "raw-command-data": 16,
      "raw-data": 16,
      "rejected-data": 16
    },
    "db-allow-listed-identity-group-names": null,
    "db-allowed-identity-domain-host": null,
    "defined-tags": {
      "Oracle-Tags": {
        "CreatedBy": "default/user@oracle.com",
        "CreatedOn": "2025-08-14T16:57:03.140Z"
      }
    },
    "description": "<your-iot-domain-description>",
    "device-host": "<domain-short-id>.device.iot.<region>.oci.oraclecloud.com",
    "display-name": "<your-iot-domain-name>",
    "freeform-tags": {},
    "id": "<iot-domain-OCID>",
    "iot-domain-group-id": "<iot-domain-group-OCID>",
    "lifecycle-state": "ACTIVE",
    "system-tags": {},
    "time-created": "2025-08-14T16:57:03.384000+00:00",
    "time-updated": "2025-08-14T16:58:43.789000+00:00"
  },
  "etag": "<unique-id>"
}
Step 3: Create a Digital Twin Instance
Use the oci iot digital-twin-instance create command and the required <iot-domain-OCID>parameter to create a digital twin instance for an associated IoT domain. When you create a digital twin instance requires and authentication ID. Use either a certificate or secret, see Creating a Secret.
<iot-domain-OCID> with the IoT domain's OCID for the digital twin instance. This example command includes the optional display name, replace <display-name> with a user-friendly name for your digital twin instance. This example does not use the optional --external-key parameter to specify a device name then the response contains a generated unique id as the external key. oci iot digital-twin-instance create --iot-domain-id <iot-domain-OCID> --auth-id <vault-secret-OCID> --display-name <display-name>{
"data": {
"auth-id": "<vault-secret-OCID>",
"defined-tags": {
"Oracle-Tags": {
"CreatedBy": "default/user@oracle.com",
"CreatedOn": "2025-08-14T06:12:43.393Z"
}
},
"description": null,
"digital-twin-adapter-id": "<iot-digital-twin-adapter-OCID>",
"digital-twin-model-id": "<iot-digital-twin-model-OCID>",
"digital-twin-model-spec-uri": "dtmi:com:oracle:example:core:Space:sp;1",
"display-name": "device for conference room 103",
"external-key": "<unique-id>",
"freeform-tags": {},
"id": "<iot-digital-twin-instance-OCID>",
"iot-domain-id": "<iot-domain-OCID>",
"lifecycle-state": "ACTIVE",
"system-tags": {},
"time-created": "2025-09-11T06:12:44.178000+00:00",
"time-updated": "2025-09-11T06:12:44.178000+00:00"
},
"etag": "<unique-id>"
}
Step 4: Send Data
Send data using the device host URL from the previous step.
You can send as much data as you want to send. This example shows sending 2 plain text data messages. The first example shows the command using values from this scenario. For more information, see Using cURL.
curl command includes the device host URL and shows the values based on this scenario.- Replace the
<domain-short-id>and the<region>with the values for your environment - Replace the
<digital-twin-instance-external-key>with the external key from the digital twin response from the previous step 3, Create Digital Twin Instance. - You must base64-decode the secret, and then use the secret contents in the
curlrequest. For more information, see Getting a Secret's Contents.
curl -u '9K7F8Y3HJGX1FA1GFG9QVV9E2C:<vault-secret-contents-decoded-Base64-digit>' https://<domain-short-id>.device.iot.us-phoenix-1.oci.oraclecloud.com/sampletopic -H 'Content-Type: plain-text' -d "sample data 1"curl command shows the name of the values:curl -u '<digital-twin-instance-external-key>:<vault-secret-contents-decoded-Base64-digit>' https://<domain-short-id>.device.iot.<region>.oci.oraclecloud.com/sampletopic -H 'Content-Type: plain-text' -d "sample data 2"
Step 5: Configure IoT Domain's Access to APEX
To view your data in APEX requires configuring access to view your IoT data in APEX, a step in that process uses the following command to add the APEX password to the IoT domain so it can access APEX.
oci iot domain configure-apex-data-access command and the required parameters to configure an IoT domain's access to APEX. Replace the <your-initial-apex-password> and the <iot-domain-OCID> with the values for your environment:oci iot domain configure-apex-data-access --iot-domain-id <iot-domain-OCID> --db-workspace-admin-initial-password <your-inital-apex-password>Example response:
{
  "opc-work-request-id": "<work-request-OCID>"
}
Optional. During the time it takes to configure access to APEX, use the oci iot work-request get command and the required parameter to get the work request update. Replace the <work-request-id> with the work request id from the previous response:
oci iot work-request get --work-request-id <work-request-OCID>Example response:
{
  "data": {
    "compartment-id": "<compartment-OCID>",
    "id": "<work-request-OCID>",
    "operation-type": "CONFIGURE_DOMAIN_DATA_ACCESS",
    "percent-complete": 0.0,
    "resources": [
      {
        "action-type": "IN_PROGRESS",
        "entity-type": "iotDomain",
        "entity-uri": "/20250531/iotDomains/<iot-domain-OCID>",
        "identifier": "<iot-domain-OCID>",
        "metadata": null
      }
    ],
    "status": "ACCEPTED",
    "time-accepted": "2025-08-14T17:44:44.716000+00:00",
    "time-finished": null,
    "time-started": null,
    "time-updated": "2025-08-14T17:44:44.716000+00:00"
  },
  "etag": "<unique-id>"
}
oci iot work-request list-logs command and the required parameter to list log entries for the work request:oci iot work-request list-logs --work-request-id <work-request-OCID>This example response shows the access to APEX for the domain is in progress and that it's finishing:
{
  "data": {
    "items": [
      {
        "message": "Configuring domain data access is in Progress",
        "timestamp": "2025-08-14T17:45:19.708000+00:00"
      },
      {
        "message": "Finishing work request",
        "timestamp": "2025-08-14T17:45:19.978000+00:00"
      }
    ]
  }
}
oci iot work-request list-errors command and the required parameter to list work requests errors:oci iot work-request list-errors --work-request-id <work-request-OCID>{
"data": {
"items": []
}
}oci iot work-request get command and the required parameter to get the work request. Replace the <work-request-id> with the work request id:oci iot work-request get --work-request-id <work-request-OCID>This example response shows the configuring access to APEX for the IoT domain is updated:
"status": "SUCCEEDED"
{
  "data": {
    "compartment-id": "<compartment-OCID>",
    "id": "<work-request-OCID>",
    "operation-type": "CONFIGURE_DOMAIN_DATA_ACCESS",
    "percent-complete": 100.0,
    "resources": [
      {
        "action-type": "UPDATED",
        "entity-type": "iotDomain",
        "entity-uri": "/20250531/iotDomains/<iot-domain-OCID>",
        "identifier": "<iot-domain-OCID>",
        "metadata": null
      }
    ],
    "status": "SUCCEEDED",
    "time-accepted": "2025-08-14T17:44:44.716000+00:00",
    "time-finished": "2025-08-14T17:45:19.978000+00:00",
    "time-started": "2025-08-14T17:45:19.708000+00:00",
    "time-updated": "2025-08-14T17:45:19.978000+00:00"
  },
  "etag": "<unique-id>"
}
Step 6: Access IoT Data in APEX
- Go to the APEX URL for IoT:
https://<domain-group-data-host>/ords/apex/In APEX log in using:
Use the domain short id that comes from the device host to log in to APEX:
For example:
device-host:<domain-short-id>.device.iot.<region>.oci.oraclecloud.com- Workspace:
<domain-short-id-from-device-host>__WKSP - Username:
<domain-short-id-from-device-host>__WKSP - Initial password set when you used the CLI command to configure an IoT domain's data access for APEX:
<initial-apex-password>
Note
Notice the two underscores:__WKSPand__IOT. - Workspace:
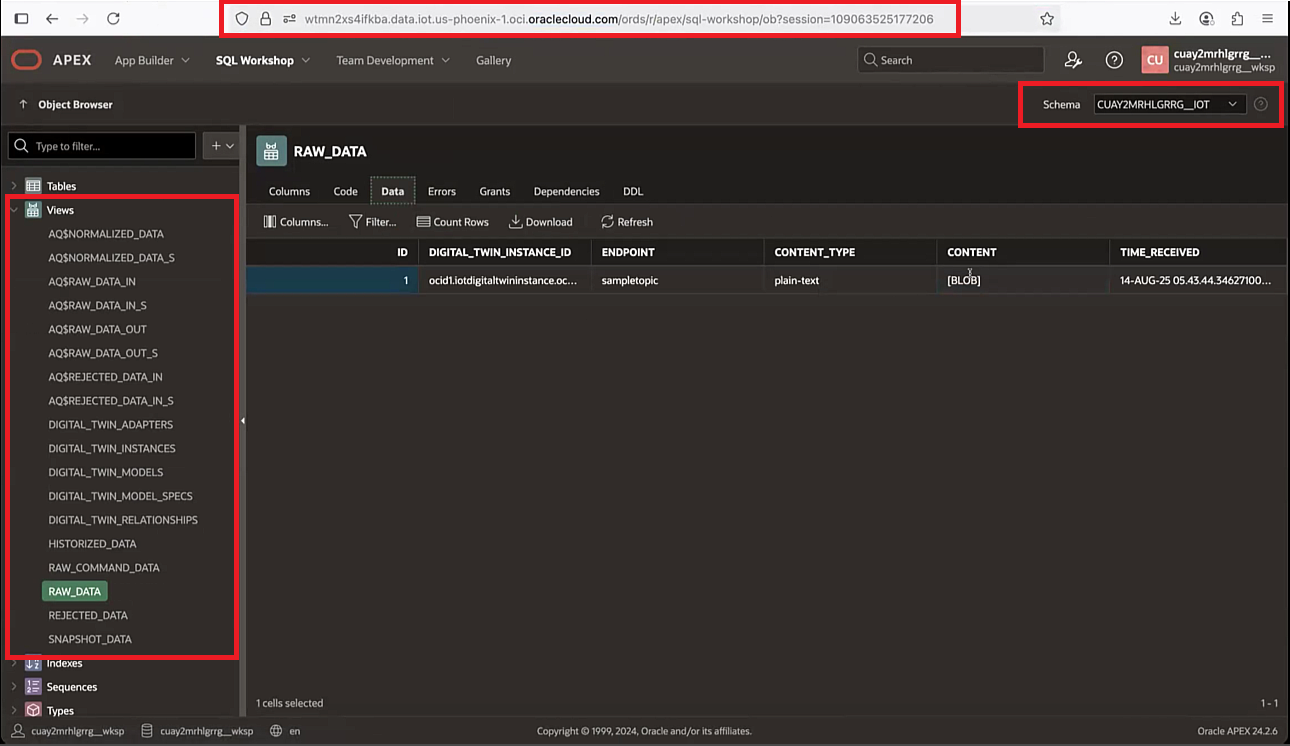
- To query the IoT data, select the
<domain-short-id-from-device-host>__IOTschema. Select SQL Workshop and then select Object Browser.SQL workshop URL:
https://<domain-group-data-host>/ords/apex/sql-workshop - Query IoT data by entering and running an SQL command. Confirm you selected the correct schema you want to query, run the following command:
select * from RAW_DATANow, you can see the database views, schemas, and raw data for your Internet of Things connected device.
To view a larger screenshot, right click and open the image in a new browser window.