Using JupyterHub in Big Data Service 3.0.26 or Earlier
Use JupyterHub to manage Big Data Service 3.0.26 or earlier ODH 1.x notebooks for groups of users.
Prerequisites
Before JupyterHub can be accessed from a browser, an administrator must:
- Make the node available to incoming connections from users. The node's private IP address needs to be mapped to a public IP address. Alternatively, the cluster can be set up to use a bastion host or Oracle FastConnect. See Connecting to Cluster Nodes with Private IP Addresses.
- Open port
8000on the node by configuring the ingress rules in the network security list. See Defining Security Rules.
JupyterHub Default Credentials
The default admin sign-in credentials for JupyterHub in Big Data Service 3.0.21 and earlier are:
- Username:
jupyterhub - Password: Apache Ambari admin password. This is the cluster admin password that was specified when the cluster was created.
- Principal name for HA cluster:
jupyterhub - Keytab for HA cluster:
/etc/security/keytabs/jupyterhub.keytab
The default admin sign-in credentials for JupyterHub in Big Data Service 3.0.22 through 3.0.26 are:
- User name:
jupyterhub - Password: Apache Ambari admin password. This is the cluster admin password that was specified when the cluster was created.
- Principal name for HA cluster:
jupyterhub/<FQDN-OF-UN1-Hostname> - Keytab for HA cluster:
/etc/security/keytabs/jupyterhub.keytabExample:Principal name for HA cluster: jupyterhub/pkbdsv2un1.rgroverprdpub1.rgroverprd.oraclevcn.com Keytab for HA cluster: /etc/security/keytabs/jupyterhub.keytab
The admin creates additional users and their sign-in credentials, and provides the sign-in credentials to those users. For more information, see Manage Users and Permissions.
Unless explicitly referenced as some other type of administrator, the use of administrator or admin throughout this section refers to the JupyterHub administrator, jupyterhub.
Accessing JupyterHub
Alternatively, you can access the JupyterHub link from the Cluster details page under Cluster URLs.
You can also create a Load Balancer to provide a secure front end for accessing services, including JupyterHub. See Connecting to Services on a Cluster Using Load Balancer.
Spawning Notebooks
The prerequisites must be met for the user trying to spawn notebooks.
- Access JupyterHub.
- Sign-in with admin credentials. The authorization works only if the user is present on the Linux host. JupyterHub searches for the user on the Linux host while trying to spawn the notebook server.
- You're redirected to a Server Options page where you must request a Kerberos ticket. This ticket can be requested using either Kerberos principal and the keytab file, or the Kerberos password. The cluster admin can provide the Kerberos principal and the keytab file, or the Kerberos password.
The Kerberos ticket is needed to get access on the HDFS directories and other big data services that you want to use.
The prerequisites must be met for the user trying to spawn notebooks.
- Access JupyterHub.
- Sign-in with admin credentials. The authorization works only if the user is present on the Linux host. JupyterHub searches for the user on the Linux host while trying to spawn the notebook server.
Manage JupyterHub
A JupyterHub admin user can perform the following tasks to manage notebooks in JupyterHub on Big Data Service 3.0.26 or earlier ODH 1.x nodes.
As an admin, you can configure JupyterHub.
Configure JupyterHub through the browser for Big Data Service 3.0.26 or earlier clusters.
Stop or start JupyterHub through the browser for Big Data Service 3.0.26 or earlier clusters.
As an admin, you can stop or disable the application so it doesn't consume resources, such as memory. Restarting might also help with unexpected issues or behavior.
As an admin, you can limit the number of active notebook servers in Big Data Service cluster.
By default, notebooks are stored in HDFS directory of a cluster.
You must have access to the HDFS directory hdfs:///user/<username>/. The notebooks are saved in hdfs:///user/<username>/notebooks/.
- Connect as
opcuser to the utility node where JupyterHub is installed (the second utility node of an HA (highly-available) cluster, or the first and only utility node of a non-HA cluster). - Use
sudoto manage JupyterHub configs that are stored at/opt/jupyterhub/jupyterhub_config.py.c.Spawner.args = ['--ServerApp.contents_manager_class="hdfscm.HDFSContentsManager"'] - Use
sudoto restart JupyterHub.sudo systemctl restart jupyterhub.service
As an admin user, you can store the individual user notebooks in Object Storage instead of HDFS. When you change the content manager from HDFS to Object Storage, the existing notebooks aren't copied over to Object Storage. The new notebooks are saved in Object Storage.
- Connect as
opcuser to the utility node where JupyterHub is installed (the second utility node of an HA (highly-available) cluster, or the first and only utility node of a non-HA cluster). - Use
sudoto manage JupyterHub configs that are stored at/opt/jupyterhub/jupyterhub_config.py. See generate access and secret key to learn how to generate the required keys.c.Spawner.args = ['--ServerApp.contents_manager_class="s3contents.S3ContentsManager"', '--S3ContentsManager.bucket="<bucket-name>"', '--S3ContentsManager.access_key_id="<accesskey>"', '--S3ContentsManager.secret_access_key="<secret-key>"', '--S3ContentsManager.endpoint_url="https://<object-storage-endpoint>"', '--S3ContentsManager.region_name="<region>"','--ServerApp.root_dir=""'] - Use
sudoto restart JupyterHub.sudo systemctl restart jupyterhub.service
Integrate with Object Storage
Integrate Spark with Object Storage for use with Big Data Service clusters.
In JupyterHub, for Spark to work with Object Storage you must define some system properties and populate them into the spark.driver.extraJavaOption and spark.executor.extraJavaOptions properties in Spark configs.
Before you can successfully integrate JupyterHub with Object Storage, you must:
- Create a bucket in Object Store to store data.
- Create an Object Storage API key.
The properties you must define in Spark configs are:
-
TenantID -
Userid -
Fingerprint -
PemFilePath -
PassPhrase -
Region
The retrieve the values for these properties:
- Open the navigation menu and select Analytics & AI. Under Data Lake, select Big Data Service.
- On the Clusters list page, select the cluster that you want to work with. If you need help finding the list page or the cluster, see Listing Clusters in a Compartment.
-
To view clusters in a different compartment, switch the Compartment.
You must have permission to work in a compartment to see the resources in it. If you're not sure which compartment to use, contact an administrator. For more information, see Understanding Compartments.
- On the Cluster details page, select Object Storage API keys.
- From the of the API key you want to view, select View configuration file.
The configuration file has all the system properties details except the passphrase. The passphrase is specified while creating the Object Storage API key and you must recollect and use the same passphrase.
- Access JupyterHub.
- Open a new notebook.
- Copy and paste the following commands to connect to Spark.
import findspark findspark.init() import pyspark - Copy and paste the following commands to create a Spark session with the specified configurations. Replace the variables with the system properties values you retrieved before.
from pyspark.sql import SparkSession spark = SparkSession \ .builder \ .enableHiveSupport() \ .config("spark.driver.extraJavaOptions", "-DBDS_OSS_CLIENT_REGION=<Region> -DBDS_OSS_CLIENT_AUTH_TENANTID=<TenantId> -DBDS_OSS_CLIENT_AUTH_USERID=<UserId> -DBDS_OSS_CLIENT_AUTH_FINGERPRINT=<FingerPrint> -DBDS_OSS_CLIENT_AUTH_PEMFILEPATH=<PemFile> -DBDS_OSS_CLIENT_AUTH_PASSPHRASE=<PassPhrase>")\ .config("spark.executor.extraJavaOptions" , "-DBDS_OSS_CLIENT_REGION=<Region> -DBDS_OSS_CLIENT_AUTH_TENANTID=<TenantId> -DBDS_OSS_CLIENT_AUTH_USERID=<UserId> -DBDS_OSS_CLIENT_AUTH_FINGERPRINT=<FingerPrint> -DBDS_OSS_CLIENT_AUTH_PEMFILEPATH=<PemFile> -DBDS_OSS_CLIENT_AUTH_PASSPHRASE=<PassPhrase>")\ .appName("<appname>") \ .getOrCreate() - Copy and paste the following commands to create the Object Storage directories and file, and store data in Parquet Format.
demoUri = "oci://<BucketName>@<Tenancy>/<DirectoriesAndSubDirectories>/" parquetTableUri = demoUri + "<fileName>" spark.range(10).repartition(1).write.mode("overwrite").format("parquet").save(parquetTableUri) - Copy and paste the following command to read data from Object Storage.
spark.read.format("parquet").load(parquetTableUri).show() - Run the notebook with all these commands.
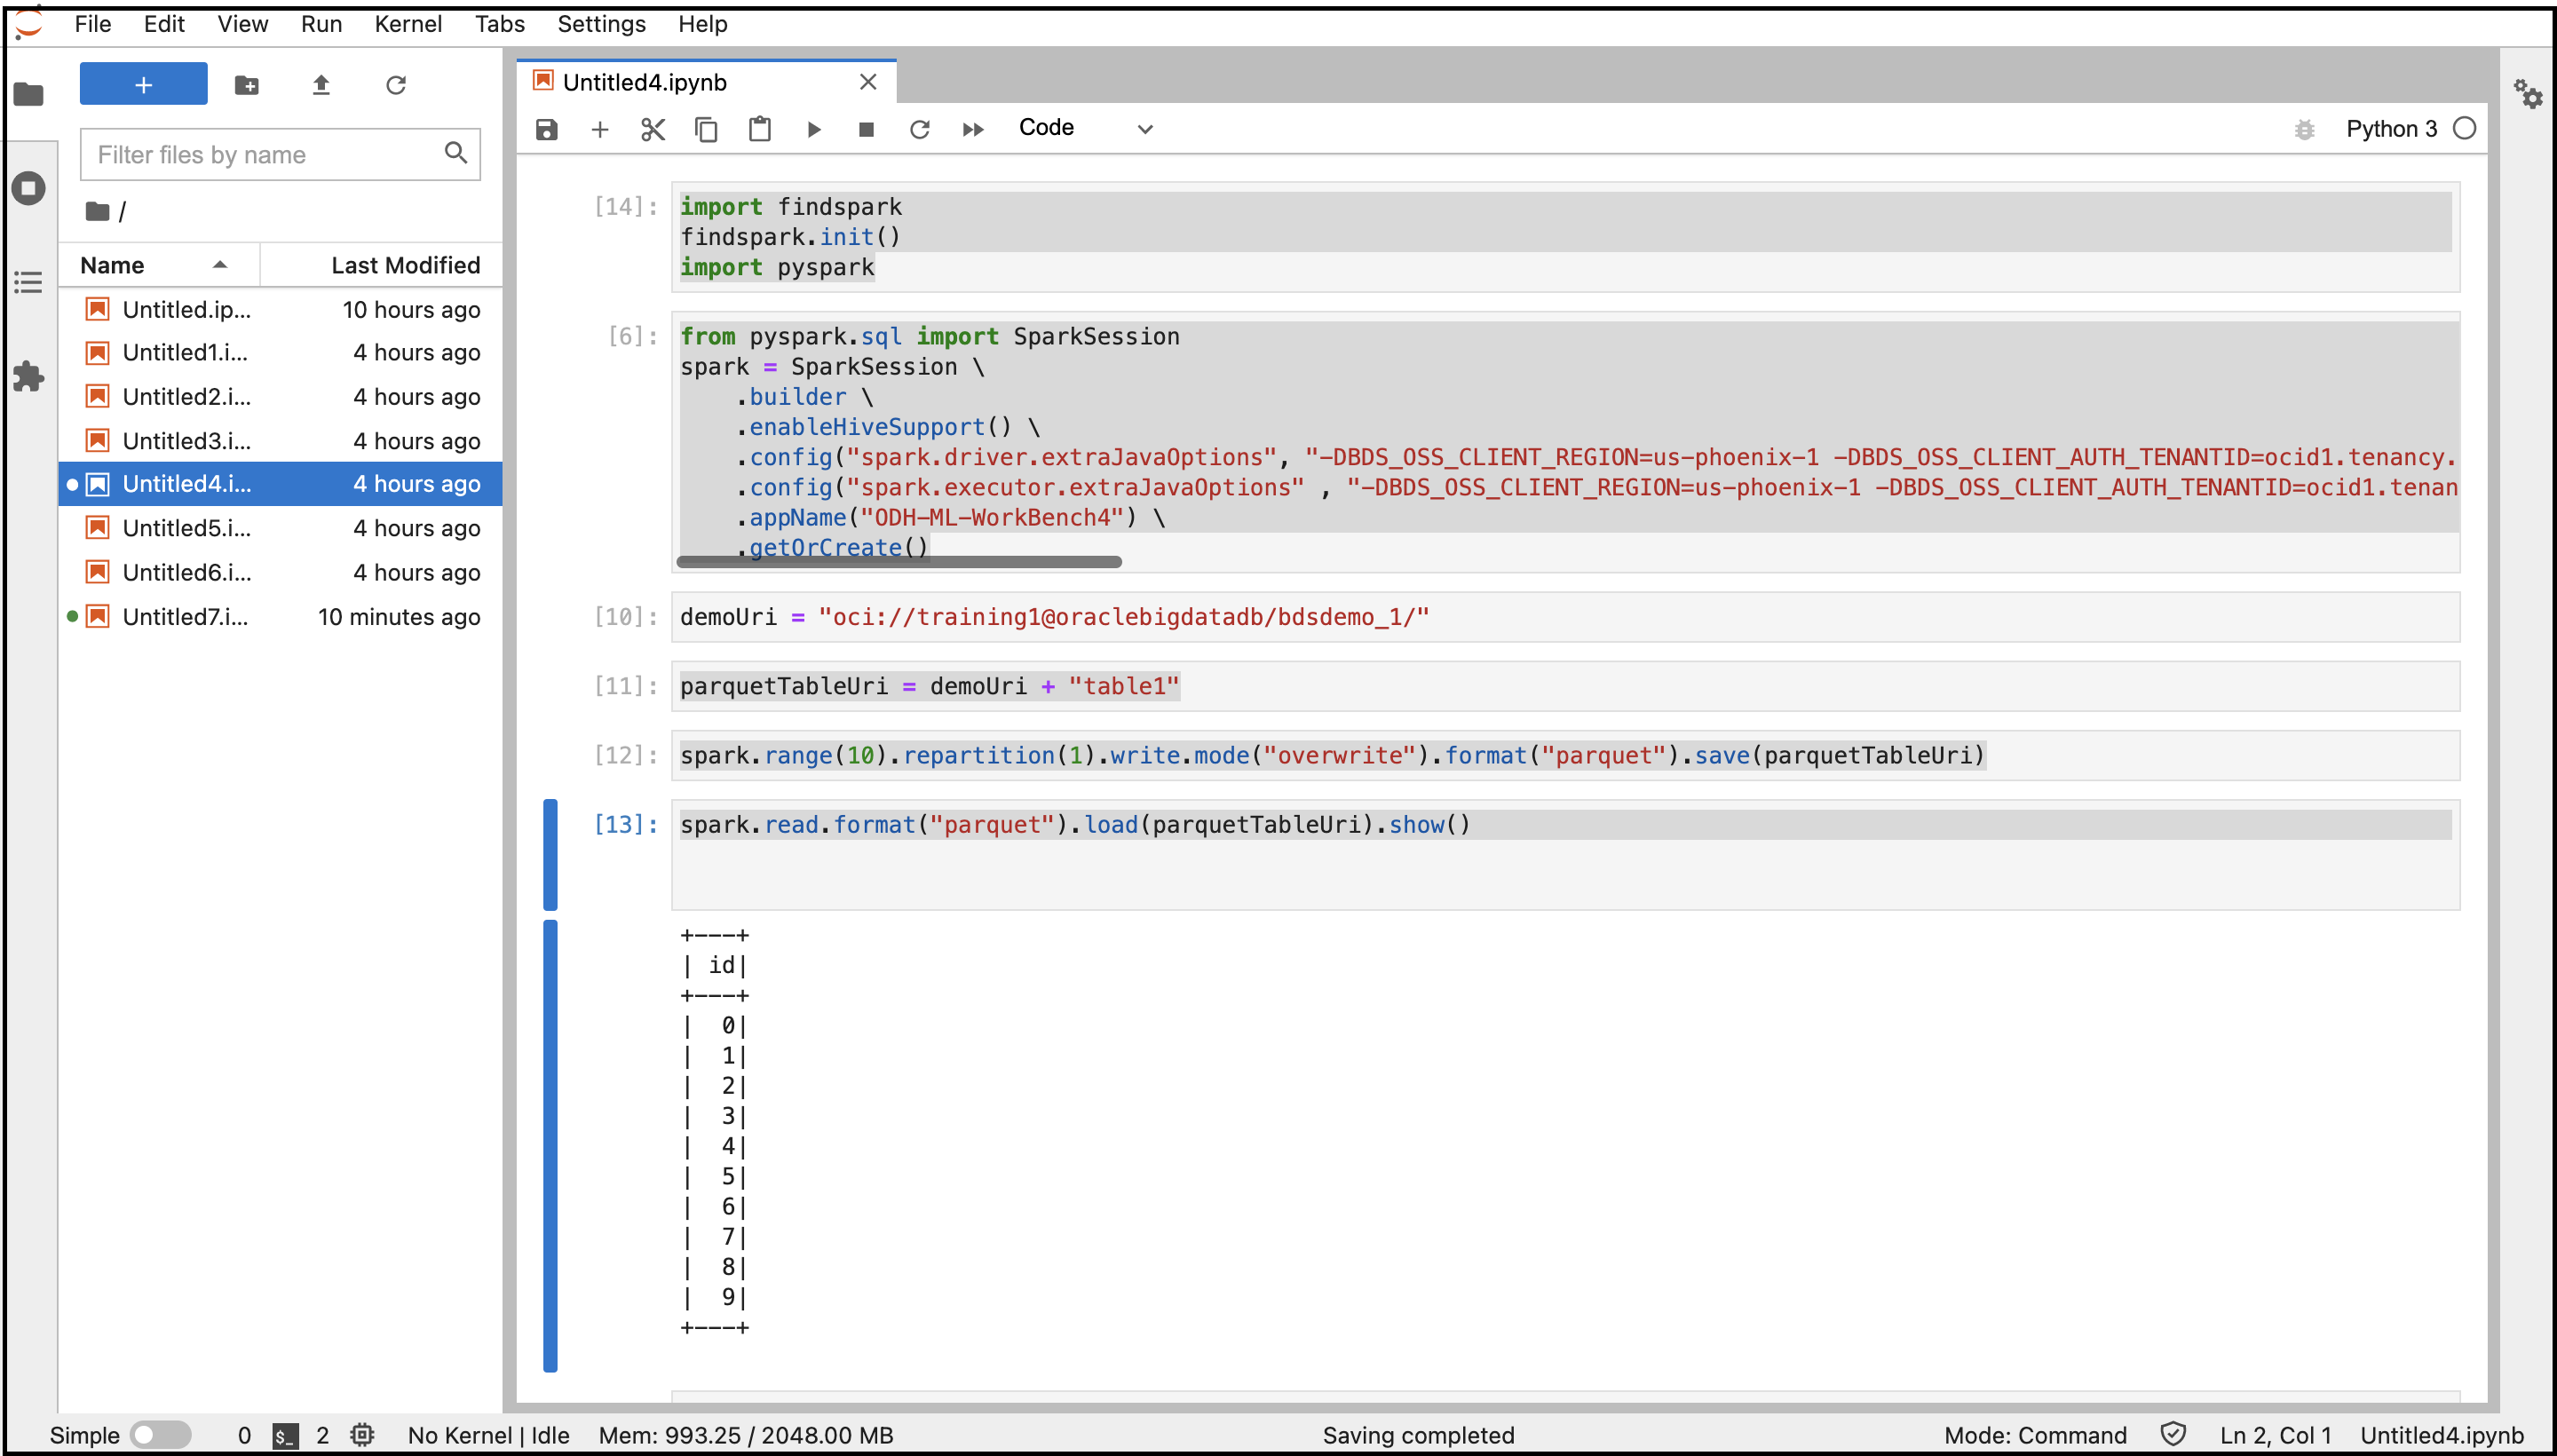
The output of the code is displayed. You can navigate to the Object Storage bucket from the Console and find the file created in the bucket.
Manage Users and Permissions
Use one of the two authentication methods to authenticate users to JupyterHub so that they can create notebooks, and optionally administer JupyterHub.
By default, ODH 1.x clusters support native authentication. But, authentication for JupyterHub and other big data services must be handled differently. To spawn single user notebooks, the user signing in to JupyterHub needs to be present on the Linux host and needs to have permissions to write to the root directory in HDFS. Otherwise, the spawner fails as the notebook process is triggered as the Linux user.
For information on native authentication, see Native Authentication.
For information on LDAP authentication for Big Data Service 3.0.26 or earlier, see LDAP Authentication.
Native authentication depends on the JupyterHub user database for authenticating users.
Native authentication applies to both HA and non-HA clusters. Refer native authenticator for details on the native authenticator.
These prerequisites must be met to authorize a user in a Big Data Service HA cluster using native authentication.
These prerequisites must be met to authorize a user in a Big Data Service non-HA cluster using native authentication.
Admin users are responsible for configuring and managing JupyterHub. Admin users are also responsible for authorizing newly signed up users on JupyterHub.
Before adding an admin user, the prerequisites must be met for an non-HA cluster.
- Access Apache Ambari.
- From the side toolbar, under Services select JupyterHub.
- Select Configs, and then select Advanced Configs.
- Select Advanced jupyterhub-config.
-
Add admin user to
c.Authenticator.admin_users. - Select Save.
Before adding other users, the prerequisites must be met for a Big Data Service cluster.
-
Admin user must sign in JupyterHub and from the new menu option to authorize signed in users, authorise the new user.
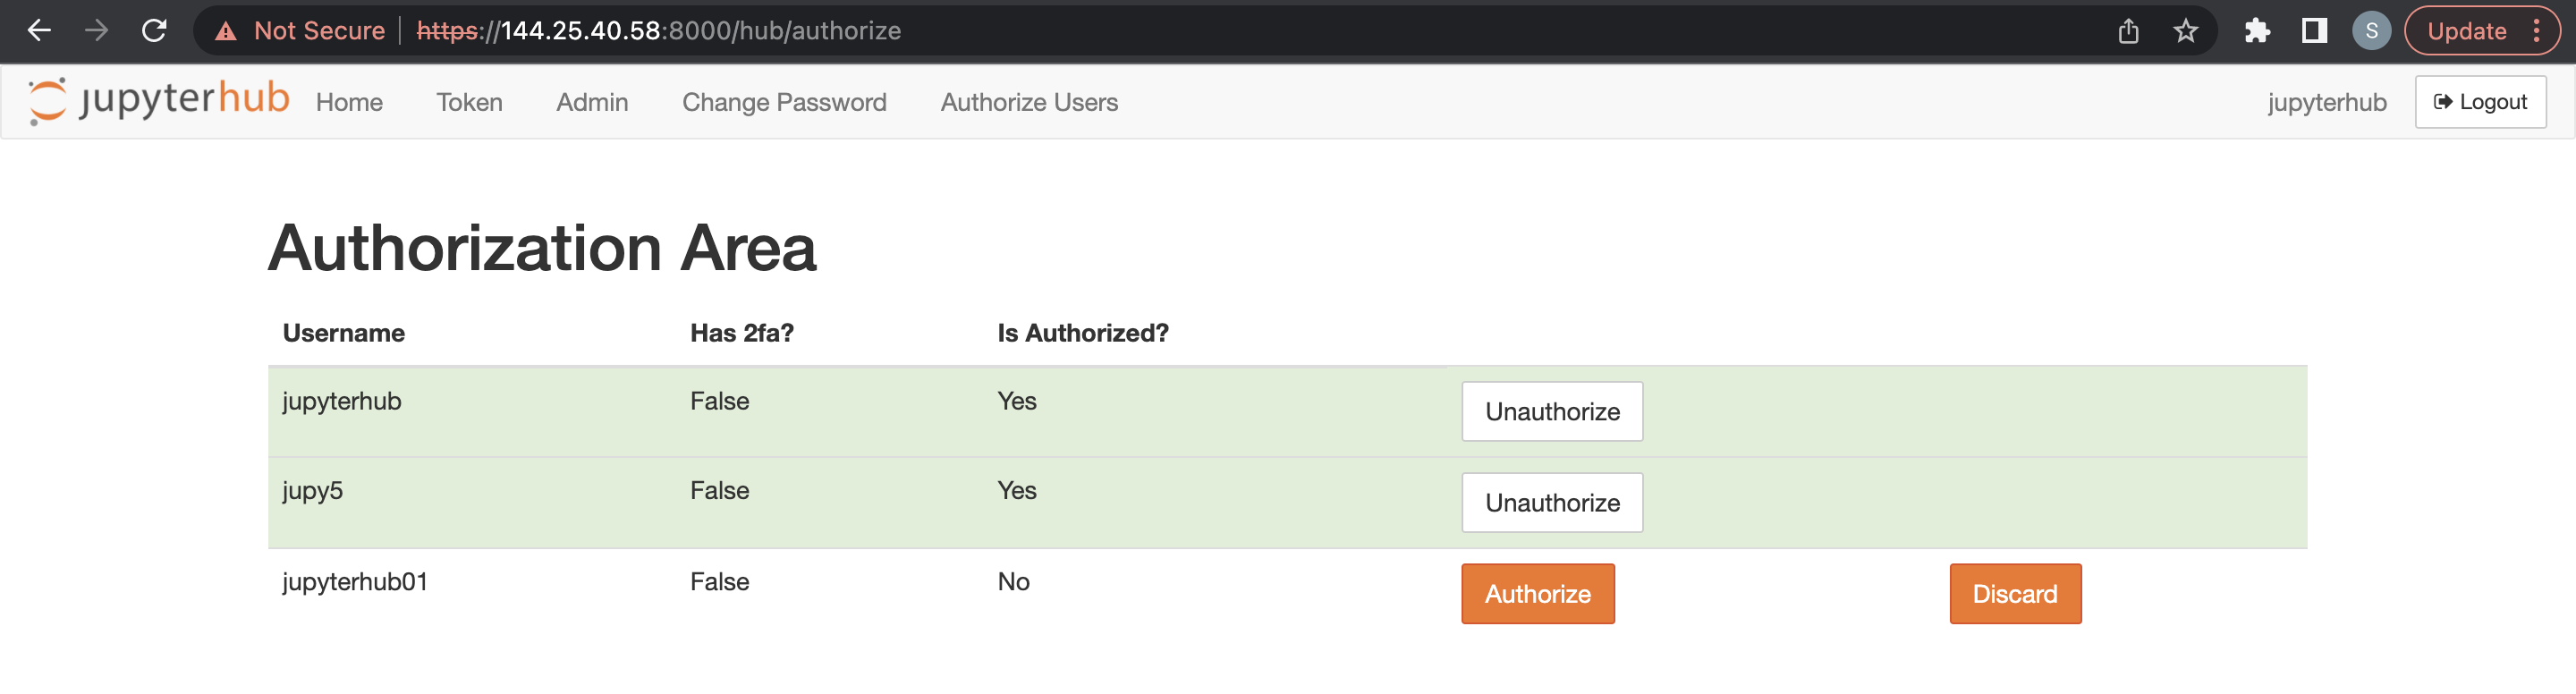
An admin user can delete JupyterHub users.
- Access JupyterHub.
- Open File > HubControlPanel.
- Navigate to the Authorize Users page.
- Delete the users you want to remove.
You can use LDAP authentication through a browser for Big Data Service 3.0.26 or earlier ODH 1.x clusters.
Integrate with Trino
- Trino must be installed and configured in Big Data Service cluster.
- Install the following Python module in the JupyterHub node (un1 for HA / un0 for non-HA cluster) Note
Ignore this step if the Trino-Python module is already present in the node.python3.6 -m pip install trino[sqlalchemy] Offline Installation: Download the required python module in any machine where we have internet access Example: python3 -m pip download trino[sqlalchemy] -d /tmp/package Copy the above folder content to the offline node & install the package python3 -m pip install ./package/* Note : trino.sqlalchemy is compatible with the latest 1.3.x and 1.4.x SQLAlchemy versions. BDS cluster node comes with python3.6 and SQLAlchemy-1.4.46 by default.
If the Trino-Ranger-Plugin is enabled, then be sure to add the provided keytab user in the respective Trino Ranger policies. See Integrating Trino with Ranger.
By default, Trino uses the full Kerberos principal name as the user. Therefore, when adding/updating trino-ranger policies, you must use full Kerberos principal name as username.
For the following code sample, use jupyterhub@BDSCLOUDSERVICE.ORACLE.COM as the user in the trino-ranger policies.
If the Trino-Ranger-Plugin is enabled, be sure to add the provided keytab user in the respective Trino Ranger policies. For more details see Enabling Ranger for Trino.
Provide Ranger permissions for JupyterHub to the following policies:
-
all - catalog, schema, table, column -
all - function