Identity Lifecycle Management Between OCI and Okta
In this tutorial, you configure user life cycle management between Okta and OCI IAM, where Okta act as the authoritative identity store.
This 30 minute tutorial shows you how to provision users and groups from Okta to OCI IAM.
- Create a confidential application in OCI IAM.
- Get the identity domain URL and generate a secret token.
- Create an app in Okta.
- Update Okta's settings.
- Test that provisioning works between OCI IAM and Okta.
- In addition, instructions on how to
- Set users' federated status so that they're authenticated by the external identity provider.
- Stop users getting notification emails when their account is created or updated.
This tutorial is specific to IAM with Identity Domains.
To perform this set of tutorials, you must have the following:
-
A paid Oracle Cloud Infrastructure (OCI) account, or an OCI trial account. See Oracle Cloud Infrastructure Free Tier.
- Identity domain administrator role for the OCI IAM identity domain. See Understanding Administrator Roles.
- An Okta account with administrator privileges to configure provisioning.
You gather the additional information the additional information you need from the steps of the tutorial:
- The OCI IAM domain URL.
- The OCI IAM client ID and client secret.
Create a confidential application in OCI IAM and activate it.
-
Open a supported browser and enter the Console URL:
- Enter your Cloud Account Name, also referred to as your tenancy name, and select Next.
- Sign in with your username and password.
- Open the navigation menu and select Identity & Security. Under Identity, select Domains.
- Select the identity domain in which you want to configure Okta provisioning and select Applications.
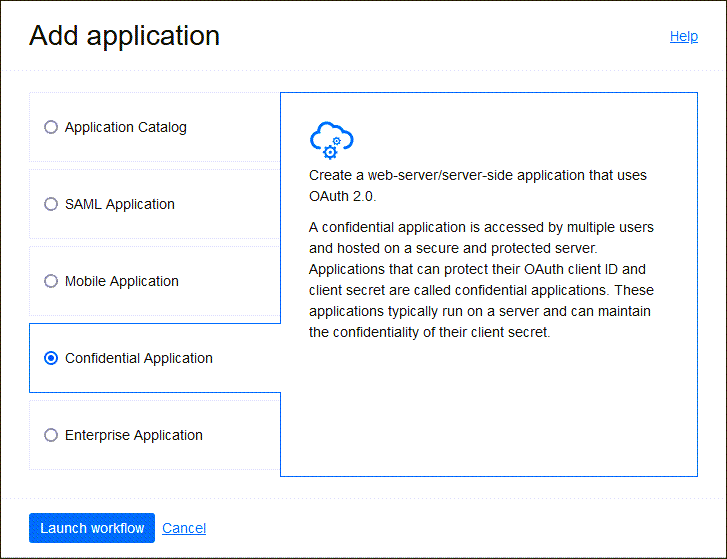
- Select Add Application, and choose Confidential Application and select Launch workflow.
- Enter a name for the confidential application, for example OktaClient. Select Next.
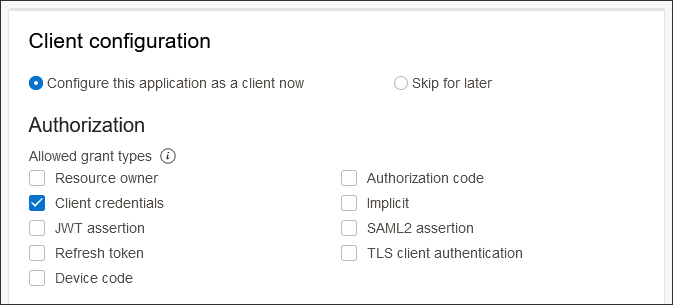
- Under Client configuration, select Configure this application as a client now.
- Under Authorization, select Client Credentials.
- Scroll to the bottom, and select Add app roles.
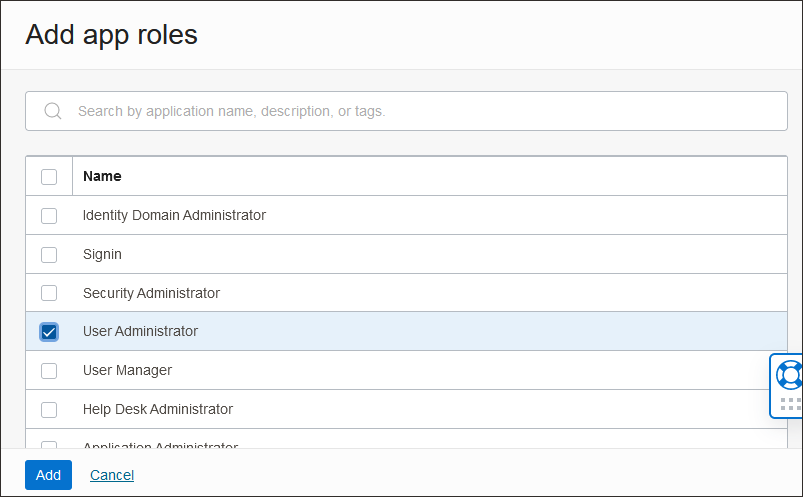
- Under App roles select Add roles, and in the Add app roles page select User Administrator and select Add.
- Select Next, then select Finish.
- In the application details page select Activate and confirm that you want to activate the new application.
You need two pieces of information to use as part of the connection settings for the Okta app you create later.
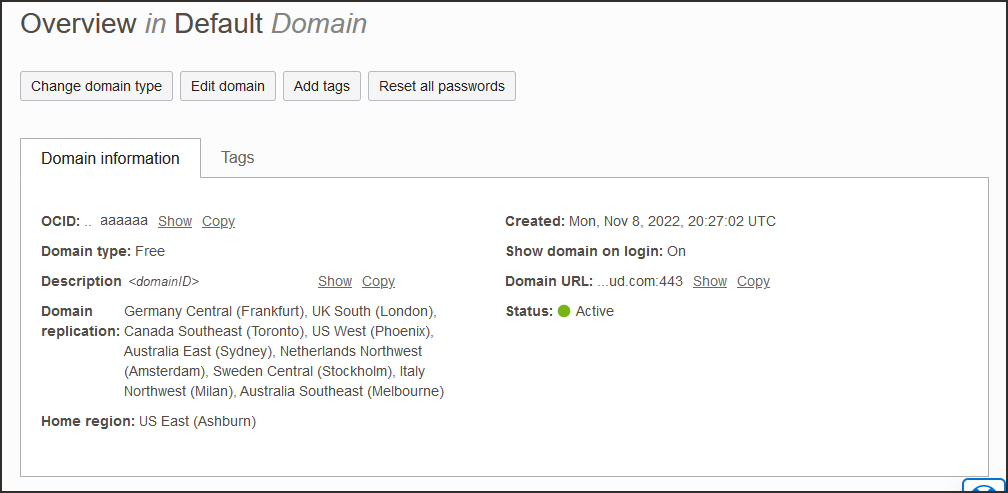
- Return to the identity domain overview by selecting the identity domain name in the breadcrumbs. Select Copy next to the Domain URL in Domain information and save the URL to an app where you can edit it.
The OCI IAM GUID is part of the domain URL:
https://<IdentityDomainID>.identity.oraclecloud.com:443/fed/v1/idp/ssoFor example:
idcs-9ca4f92e3fba2a4f95a4c9772ff3278 - In the confidential app in OCI IAM, select OAuth configuration under Resources.
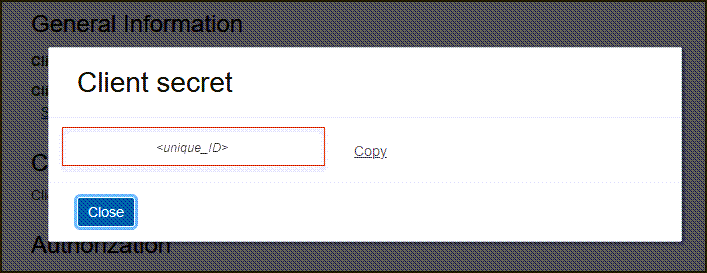
- Scroll down, and under General Information make a note of the client ID and client secret.
- Scroll down, and find the Client ID and Client secret under General Information.
- Copy the client ID and store it
- Select Show secret and copy the secret and store it.The secret token is the base64 encoding of
<clientID>:<clientsecret>, orbase64(<clientID>:<clientsecret>)These examples show how to generate the secret token on Windows and MacOS.
In a Windows environment, open CMD and use this powershell command to generate base64 encoding
[Convert]::ToBase64String([System.Text.Encoding]::Unicode.GetBytes('client_id:secret'))"In MacOS, useecho -n <clientID>:<clientsecret> | base64The secret token is returned. For exampleecho -n 392357752347523923457437:3454-9853-7843-3554 | base64 Nk0NzUyMzcyMzQ1NzMTc0NzUyMzMtNTQzNC05ODc4LTUzNQ==Make a note of the secret token value.
Create an application in Okta.
- In the browser, sign in to Okta using the URL:
https://<Okta-org>-admin.okta.comWhere
<okta-org>is the prefix for your organization with Okta. - In the menu on the left, select Applications.
If you already have an application which you created when you went through SSO With OCI and Okta, you can use it. Select to open it and edit it, and go to 5. Change Okta Settings.
- Select Browse App Catalog and search for
Oracle Cloud. Select Oracle Cloud Infrastructure IAM from the options available. - Select Add Integration.
- Under General settings, enter a name for the application, for example
OCI IAM, and select Done.
Connect the Okta app to the OCI IAM confidential app using the domain URL and secret token from an earlier step.
- In the newly created application page, select the Sign On tab.
- In Settings, select Edit.
- Scroll down to Advanced Sign-on Settings.
- Enter the domain URL in Oracle Cloud Infrastructure IAM GUID.
- Select Save.
- Near the top of the page, select the Provisioning tab.
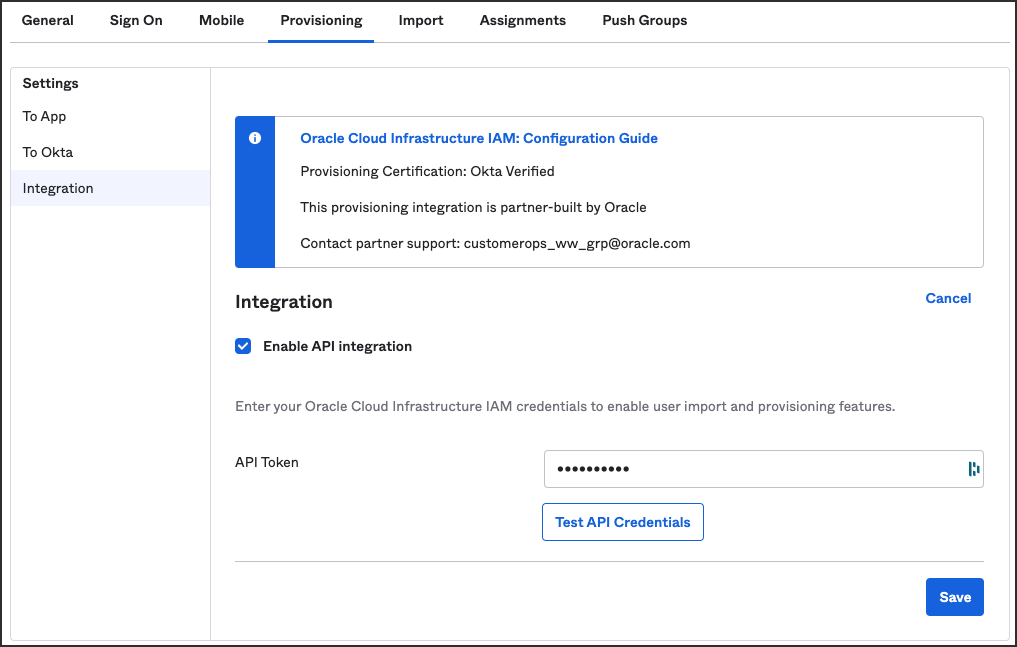
- Select Configure API Integration.
- Select Enable API Integration.
- Enter the the secret token value you copied earlier in API Token.
-
Select Test API Credentials.
If you get an error message, check the values that you have entered and try again.
When you get a message
Oracle Cloud Infrastructure IAM was verified successfully!, Okta has successfully connected to the OCI IAM SCIM endpoint. -
Select Save.
The Provisioning to App page opens, where you can create users, update user attributes, map attributes between OCI IAM and Okta.
To test user and group provisioning for Okta:
- In the newly created application, choose the Assignments tab.
- Select Assign and select Assign to People.
- Search for the user to provision from Okta to OCI IAM.
Select Assign next to the user.
- Select Save, and then Go Back.
- Now provision Okta groups into OCI IAM. In the Assignments tab, select Assign and select Assign to Groups.
- Search for the groups to be provisioned to OCI IAM. Next to the group name, select Assign.
- Select Done.
- Now sign in to OCI:
-
Open a supported browser and enter the OCI Console URL:
- Enter your Cloud Account Name, also referred to as your tenancy name, and select Next.
- Select the identity domain in which Okta has been configured.
-
- Select Users.
- The user which was assigned to the OCI IAM application in Okta is now present in OCI IAM.
- Select Groups.
- The group which was assigned to the OCI IAM application in Okta is now present in OCI IAM.
- You can set users' federated status so that they're authenticated by the external identity provider.
- You can disable notification emails being sent to the user when their account is created or updated.
Federated users don't have credentials to sign in directly to OCI. Instead they're authenticated by the external identity provider. If you want users to use their federated accounts to sign in to OCI, set the federated attribute to true for those users.
To set the user's federated status:
- In the browser, sign in to Okta using the URL:
https://<Okta-org>-admin.okta.comWhere
<okta-org>is the prefix for your organization with Okta. - In the menu on the left, select Applications.
- Select the application you created earlier,
OCI IAM. - Scroll down to the Attribute Mappings section.
- Select Go to Profile Editor.
- Under Attributes, select Add Attributes.
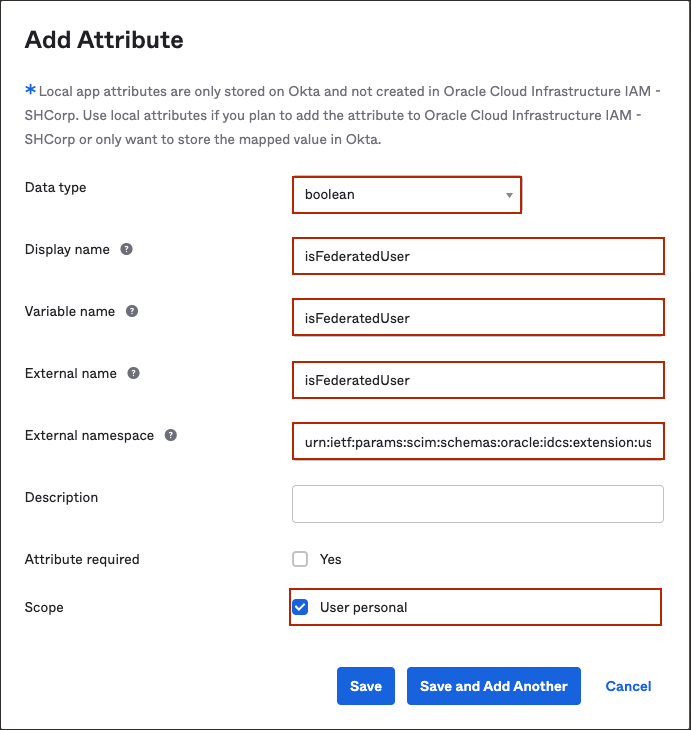
- In the Add Attribute page:
- For Data Type, choose
Boolean. - For Display Name enter
isFederatedUser. - For Variable Name enter
isFederatedUser.Note
The external name is automatically populated by the value of the variable name. - For External namespace, enter
urn:ietf:params:scim:schemas:oracle:idcs:extension:user:User. - Under Scope, check
User personal.
- For Data Type, choose
- Navigate back to Okta's Application page and select the
OCI IAMapplication. - Select Provisioning.
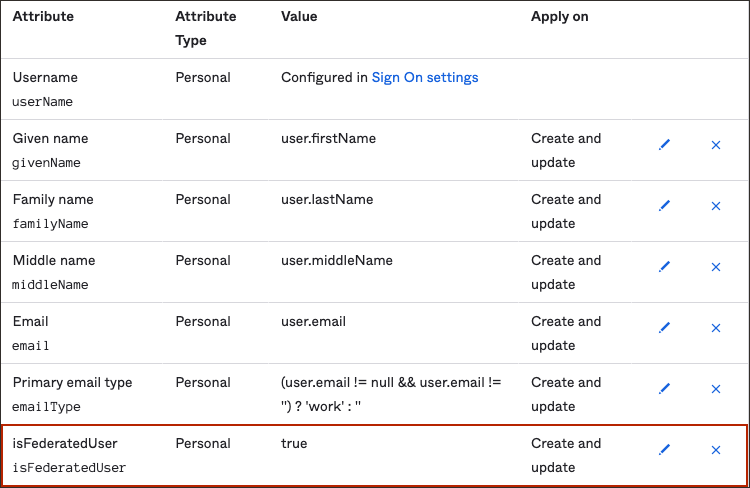
- Scroll down to Attributes Mapping and select Show Unmapped Attributes.
- Locate
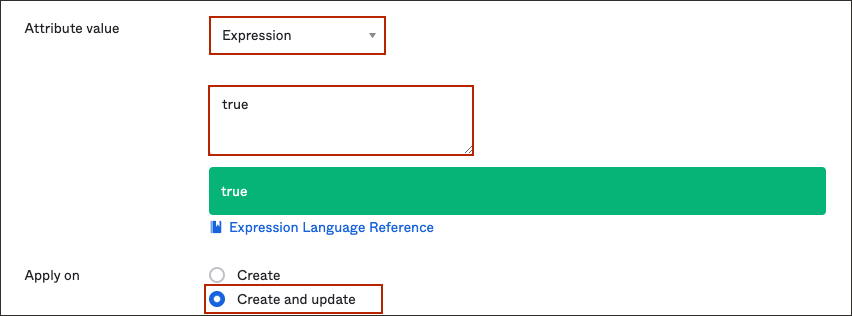
isFederatedUserattribute and select the edit button next to it. - In the attribute page:
- For Attribute value choose
Expression. - In the box below, enter
true. - For Apply on, choose Create and update.
- For Attribute value choose
- Select Save.
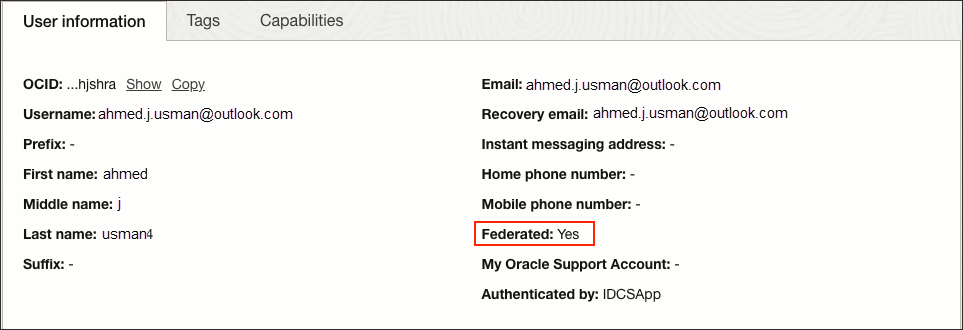
Now, when the users are provisioned from Okta to OCI, their federated status is set to true. You can see this in the user's profile page in OCI.
- In the OCI Console, navigate to the identity domain you are using, select Users, and select the user to show the user information.
-
Federated is shown as
Yes.
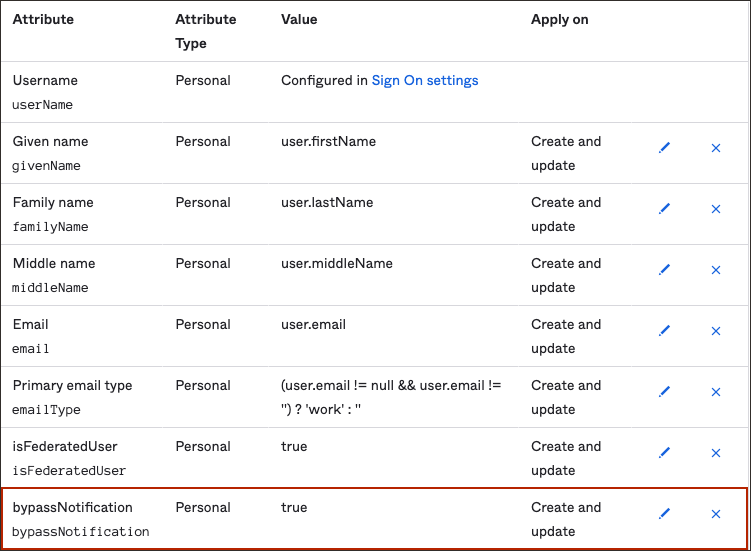
The bypass notification flag controls whether an email notification is sent after creating or updating a user account in OCI. If you don't want users to be notified that account have been created for them, then set the bypass notification flag to true.
To set the bypass notification flag:
- In the browser, sign in to Okta using the URL:
https://<Okta-org>-admin.okta.comWhere
<okta-org>is the prefix for your organization with Okta. - In the menu on the left, select Applications.
- Select the application you created earlier,
OCI IAM. - Scroll down to the Attribute Mappings section.
- Under Attributes, select Add Attributes.
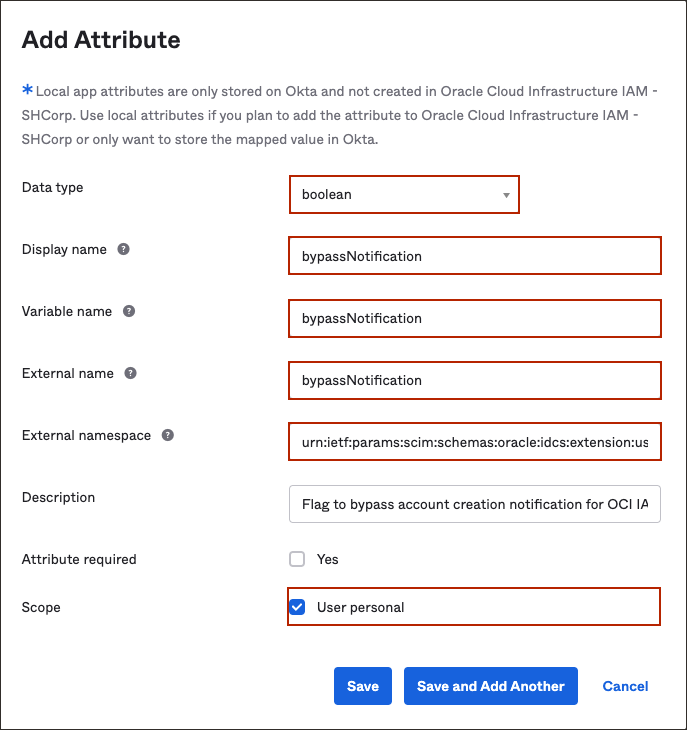
- In the Add Attribute page:
- For Data Type, choose
Boolean. - For Display Name enter
bypassNotification. - For Variable Name enter
bypassNotification.Note
The external name is automatically populated by the value of the variable name. - For External namespace, enter
urn:ietf:params:scim:schemas:oracle:idcs:extension:user:User. - Under Scope, check
User personal.
- For Data Type, choose
- Navigate back to Okta's Application page and select the
OCI IAMapplication. - Select Provisioning.
- Scroll down to Attributes Mapping and select Show Unmapped Attributes.
- Locate
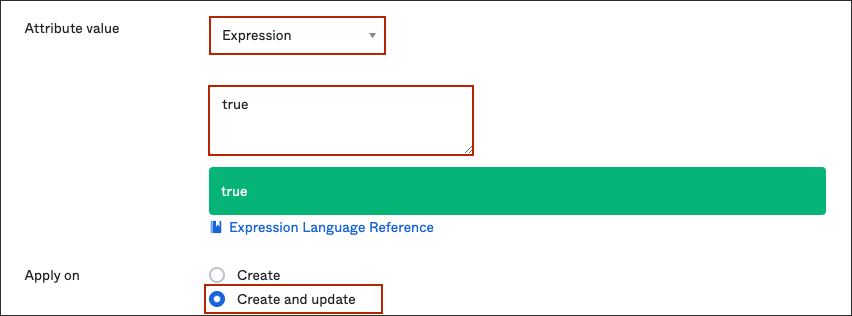
bypassNotificationattribute and select the edit button next to it. - In the attribute page:
- For Attribute value choose
Expression. - In the box below, enter
true. - For Apply on, choose Create and update.
- For Attribute value choose
- Select Save.
Congratulations! You have successfully set up user lifecycle management between Okta and OCI.
To explore more information about development with Oracle products, check out these sites:
