Using OAuth 2 to Access the REST API
The identity domains REST API supports SCIM 2.0 compliant endpoints with standard SCIM 2.0 core schemas and Oracle schema extensions to programmatically manage users, groups, applications, and identity functions, such as password management and administrative tasks. To make REST API calls to your identity domain, you need an OAuth2 access token to use for authorization. The access token provides a session (with scope and expiration), that your client application can use to perform tasks in an identity domain.
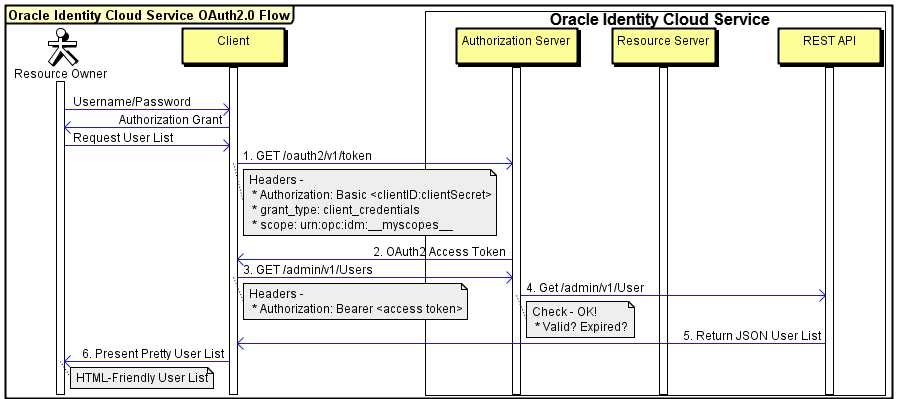
The following sequence diagram illustrates a basic example of the OAuth 2.0 authorization flow to access the identity domains REST API.
Use specific OAuth 2.0 parameters when working with an identity domain. The following table describes the most common parameters.
| Parameter | Value | Comments |
|---|---|---|
|
Authorization Header |
Basic <base64_clientid_secret> |
Used by the client as a Basic authentication scheme to transmit the access token in a header. The access token value needs to be a base64 UTF-8 encoded value of the Client ID and Client Secret concatenated using a colon as a separator-for example, clientID:clientSecret. |
|
Client ID |
<client_id> |
Required. A unique "API Key" that's generated when you register your application in the identity domain Console. |
|
Client Secret |
<client_secret> |
Required. A private key similar to a password that's generated when you register your application in the identity domain Console. Don't share this value. |
|
Access Token URL |
/oauth2/v1/token |
An endpoint used to obtain an access token from the identity domain. |
|
Auth URL |
/oauth2/v1/authorize |
An endpoint used to obtain an authorization code from identity domains, and then used during a 3-legged OAuth flow. |
|
Grant Type |
client_credentials |
Required. It means the REST API that's invoked is owned by the client application. |
|
Scope (required) |
urn:opc:idm:__myscopes__ |
This scope returns all the grants given to your application, other scopes could be used to get specific grants, if necessary. |
Step 1: Register a Confidential Application in Identity Domains Using the Console
When you register a confidential application in the identity domain Console, you obtain some of the key parameters that you need to work with OAuth 2.0: Client ID, Client Secret, and Scopes. OAuth 2.0 is a standard for implementing delegated authorization, and authorization is based on the access token required to access a resource. The access token can be issued for a given scope, which defines what the access token can do and what resources it can access. When you register a web application in an identity domain, you add scopes. In the following example, the required scopes to request User searches, edits, creates, and deletes are added. But, if you were to do other things-for example, manage Audit Events, that would require other scopes.
To create and register a confidential application access the OCI Console and then complete the following steps:
- Open the navigation menu and select Identity & Security. Under Identity, select Domains.
- Click the name of the identity domain that you want to work in. You might need to change the compartment to find the domain that you want. Then, click Integrated applications.
- Select Add application.
- In the Add application dialog box, select Confidential Application, and then select Launch workflow.
- On the Add application details page, enter an application name and description, and then select Next.
- On the Configure OAuth page, under Client configuration, select Configure this application as a client now.
- Under Authorization, select only Client Credentials as the Allowed Grant Type.
- At the bottom of the page, select Add app roles and then select Add roles.
- In the Add app roles panel, select Identity Domain Administrator, and then select Add.
- Select Next and then select Finish.
- On the application detail page, scroll down to General Information. Copy the Client ID and the Client Secret and store it in a safe place.
- After the application is created, select Activate.
Step 2: Base64 Encode the Client ID and Client Secret
Before base64 encoding, individually URL encode the client ID and the client secret. If your client ID and client secret don't contain special characters, you aren't required to URL encode them first. However, as a best practice, we highly recommend it.
Windows
-
Launch Notepad, and then paste the client ID and client secret into Notepad.
-
Place the client ID and client secret on the same line and insert a colon between them:
clientid:clientsecretNote
Ensure that no spaces are the clientid:clientsecret attribute. -
Save the file to
C:\tempand name the fileappCreds.txt. -
In Windows Explorer, right-click
C:\temp, and then select CMD Prompt Here from the context menu. -
Enter the following command to encode the client ID and client secret:
certutil -encode appCreds.txt appbase64Creds.txt -
In Notepad, open
C:\temp\appbase64Creds.txt, copy its contents, and then close the file.Note
For security reasons, delete theappCreds.txtand theappbase64Creds.txtfiles after you finish.
Mac and Linux
-
Launch your preferred note utility (for example, Mac Notes, Gedit Linux, or Vi), and then paste the client ID and client secret into the note utility.
Place the client ID and client secret on the same line and insert a colon between them:
clientid:clientsecret.Notestatement.
Ensure no spaces in the clientid:clientsecret.-
Copy the
clientid:clientsecretline. -
Launch a terminal and enter the following command, replacing
clientid:clientsecretwith the value that you copied to the clipboard.echo -n "clientid:clientsecret" | base64 -w 0Note
For Linux, add-w 0to the command to remove line breaks. -
Copy the value that's returned.Note
If the value that's returned is broken into more than one line, return to your text editor and ensure the entire results are on a single line with no text wrapping.
Step 3: Obtain an Access Token
The next step in this process is to request the access token.
-
Launch a command prompt.
-
Enter the cURL command below, replacing the text in brackets ( < > ) with the appropriate values:
   curl -i
   -H "Authorization: Basic <base64encoded clientid:secret>"
   -H "Content-Type: application/x-www-form-urlencoded;charset=UTF-8"
   --request POST https://<domainURL>/oauth2/v1/token
   -d "grant_type=client_credentials&scope=urn:opc:idm:__myscopes__"
Note
If you're using a UNIX OS, you can append| awk -F"\"" '{print $4}'to the end of the cURL command to parse out just the Bearer token. Just remember that the default expiration of the token is 3600 seconds from the time of the request.Note
Optionally, run the following cURL command to have the access token value accessible through a UNIX variable calledAccessTokenValuein your environment:
You can then runexport AccessTokenValue=`curl -i -H "Authorization: Basic <base64encoded clientid:secret>" -H "Content-Type: application/x-www-form-urlencoded;charset=UTF-8" --request POST https://<domainURL>/oauth2/v1/token -d "grant_type=client_credentials&scope=urn:opc:idm:__myscopes__" | awk -F"\"" '{print $4}' | tail -n +16`echo $AccessTokenValuecommand to get the access token value.Text in Brackets Value base64encoded clientid:secret Replace with the encoded credentials that you generated in the Base64 Encode the client ID and client secret section. Ensure no spaces in the clientid:clientsecret credentials. IDCS_Service_Instance Replace with your identity domain URL (for example, https://<domainURL>/).Note
Theurn:opc:idm:__myscopes__scope in the command is used as a tag by identity domain clients requesting access tokens from the OAuth authorization server. Access tokens are returned that contain all applicable identity domains scopes based on the privileges represented by the identity domains administrator roles granted to the requesting client and the user being specified by the client's request (if present). This scope isn't granted directly to any identity domains administrator role. -
Copy the
access_tokenvalue from the response. Ensure to copy only the actual token, which is theaccess_tokenvalue between the quotation marks:Status: 200 "access_token":"eyJ4NXQiOiI4Wk. . ." "token":"Bearer", "expires_in":3600Note
The response includes theexpires_in: 3600parameter. This means that your token is no longer valid after one hour from the time that you generate it. After one hour, you must refresh the token or get a new access token. To refresh the token, enter the cURL command below, replacing the text in brackets ( < > ) with the appropriate values:curl -i -H "Authorization: Basic <base64 encoded client ID and secret>" -H "Content-Type: application/x-www-form-urlencoded;charset=UTF-8" --request POST https://<domainURL>/oauth2/v1/token -d "grant_type=refresh_token&refresh_token=<token_value>"
Step 4: Make a REST Request to the Environment
After you obtain the OAuth 2.0 access token, you can use the token in a cURL command to send a REST request to the identity domains REST API. The following command returns a list of users in an identity domain.
   curl -X GET
   -H "Content-Type:application/scim+json"
   -H "Authorization: Bearer <access_token>"
https://<domainURL>/admin/v1/Users| Item | Value |
|---|---|
| Method | -X GET |
| Content Type Header | -H "Content-Type:application/scim-json" |
| Authorization Header | -H "Authorization: Bearer <access_token>" |
| HTTP Protocol | HTTP or HTTPS (HTTP is recommended) |
| Identity Domain | The identity domain URL (for example, https://<domainURL>). |
| Identity Domains REST Endpoint | /admin/v1/Users |
Example JSON Output from the Identity Domains REST API
In the previous step, the REST request sent using cURL returned a response in JSON format. JSON is an open standard that can be formatted or parsed per your needs such as getting specific attributes required by your application.
{
  "schemas": [
    "urn:scim:api:messages:2.0:ListResponse"
  ],
  "totalResults": 1,
  "Resources": [
    {
      "displayName": "admin opc",
      "name": {
        "givenName": "admin",
        "formatted": "admin opc",
        "familyName": "opc"
      },
      "urn:ietf:params:scim:schemas:oracle:idcs:extension:userState:User": {
        "locked": {
          "on": false
        }
      },
      "userName": "admin@example.com",
      "id": "d252a54d83c344eb8f59f7053a0562ce",
      "urn:ietf:params:scim:schemas:oracle:idcs:extension:user:User": {
        "isFederatedUser": false
      },
      "active": true,
      "nickName": "TAS_TENANT_ADMIN_USER",
      "emails": [
        {
          "verified": false,
          "value": "admin@example.com",
          "type": "work",
          "primary": true
        },
        {
          "verified": false,
          "value": "admin@example.com",
          "primary": false,
          "type": "recovery"
        }
      ],
      "schemas": [
        "urn:ietf:params:scim:schemas:oracle:idcs:extension:user:User",
        "urn:ietf:params:scim:schemas:oracle:idcs:extension:userState:User",
        "urn:ietf:params:scim:schemas:core:2.0:User"
      ],
      "meta": {
        "resourceType": "User",
        "created": "2022-07-22T18:11:08Z",
        "lastModified": "2022-07-25T21:19:28Z",
        "location": "https://<domainURL>admin/v1/Users/d252a54d83c344eb8f59f7053a0562ce"
      },
      "idcsLastModifiedBy": {
        "value": "idcssso",
        "$ref": "https://<domainURL>admin/v1/Apps/idcssso",
        "type": "App",
        "display": "idcssso"
      }
    }
  ],
  "startIndex": 1,
  "itemsPerPage": 50
}