Scenario: Connecting Directly to the IoT Database
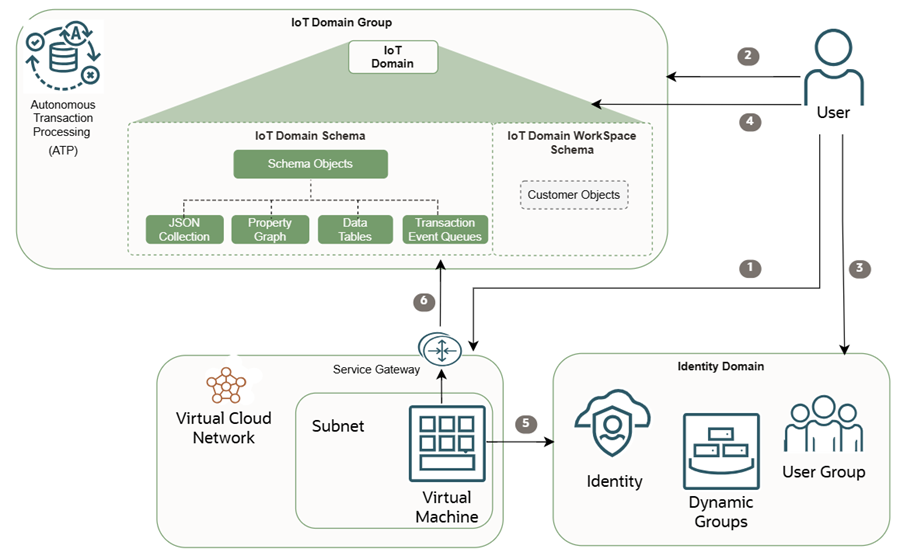
This scenario shows how to configure access to establish a direct connection to the IoT database. Each IoT domain group uses a dedicated database instance, that's shared by all IoT domains in that domain group.
The IoT domain database schema contains the metadata and data from the digital twin resources associated to an IoT domain.
Complete the following steps to configure access to your IoT data so you can query your IoT database schema to view tables and transactional event queues directly in the database.
Before you Begin
Make sure you have the required permissions. An administrator grants access by creating the required policies. For more information, see Prerequisites and Policy Details for the Internet of Things (IoT) Platform.
Step 1: Create a VCN to Allowlist Direct Database Connectivity to the Data Host
Configure a VCN with a subnet and service gateway to access a private and secure connection directly to the database.
- In your Internet of Things tenancy, log in as an administrator.
- Open the navigation menu, select Networking, and then select Virtual Cloud Networks.
- On the Virtual Cloud Networks list page, select Create VCN.
- Enter a descriptive name for the VCN. It doesn't have to be unique, and it can't be changed later in the Console, you can change it later with the Identity domain API or CLI. Avoid entering confidential information.
- Verify the compartment you want to create the VCN in, select another compartment if needed. Note
Your VCN must be in the same region as your IoT domain group, IoT domain, and any other IoT resources. The maximum number of VCNs you can associate to an IoT domain group is 5. - In the IPv4 CIDR Blocks section, enter an IP range that's allowed to access the database, for example:
10.0.0.0/16For a complete list of settings, see Creating a VCN.
- Select Create a VCN.
- The Virtual Cloud Network details page opens, select the Subnets tab. Select Create Subnet.
For more information, see, Creating a Subnet and Overview of VCNs and Subnets.
- On the Create a Subnet page:
- Enter a friendly name for the subnet. It doesn't have to be unique, and it can't be changed later in the Console, you can change it later with the Identity domain API. Avoid entering confidential information.
- Verify the compartment that you want to create the subnet in. Select another compartment if needed.
- Select the subnet type, Regional. A regional subnet means that the subnet can contain resources in any of the region's availability domains.
- Enter a IPv4 CIDR Block, for example
10.0.0.0/16. - Select Private Subnet access to prohibit public IP address for Instances in this subnet.
- Select the check box Use DNS host names in this Subnet.
- Enter the DNS Domain Name with the subnet DNS label name:
<subnet_DNS_label>.<VCN_DNS_label>.oraclevcn.com - For the Dhcp Options compartment select the compartment with your IoT resources. For Dhcp Options, select the Default Dhcp Options.
- For the Security List compartment, select the compartment with your IoT resources. Select Security List.
- Select Create Subnet.
- The Virtual Cloud Network details page opens, select the Gateways tab. Under Service Gateways, select Create Service Gateway.
For more information, see the Available Service CIDR Labels on the Creating a Service Gateway page.
- Enter a name for the service gateway. It doesn't have to be unique. Avoid entering confidential information. Select the compartment that you want to create the gateway in. Select another compartment if needed.
- For Services, select the option: All <region> Services In Oracle Services Network.
- Select Advanced options, under Route Table Association select the route table compartment. Use the compartment for your associated IoT resources. Your IoT resources can be in different compartments and must be in the same region.
- Select Create Service Gateway.
- The Virtual cloud networks details page opens, select the Routing tab.
- Under Route Tables, select the Default Route Table.
- Select the Route Rules tab, and select Add Route Rules.For more information, see add a routing rule.
- For Target Type, select Service Gateway.
- For Destination Service select All <region> Services In Oracle Services Network .
- Select Target Service Gateway compartment: Select the same compartment as you selected when you created the service gateway in the previous step.
- Select the Target Service Gateway created in the previous step.
- Select Add Route Rules.
- The Virtual Cloud Network details page opens, select the Security tab. Select Create Network Security Group.
- Enter a name, select the same compartment you selected in the previous step.
- In the Rule section, for the Direction, select Egress.
- For the Destination Type, select CIDR.
- In the Destination CIDR field, enter the CIDR for your environment for example:
0.0.0.0/0 - For IP Protocols select All Protocols.
- Select Create. For more information, see Network Security Group.
- View the details for the Network Security Group.
- On the Virtual cloud network details page, copy the OCID for the VCN or VCNs. Use this VCN OCID or OCIDs in the next step.
Step 2: Add your VCN OCID to your IoT Domain Group
To complete the following steps your user must have at least read access to the VCN or VCNs you want to add to the IoT domain group. To confirm if you have read access to the VCN, see Getting a VCN's Details to view the VCNs you have access to.
Allow any-user to {VCN_READ} in compartment <compartment-name> where request.principal.type = 'iotdomain'Use the
oci iot domain-group configure-data-accesscommand and required parameters to configure data access for the IoT domain group. Replace the<vcn-ocids>with the OCIDs for the VCNs for your IoT domain group. Depending on your configuration, you can include one VCN OCID or multiple VCN OCIDs using the following format:For instructions using the Console or the API to add the VCN to the IoT domain group, see Configuring Data Access for an IoT Domain Group.oci iot domain-group configure-data-access --db-allow-listed-vcn-ids '["ocid1.vcn.OCID","ocid2.vcn.OCID"]' --iot-domain-group-id <domain-group-OCID>Note
The maximum number of VCNs you can associate to an IoT domain group is 5.After a few minutes, use the
oci iot domain-group getcommand and required parameters to get the IoT domain group details including the domain group's database connection details, to confirm it's configured. Replace the<iot-domain-group-OCID>with the OCID for your IoT domain group:oci iot domain-group get --iot-domain-group-id <iot-domain-group-OCID>This example response shows the domain group is active,
"lifecycleState": "ACTIVE"and if it's configured this response includes the database connection details for the domain group:db-allow-listed-vcn-ids: Notice the VCN is displayed.db-connection-stringdb-token-scope{ "data": { "compartment-id": "<compartment-OCID>", "data-host": "<domain-group-short-id>.iot-data.<region>.oci.oraclecloud.com", "db-allow-listed-vcn-ids": '["<vcn-OCID>"]', "db-connection-string": null, "db-token-scope": null, "defined-tags": { "Oracle-Tags": { "CreatedBy": "default/user", "CreatedOn": "2025-08-05T18:15:41.260Z" } }, "description": null, "display-name": "<your-iot-domain-group-name>", "freeform-tags": {}, "id": "<domain-group-OCID>", "lifecycle-state": "ACTIVE", "system-tags": {}, "time-created": "2025-08-05T18:15:43.054000+00:00", "time-updated": "2025-08-05T18:27:53.655000+00:00" }, "etag": "<unique-id>" }
Step 3: Create a Compute Instance for SSH Access
Creating a Compute Instance and a Virtual Cloud Network (VCN) in Oracle Cloud Infrastructure provides Secure Shell (SSH) access to compute resources and creates a secure isolated network environment for your virtual machine. The VCN determines how your instance is accessed, while the compute instance is the virtual server you need to connect to.
You can create a compute instance to host the applications, providing computing power for your workload, and you target a Virtual Cloud Network (VCN) to create the instance in a private, secure network in the cloud, controlling its connectivity and isolation from other networks and the public internet. Using a VCN is essential for network security and connectivity, allowing you to define subnets, gateways, and rules to manage how instances communicate with other resources. For more information, see Overview of VCNs and Subnets and Overview of the Compute Service.
- Open the navigation menu and select Compute. Under Compute, select Instances. Select Create instance.
- Enter a name for the instance. You can add or change the name later. The name doesn't need to be unique, because an Oracle Cloud Identifier (OCID) uniquely identifies the instance. Avoid entering confidential information. Select the compartment to create the instance in. All IoT resources must be in the same region.
- In some cases, the default options may apply. If you want to configure specific options for your compute instance, see Creating an Instance. Select the Availability domain that you want to create the instance in. Select Next.
- Under Security, toggle the switch to turn on Shielded instance. Select Next.
- Confirm the option to Select existing virtual cloud network is selected.
- Select your Virtual cloud network compartment, and your Virtual cloud network created in the previous step.
- Under Subnet, confirm the option Select existing subnet is selected. Select the regional subnet created in the previous step.
- Under Add SSH Keys confirm the option to Generate a key pair for me.
- Select Download private key. Oracle Cloud Infrastructure generates an RSA key pair for the instance. The private key is downloaded so that you can connect to the instance using SSH. Select Next.
- Select Create.
Step 4: Create an Identity Domain Dynamic Group
- In your IoT tenancy, sign in as an administrator to the Oracle Cloud Infrastructure Console.
- Open the navigation menu and select Identity & Security. Under Identity, select Domains.
- Select the Dynamic Groups tab, select Create dynamic group.
- Enter a name and optionally a description. Select Match any rules defined below.
- For Rule 1, enter the following replace
instance-OCIDwith the OCID from your compute instance created in the previous step.any{instance.id='instance-OCID'}You can find the Compute Instance OCID on the Instance details page. Open the navigation menu and select Compute. Under Compute, select Instances. Select the Instance you want to use to open the Instance details page.
The instance must be in the same region as all IoT resources.
- Select Create. The Dynamic Group information displays with the dynamic group OCID.
Step 5: Create a Bastion
- In your IoT tenancy, sign in as an administrator to the Oracle Cloud Infrastructure Console.
- Open the navigation menu, select Identity & Security, and then select Bastion.
- Under Configure networking select the Target virtual cloud network compartment and select the Target virtual cloud network created in the previous step.
- Select the Target subnet compartment and select the Target subnet created in the previous step.
- For the CIDR block allowlist add one or more address ranges in CIDR notation that you want to allow to connect to sessions hosted by this bastion, for example:
0.0.0.0/0Enter a CIDR block into the input field, and then either select the value or press Enter to add the value to the list. The maximum allowed number of CIDR blocks is 20. For a complete list of options, see Creating a Bastion.
A more limited address range offers better security.
- Select Add to list.
- Select Create bastion.
- The Bastion details page opens, with the OCID for this bastion.
- Select the Sessions tab, select Create session.
- For Session type select SSH port forwarding session. Enter a Session name. For more information, see Creating a Port Forwarding Session in Bastion.
- Under Connect to the target host by using, select Instance name.
- Select the Compute instance compartment and the Compute instance created in the previous step.
- Enter the port number that you want to connect to on the target resource, for example: a SSH server on a Linux instance:
22(default) - Under Add SSH key, select Generate SSH key pair. Select Save private key and Save public key.
- Under Advanced options, Session configuration Maximum session time-to-live is 180, and interval minutes. Select Create session. The sessions list page opens.
- At the end of the row for the session you want to use, select the Actions menu and select Copy SSH command.
- Create an SSH Port Forwarding Session to a virtual machine, a SSH Port Forwarding Tunnel. To do that, open your local command line or terminal and execute the SSH command customized for your environment.
Replace
<path-to-SSH-private-Key>: with the full path to the private key file corresponding to the public key you downloaded when creating the port forwarding session in the previous step. Replace<localPort>: with an available local port on your machine that you want to use for the tunnel. This is the port you will connect to locally to access the forwarded service.
For example:ssh -i <path-to-SSH-private-Key> -p <localPort>:<targetResourceIP>:<targetPort> <sessionOCID>@<bastionPublicIP> -N
Follow the prompts to connect. Once the SSH command is running and the tunnel to your Bastion host is established, you can access the target resource's service by connecting to Bastion host set up in the previous step.ssh -i <privateKey> -p 1224:opc@127.0.0.1[opc@compute-instance-name ~]$ - Install the OCI CLI.
The following example is for Oracle Linux 9.
Use thednfcommand to execute the Oracle Cloud Infrastructure (OCI) Command Line Interface (CLI) installer script. For more information, see Command Line Interface (CLI). To install CLI on other operating systems and environments, see Installing the CLI.sudo dnf install -y python39-oci-cli - Now you can use the
oci iotCLI commands.
Step 6: Add your OCI Identity Domain Dynamic Group to the IoT Domain
If the data access for the IoT domain is already configured, use the oci iot domain get command to confirm the database connection details for an existing IoT domain. For more information, see Getting an IoT Domain's Details.
Or use this oci iot domain configure-direct-data-access command and the required parameters to configure an IoT domain's access to connect directly to the database.
Replace the tenancy OCID with the IoT tenancy OCID for your environment, and replace with the Identity group name with the Identity dynamic group, following these guidelines.
For the <identity-group-name> parameter, you can refer to either the identity group of users or the identity dynamic group. In this example, the dynamic group set up in the previous step is referenced:
oci iot domain configure-direct-data-access --iot-domain-id <iot-domain-OCID> --db-allow-listed-identity-group-names '["<tenancy-OCID>:<identity-group-name>"]'If the <identity-domain-name> is not in the default identity domain, then you must specify the <identity-domain-name>. For example: <tenancy-OCID>:<identity-domain-name>/<identity-group-name>
oci iot domain configure-direct-data-access --iot-domain-id <iot-domain-OCID> --db-allow-listed-identity-group-names '["<tenancy-OCID>:<identity-domain-name>/<identity-group-name>"]'Step 7: Retrieve the db-token from the Identity Service Using the db-token-scope to Connect to the Database
Both the user or the application running in the virtual machine or machines, that are located in the allowlisted VCN, and can retrieve the db-token from the IAM Identity service using the db-token-scope using the instance principal.
Use this command: oci iam db-token get --scope --auth instance_principal
oci iam db-token get command to get the instance token. Replace the urn:oracle:db::id::<database-compartment-OCID> with the database token scope for the IoT domain group. oci iam db-token get --scope <urn:oracle:db::id::<database-compartment-OCID> --auth instance_principaliam db-token get --auth instance_principal --scope urn:oracle:db::id::<database-compartment-OCID>
Private key written at /home/opc/.oci/db-token/oci_db_key.pem
db-token written at: /home/opc/.oci/db-token/token
db-token is valid until 2025-08-30 21:09:45Step 8: Using a JDBC URL TLS Connection String for JDBC Thin Driver Without a Wallet to Connect to the Database
Both the user or application can establish a connection to the data host using the db-connection-string and the OCI token to query the IoT domain data.
The retrieved db-token is then used by the database client for example: SQL*Plus, SQLcl, or a JDBC driver to authenticate the connection to an Oracle database configured for IAM token authentication.
While connecting to the database, the JDBC application provides a token to the database. The database verifies the token with a public key that it requests from the authentication service, and retrieves the corresponding user group membership information to find the database schema and role mappings to complete the user authorization to the database.
./sql /@"jdbc:oracle:thin:@tcps:adb.<region>.oraclecloud.com:<port>/<database-host-name>.adb.<region>.oraclecloud.com?TOKEN_AUTH=OCI_TOKEN"Additionally, the application sends a signed header, which proves that it possesses a private key that is paired to a public key embedded in the token. If both the token and the signature are valid, and there exists a mapping between the IAM user and a database user, then access to the database is granted to the JDBC application.
For more information about using SQLcl, see Oracle SQLcl documentation.
Now, you can query the IoT domain data directly in the database.