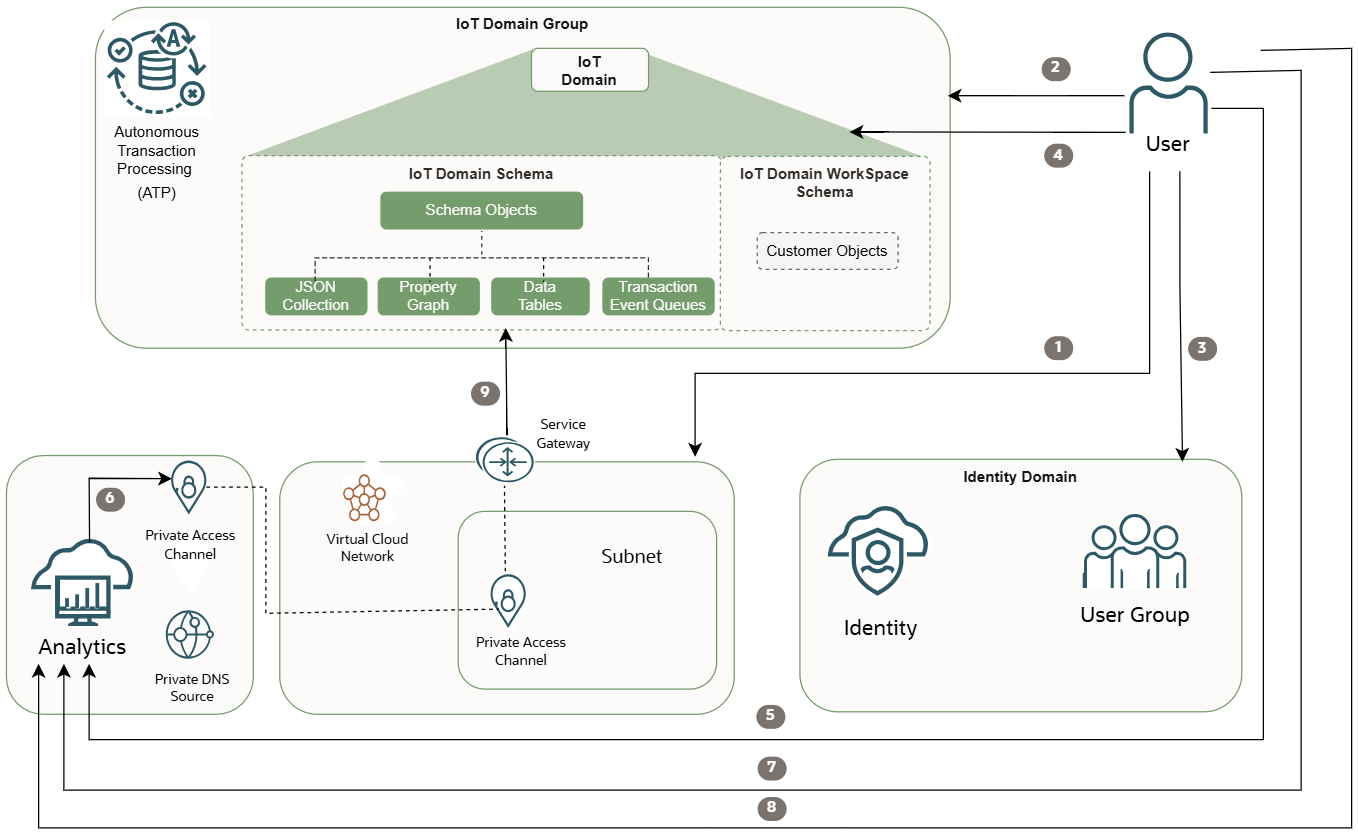
Scenario: Connecting your IoT Data to Analytics Cloud
Configure access to view your Internet of Things (IoT) data in Oracle Analytics Cloud.
The IoT domain database schema contains the metadata and data from the digital twin resources associated to an IoT domain.
Step 1: Create a Virtual Cloud Network
Configure a VCN with a subnet and service gateway to access a private and secure connection directly to the database.
- In your Internet of Things tenancy, log in as an administrator.
- Open the navigation menu, select Networking, and then select Virtual Cloud Networks.
- On the Virtual Cloud Networks list page, select Create VCN. If you want to use an existing VCN, to see VCNs in a different compartment select a compartment, next to Applied filters to change compartments.
- Enter a descriptive name for the VCN. It doesn't have to be unique, and it can't be changed later in the Console, you can change it later with the Identity domain API or CLI. Avoid entering confidential information.
- Verify the compartment you want to create the VCN in, select another compartment if needed. Note
Your VCN must be in the same region as your IoT domain group and all other IoT resources. The limit to the number of VCNs you can associate to an IoT domain is 5. - In the IPv4 CIDR Blocks section, enter an IP range that's allowed to access the database, for example:
10.0.0.0/16 - Turn on the toggle to use DNS host names in the VCN, confirm DNS label is entered in the field below.
- Confirm or enter the DNS Domain Name, for example:
<vcn-name>.oraclevcn.com - Select Create a VCN. For a complete list of additional settings, see Creating a VCN.
- The Virtual Cloud Network details page opens, with the OCID for this VCN. Select the Subnets tab. Select Create Subnet.
- On the Create a Subnet page, use the following settings:
- Enter a friendly name for the subnet. It doesn't have to be unique, and it can't be changed later in the Console, you can change it later with the Identity domain API. Avoid entering confidential information.
- Verify the compartment that you want to create the subnet in. Select another compartment if needed. Your Subnet and VCN must be in the same region as the IoT database and your IoT domain group and domain resources.
- Select the subnet type, Regional. A regional subnet means that the subnet can contain resources in any of the region's availability domains.
- Enter a IPv4 CIDR Block, for example
10.0.0.0/16. - Under the IPv6 Prefixes, confirm the Route Table compartment for your IoT resources is selected. For the Route Table, select the Default Route Table for this VCN.
- Select Private Subnet access to prohibit public IP address for Instances in this subnet.
- Under DNS Resolution, select the check box Use DNS host names in this Subnet. Confirm DNS Label is in the following field.
- Enter the DNS Domain Name with the subnet DNS label name, for example:
<subnet_DNS_label>.<VCN_DNS_label>.oraclevcn.com - For the Dhcp Options compartment confirm or select the compartment with your IoT resources. For Dhcp Options, confirm or select the Default Dhcp Options for the VCN name.
- For the Security List compartment, confirm or select the compartment with your IoT resources. Confirm or enter Security List in the next field.
- Select Create Subnet.
For a list of additional settings and more information, see Creating a Subnet and Overview of VCNs and Subnets.
- The Subnet is created for the Virtual Cloud Network and it's details page opens, select the Gateways tab. Under Service Gateways, select Create Service Gateway.
- Enter a name for the service gateway. It doesn't have to be unique. Avoid entering confidential information. Select the compartment that you want to create the gateway in. Select another compartment if needed. The compartment must be in the same region as the database and other IoT resources.
- For Services, select the option: All <region> Services In Oracle Services Network.
For more information, see the Available Service CIDR Labels on the Creating a Service Gateway page.
- Select Create Service Gateway.
- The Virtual cloud networks details page opens, select the Routing tab.
- Under Route Tables, select the Default Route Table.
- Select the Route Rules tab, and select Add Route Rules to edit and apply Route Table Rules to the Service Gateway. For more information, see Updating a VCN Route Table's Rules or see Updating a Service Gateway's Route Table Association to change the association later.For more information, see add a routing rule.
- For Target Type, select Service Gateway.
- For Destination Service, select All <region> Services In Oracle Services Network .
- Select the Target Service Gateway compartment. Select the same compartment that you selected when you created the service gateway in the previous step.
- Select the Target Service Gateway created in the previous step. Optionally, enter a description.
- Select Add Route Rules.
- The Route Rule is created and displays on the Route Rule list page.
- Go to the Virtual Cloud Network details page for the VCN, if you need help finding the VCN, see Listing VCNs and then select the VCN you want to work with.
- Select the Security tab. The Security List page opens. For more information, see Creating an Network Security Group (NSG).
- Go to the Network Security Groups section. Under Resources, select Network Security Groups.
- Select Create Network Security Group, enter the following settings:
- Enter a name, select the same compartment you selected in the previous step.
- In the Rule section, for the Direction, select Egress.
- For the Destination Type, select CIDR.
- In the Destination CIDR field, enter the CIDR for your environment for example:
0.0.0.0/0 - For IP Protocols select All Protocols.
- Select Create. For more information, see Network Security Group.
- The Network Security page opens, to view the details for the Network Security Group.
- On the Virtual cloud network details page, copy the OCID for the VCN or VCNs. Use this VCN OCID or VCN OCIDs in the next step.
Step 2: Configure an IoT Domain Group's Data Access
Add the VCN OCID to an IoT domain group to allowlist access the database.
To complete the following steps your user must have at least read access to the VCN or VCNs you want to add to the IoT domain group. To confirm if you have read access to the VCN, see Getting a VCN's Details to view the VCNs you have access to. If you don't have read access for the VCN, ask an administrator to add the related policy, see IoT Prerequisites.
Use the oci iot domain-group configure-data-access command to configure the VCN or VCNs that you want to allow access to the database for the domain group.
Replace the ["vcn-OCID-1","vcn-OCID-2"] with the VCN OCIDs configured for your environment. Replace the <domain-group-OCID> with the domain group's OCID that you want to work with:
oci iot domain-group configure-data-access --db-allow-listed-vcn-ids '["vcn-OCID-1","vcn-OCID-2"]' --iot-domain-group-id <domain-group-OCID>The maximum number of VCNs you can associate to an IoT domain group is 5.
For more information, see Configuring Data Access for an IoT Domain Group.
Step 3: Get the Details for an IoT Domain Group
After you complete step 2, use this oci iot domain-group get command to confirm the VCN is added to the IoT domain group. You can use the information returned in the response when you create the database connection complete Step 6: Create an Oracle Analytics Cloud Instance and Configure a Private Access Channel (PAC), described below.
Use the oci iot domain-group get command and the required parameter to get the IoT domain group details, if configured the response includes the IoT domain group's data access details.
Replace the <iot-domain-group-OCID> with the OCID for your IoT domain group:
oci iot domain-group get --iot-domain-group-id <iot-domain-group-OCID>In this example response, notice the following parameters. Use these values when you create a database connection in Oracle Analytics Cloud:
db-connection-string: tcps:adb.<region>.oraclecloud.com:<port>/<unique-id>.adb.oraclecloud.com
db-token-scope: urn:oracle:db::id::<database-compartment-OCID>
{
  "data": {
    "compartment-id": "<compartment-OCID>",
    "data-host": "<domain-group-short-id>.iot-data.<region>.oci.oraclecloud.com",
    "db-allow-listed-vcn-ids": [
      "<vcn-OCID>"
    ],
    "db-connection-string": "tcps:adb.<region>.oraclecloud.com:<port>/<unique-id>.adb.oraclecloud.com?retry_count=20&retry_delay=3",
    "db-token-scope": "urn:oracle:db::id::ocid1.<database-compartment-OCID>",
    "defined-tags": {
      "Oracle-Tags": {
        "CreatedBy": "default/user@oracle.com",
        "CreatedOn": "2025-08-11T19:21:24.791Z"
      }
    },
    "description": "<your-description>",
    "display-name": "<your-display-name>",
    "freeform-tags": {},
    "id": "<domain-group-OCID>",
    "lifecycle-state": "ACTIVE",
    "system-tags": {},
    "time-created": "2025-08-11T19:21:26.411000+00:00",
    "time-updated": "2025-08-12T02:17:02.763000+00:00"
  },
  "etag": "<unique-id>"
}
Step 4: Creating an Identity Domain User, Group, and Database Password
- In your Internet of Things tenancy, log in as an administrator.
- Open the navigation menu, select Identity & Security, and then select Domains. Select the domain you want to work with.
- On the Domain details page, select the User Management tab.
- To create a user to establish direct database connection from Oracle Analytics Cloud under Users, select Create.
For more information, see Create a user in the Identity domain
- Select the Administrators tab, remove the domain administrator user. For more information, see Removing an Identity Domain Administrator.
- Select the Settings tab, under the Domain Settings - User settings section, deselect Primary email address required.
- Deselect Use the email address as the username.
- Optionally, depending on your use case on the Domain details page, you can edit this identity domain and turn off Show identity domain on login.
- To create a database password for the user. Select the domain you want to work with. Select the User Management tab, select the user you want to work with. Select Database Passwords to create or delete a database password. Use this password in Oracle Analytics Cloud to connect to the database.
- On the domain details page, select the User Management tab. Select Create Group.
For more information, see Create a group in the Identity domain
Use this user name, group name, and database password to create the connection to the database in Oracle Analytics Cloud.
- If you need to update your IAM Identity domain group database password for the Identity domain group or groups that connect to an IoT domain.
- Open the navigation menu, go to Identity & Security, select domains.
- On the domain list page, select the Identity domain that you want to work with and connect to an IoT domain.
- Select the User Management tab, select the user you want to update the password for. Select the Database Passwords tab, to update the password delete your current IAM database password and create a new IAM database password.
Step 5: Add your Identity Domain User to an IoT Domain
Configure the Identity group or groups that can access the Oracle Analytics Cloud instance for an IoT domain.
- Replace the
<tenancy-OCID>:<identity-domain-name>/<identity-group-name>with the IAM Identity group or groups if the Identity domain is not in the default Identity domain. - Use
<tenancy-OCID>:<identity-group-name>if the Identity domain is in the default domain. - An
<identity-group-name>is either the Identity group of users or an Identity dynamic group.
oci iot domain configure-direct-data-access --iot-domain-id <iot-domain-OCID> --db-allow-listed-identity-group-names '["<tenancy-OCID:<identity-domain-name>/<identity-group-name>"]'Step 6: Create an Oracle Analytics Cloud Instance and Configure a Private Access Channel (PAC)
- In your Internet of Things tenancy, log in as an administrator.
- Open the navigation menu, select Analytics & AI, Under Analytics, select Analytics Cloud.
- Select Create Instance to create an Analytics Cloud instance, in the same compartment as your IoT resources.
- Enter a name for your Analytics Cloud instance with the Capacity Type OCPU and specify the number of OCPUs you want to deploy with the service. Under License and Edition, select License Included and Enterprise Edition. Software updates, select Regular.
- Under Advanced Options, select Network Access Type, select the Access type for Public.
- In the Data Encryption section select Encrypt using Oracle-managed Keys.
- Select Create.
- The Instance Details page opens for the new Analytics Instance. On the left navigation, in the Resources section, select Private Access Channel, and then select Configure Private Access Channel. You must be logged in as an administrator with the permissions to create the Private Access Channel.
- Enter a name to identify the private access channel.
- Configure the following for your Oracle Analytics Cloud instance:
- To create a private Oracle Analytics Cloud instance, select advanced options and select the compartment that uses the private subnet created in the previous step, and then add a network security group.
- Select the Virtual Cloud Network and the Subnet for the Oracle Analytics Cloud instance to use, that was created in the previous step.
- Enable access to at least one private data source, for example:
- In DNS Zone, enter the database host name you want to give access to. For example, to connect an Oracle Autonomous Transaction Processing in an Oracle Cloud Infrastructure VCN with a DNS zone that points to an ATP host name in your region enter:
<adb-name>.<region>.oraclecloud.comFor more information, see Configure a Private Access Channel using the Console.
Note
The VCN must be in the same region as the IoT as all your other IoT resources. - In DNS Zone, enter the database host name you want to give access to. For example, to connect an Oracle Autonomous Transaction Processing in an Oracle Cloud Infrastructure VCN with a DNS zone that points to an ATP host name in your region enter:
- Select Configure to create with the configuration described above for the Private Access Channel.
- Under the Access Information, you can find the URL for your Oracle Analytics Cloud instance, for example:
https://name-<unique-id>.analytics.ocp.oraclecloud.com/ui
Step 7: Create an Oracle Analytics Cloud Database Connection
- On the Analytics Cloud Instance Details page, under Access Information select the OAC Access URL to go to Oracle Analytics Cloud. Select Create and then Connection.
- Select Oracle Autonomous Transaction Processing database enter the following information for the specific IoT domain group. Use
oci iot domain-group getcommand to find the specific values for your IoT domain group, described in the previous step:- Connection Name: Enter a name for this connection.
- Description: (Optional) Enter a description.
- Encryption Type: TLS
- Connection String: Use the following connection string and replace the values from your specific IoT domain group. For example:
Replace the
<database-service-name>with the database from thedb-connection-stringfrom your IoT domain group.<unique-id>.adb.oraclecloud.com- Replace the
<user-tenancy-OCID>with your tenancy OCID where you created your IoT domain and Oracle Analytics Cloud is located. - Replace the
<database-compartment-OCID>from thedb-token-scope - Replace the
<region>with your region name that must be in the same region as the<database-hostname>. For example:us-phoenix-1
Connection string:(description= (retry_count=20) (retry_delay=3) (address= (protocol=tcps) (port=1521) (host=<database-host-name>) ) (connect_data=(service_name=<database-service-name>)) (security= (ssl_server_dn_match=yes) (password_auth=OCI_TOKEN) (oci_iam_url=https://auth.<region>.oraclecloud.com/v1/actions/generateScopedAccessBearerToken) (oci_tenancy=<user-tenancy-OCID>) (oci_compartment=<database-compartment-OCID>) ) ) - Username: Enter the Identity domain user and group set up in the previous step.
- An
<identity-group-name>is either the Identity group of users or an Identity dynamic group. - If not in the default identity domain then you specify the identity domain and the group name:
<identity-domain-name>/<identity-group-name>
- An
- Password: Enter the database password for the Identity domain user or group. To change your database password:
- Open the navigation menu, go to Identity & Management, select domains.
- On the domain list page, select the Identity domain that you want to work with and connect to an IoT domain.
- Select the User Management tab, select the user you want to update the password for. Select the Database Passwords tab, to update the password delete your current IAM database password and create a new IAM database password.
- Select Save.
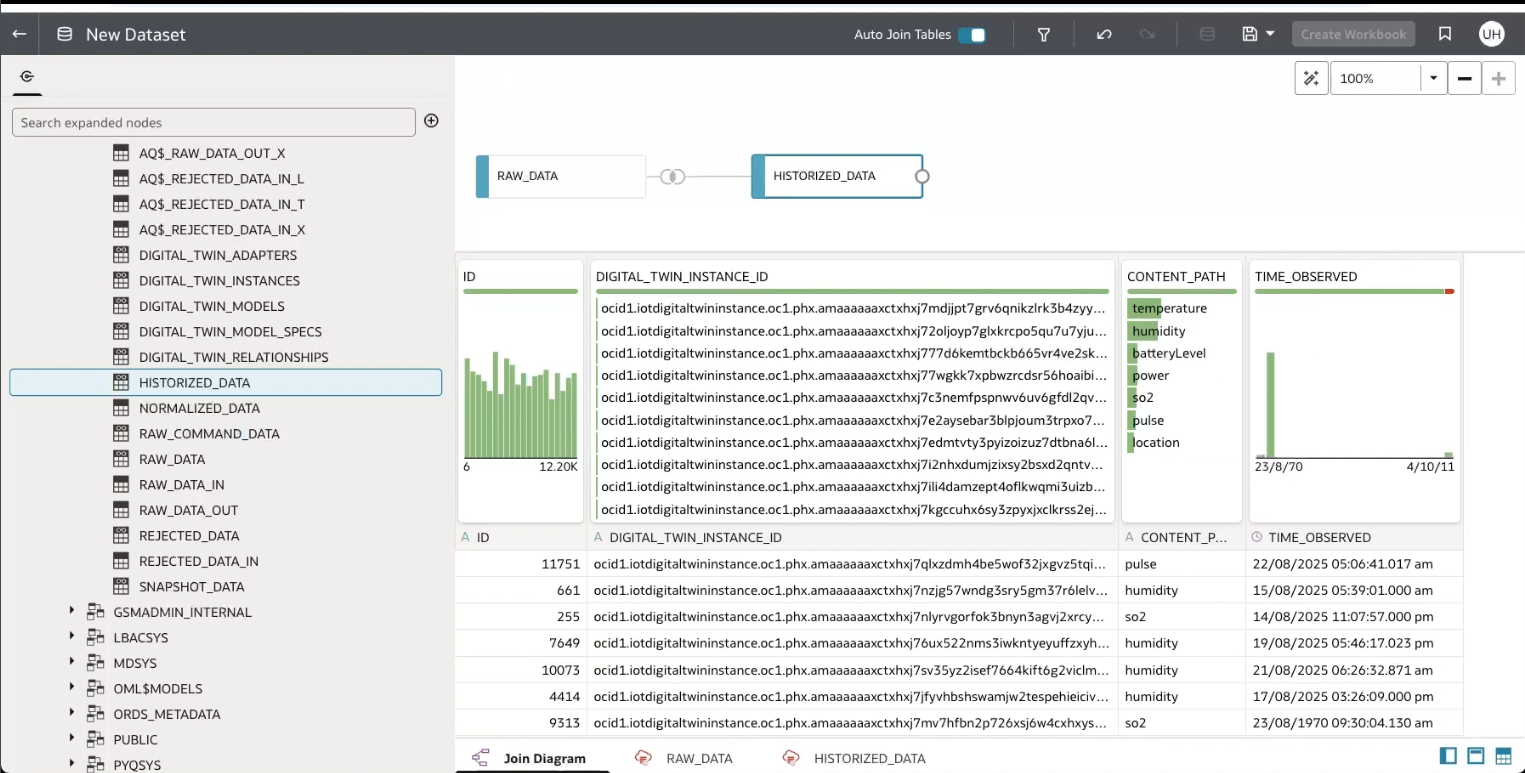
Now, you can view your IoT data in Oracle Analytics Cloud.
From the Analytics Cloud home page, click Create, then click Dataset, then select the connection that you just created to view and analyse your IoT data in Analytics Cloud.
Right click and select open in new browser to view a larger screenshot.